Difference between revisions of "PracticalTheExpandedToolbox/Lab2"
| Line 18: | Line 18: | ||
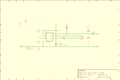
== The circuit == | == The circuit == | ||
| − | + | <gallery> | |
| + | Image:One half atari punk console sch.png|Schematic (PNG) | ||
| + | File:One half atari punk console.pdf|Schematic (PDF) | ||
| + | Image:One half atari punk console.png|Board with component values (PDF) | ||
| + | File:One half atari punk console brd.pdf|Board for printing (40x40mm PDF) | ||
| + | File:One half atari punk console panel.pdf|Panel with 6 boards for printing (100x160 PDF) | ||
| + | </gallery> | ||
= References = | = References = | ||
<references /> | <references /> | ||
Revision as of 21:50, 30 May 2016
Lab2: Making a circuit
Introduction
Circuits can be made in many different ways. During class we've seen:
- breadboard[1]
- dead bug style[2]
- wire wrapping[3]
- prototype board (e.g. perfboard or stripboard)[4]
- volumetric circuits[5][6]
- Etching a Printed Circuit Board (PCB)[7][8].
There are still other ways of making circuits, for example using the vinyl cutter to cut copper traces, using conductive fabric, etc. A nice overview of other alternative methods you can find at the great website of KobaKant: How To Get What You Want. Besides a lot of other interesting stuff (browse through it!!) the traces making sections you can find here: Kobakant section on Traces.
It is even possible to (almost) entirely knit your circuit: The Knitted Radio, Drapery FM.
In this lab you will be making a circuit with your preferred method with exception of the breadboard.
The circuit
Schematic (PNG)

Schematic (PDF)

Board with component values (PDF)
Board for printing (40x40mm PDF)
Panel with 6 boards for printing (100x160 PDF)

