Difference between revisions of "User:AlexLaman"
| Line 743: | Line 743: | ||
cynische video: https://www.youtube.com/watch?v=F1X_hT1PnqU | cynische video: https://www.youtube.com/watch?v=F1X_hT1PnqU | ||
| + | |||
| + | |||
| + | |||
| + | =Final Project:= | ||
Revision as of 14:51, 25 January 2017
Hallo,
My name is Alex Laman, 0901319 Illlu 2B
Good Morning.
Here is somthing.
Contents
- 1 Introduction:
- 2 Week 1:
- 3 Week 2:
- 4 Week 3:
- 5 Week 4:
- 6 Workshops:
- 7 Project Mind Game:
- 8 Hack Mindwave Mobile:
- 9 Q 10:
- 10 Research:
- 11 Concepten:
- 12 Codes Arduino:
- 13 Codes Processing:
- 14 Proces transparant scherm:
- 15 Proces cardboard istallation:
- 16 Proces video mapping:
- 17 Video Project:
- 18 Final Project:
Introduction:
Unravel the Code V
Radio is one of the major technological infrastructures of our contemporary life. One of the fundamental building blocks that a lot of the technologies we use depend on. When you read the word 'radio' however, you might think of commercial FM stations, pop music, talk shows and wonder what's so relevant and fundamental about that. We've got the internet right? Radio however is much bigger than just commercial broadcast radio. At any given moment the air is filled signals ranging from cell phone packets, the walkie-talkie chatter of bus drivers, airplane tracking signals, bluetooth mouse movements, satellites broadcasting down to earth, the hum of electrical devices, bleeping wireless car keys, television, pagers, navigational beacons and much much more. And aside from that list there are all those technologies which are part of 'the internet', such as Wi-Fi, 3G, 4G, microwave towers etc which are also radio based. In short, any electrical device which doesn't work via wires (hence: wireless) works via radio. However, radio itself is a natural phenomenon, deeply physical and older than man kind. The strongest broadcasters are the stars.
For Unravel The Code 2k16 we will take this expanded understanding of radio as our topic and approach it as Digital Craftsmen.We will get an insight of how various radio based systems work, what they do, what they send, who they send to and why. With that knowledge we will design objects that relate to this electromagnetic spectrum. We will dream up devices that make these radio systems more present or visible, opening them up to critical inquire, poetical intervention, aesthetic experience etc.
During Q9 students will unravel the mysteries of radio on a week by week basis. Q9 is centered around a series of workshops. During these workshops we will approach a radio system technically, culturally and poetically to understand and learn to work practically with them. For Q10 students will put this experience to use in order to design poetic interventions, recount obscure histories or meticulously craft objects in the grey zone between crafts and the electromagnetic spectrum.
Week 1:

https://www.youtube.com/watch?v=ntqSi17jL6k
( 2nd year project).first workshop with radio

the workshops in week one was about Analog Sensing Devices.
We made this little device that works on radio. a kopper wire with a LED that blinks when your device is datecting radio.
Week 2:


My First expirience with a dongel,
We used the dongel to tap radio waves out of the sky and record them.
On this foto u see the channel I record the conversations from.
Recordings:
random noise. http://vocaroo.com/i/s1ssbEYKPHwp
Guy1: Talking about a TED X Event.
http://vocaroo.com/delete/s0gBXu12RFpQ/da8c699dc92365c2
Guy2: Talking back and coments on Guy1 http://vocaroo.com/delete/s1mWkUFckQ4m/2873c72ae75c5042
Week 3:
Research.


I searched for a spectrum of different radio waves.
To help me to understand more about the different forms of radio.
Inspiration:
5 Types Of Brain Waves Frequencies: Gamma, Beta, Alpha, Theta, Delta
It is important to know that all humans display five different types of electrical patterns or “brain waves” across the cortex. The brain waves can be observed with an EEG (or an “electroencephalograph”) – a tool that allows researchers to note brain wave patterns. Each brain wave has a purpose and helps serve us in optimal mental functioning.
Our brain’s ability to become flexible and/or transition through various brain wave frequencies plays a large role in how successful we are at managing stress, focusing on tasks, and getting a good night’s sleep. If one of the five types of brain waves is either overproduced and/or under produced in our brain, it can cause problems. For this reason, it is important to understand that there is no single brain wave that is “better” or more “optimal” than the others.
Each serves a purpose to help us cope with various situations – whether it is to help us process and learn new information or help us calm down after a long stressful day. The five brain waves in order of highest frequency to lowest are as follows: gamma, beta, alpha, theta, and delta.


New Instituut Rotterdam. (brain wave game) game you play with your mind/focus.
http://frontiernerds.com/brain-hack
http://openvibe.inria.fr/?q=bci
http://brainstorms.puzzlebox.info/index.php?entry=entry100802-202304
Experiment:

 https://www.youtube.com/watch?v=B0L2sUTH8HU
EEG scan made with Neurosky's Mindwave Mobile. (software NeuroVieuw)
It is important to know that all humans display five different types of electrical patterns or “brain waves” across the cortex. The brain waves can be observed with an EEG (or an “electroencephalograph”) – a tool that allows researchers to note brain wave patterns. Each brain wave has a purpose and helps serve us in optimal mental functioning.
Our brain’s ability to become flexible and/or transition through various brain wave frequencies plays a large role in how successful we are at managing stress, focusing on tasks, and getting a good night’s sleep. If one of the five types of brain waves is either overproduced and/or under produced in our brain, it can cause problems. For this reason, it is important to understand that there is no single brain wave that is “better” or more “optimal” than the others.
Each serves a purpose to help us cope with various situations – whether it is to help us process and learn new information or help us calm down after a long stressful day. The five brain waves in order of highest frequency to lowest are as follows: gamma, beta, alpha, theta, and delta.
5 Brain Waves: Frequencies To Understand
Before I get into specifics, it is important to realize that when I refer to a certain brain wave, I am implying that a particular brain wave is “dominant.” Throughout the day in your waking state, your EEG will display all 5 types of brain waves at the same time. However, one particular brain wave will be dominant depending on the state of consciousness that you are in.
For example, if you are awake, but have really bad ADHD, you may have more slow wave (alpha and/or theta) activity than beta waves. During sleep usually there are combinations of the slower frequencies, but even gamma has been found to be involved in rapid-eye movement (REM). Below is a brief description of each brainwave state, but a more in-depth understanding can be derived from the book “Getting Started with Neurofeedback.”
Week 4:
Future Concept:
I want to make a game you can play with your brain/mind.


Mind Game is a game to train your brain.
You have to learn to Focus on Different elements of your brain.
This game helps you to focus on simple movements like forwards,
Backwards, up, down and Sideways.
Every move is made with the headset. play without a controller. play and free your mind.
Workshops:


First we got a bag of chips. after we had to make a transmitter with the paper and the chips. test model. Transmitter on kopper


Data's from de transmitter transformd in a pixel image. Image printed by a lazer cutter in textile


Data's from de transmitter transformd in a pixel image. woven image from radio signals.


Making a antena that is stronger than the one we used befor
Project Mind Game:
Because I’m as well a free-runner as a illustrator I started to get interested in the way how people move and how they make things move. For me every body has his own way to move the things around himselfs. As a kid i thouth about how great it wil be if I could move thing with my mind without touching them. Now in 2016 this is not a dream annymore and people made a devices a (mobile headsets) that scans your brain waves. And not onley it give us information to learn more about oure brain, funny apps and other random stuff. But also make a device that give’s us data produced by oure own brain. Data straight from the brain into the computer. I want to use the dives do collect data from my brain waves and use them to move thing around. And design games u could play with this divice.
What I want to do with this divice:
I want the data that the divice record and I want to conect the recorded data to movement. I want to use the divice as a controller to control the movment.
How I want to visualize it.
I want to make a game digital or analog. I want to connect the data to a object or computer and use it to make boxes move up, down, left, right and sideways.
How i want to use it.
I want to use it as a tool to train the brain.
Why i want to use it.
I want to use it for myself to make a connection between art and movment.
What is the maening of this project for me. Free the mind. The meaning of this project is that every time the ball is at the end of the level and u played yourslef free the ball and so your mind.
Hack Mindwave Mobile:


Q 10:
This is how I finish Q9 and start Q10
https://www.youtube.com/watch?v=QNG3EGCBxRQ
Research:
Digital Craft, Radiation. Radiation in Hersen golven.
Het brein wordt aangestuurd door hele kleine elektrische schokjes in de neuronen die impulsen veroorzaken.
Zowel de hersen golven als de golven van de radio zijn meetbaar.
Golven die we niet kunnen zien maar wel kunnen meten.
Door de Hersen golven te meten kunnen we meer over het brein te weten komen.
En komen we een stukje dichterbij het begrijpen van misschien wel het meest gecompliceerde orgaan in het menselijk lichaam.
The Mindwave mobile is een device voor het meten van je hersen golven.
Het magneet aan de voorkant van de headset meet je ‘’Apha’’ en ‘’Beta’’ hersen golven.
Ook merkt het magneet wanneer je fronst of knippert.
De oor klip op de headset is de ‘’ground’’ de ground meet alle ruis die vervolgens wordt afgetrokken van de opgemeten Apha en Beta metingen, voor een stabiele meting.
In mijn project wil ik de Mindwave mobile hacken en de data van het apparaat gebruiken en omzetten om een nieuwe ervaring te creëren binnen het gebruik van het apparaat. De Alpha wave die gemeten wordt door je focus/attention is de golf die ik wil gebruiken voor de input van mijn werk die omgezet wordt naar een visuele output.
Alpha golven.
Gelijkmatige Apha golven binnen het brein kunnen worden bereikt door het denken aan Ruimte, het gebruik van de Alpha golven bevind zich ongeveer op 7 Hz tot 14 Hz. Wanneer we ons ontspannen, produceren onze hersen golven een lagere frequentie dan met de Beta golven. In de Alpha staat zijn we in staat om beter te leren, informatie op te nemen en te verwerken. Ook opent zich in de Alpha staat de creativiteit die zich net onder ons bewustzijn bevind die de poort is naar diepere staten van bewustzijn. In een diepe Apha staat ben je in een ultieme concentratie waarin je informatie optimaal kan verwerken. Binnen het Alfa bereik vinden we ook de Schuman Resonatie terug. Dit is de frequentie van het elektromagnetisch veld van de aarde.
Beta golven.
De Beta Golven kenmerken zich door een frequentie van 14 Hertz (Hz.) tot ongeveer 40 Hz. Dit bereik is het meest krachtige bereik waar onze hersenen zich in kunnen bevinden want het is de staat waarin wij redeneren, besluiten nemen, werken, discussiëren en over het algemeen onze aandacht extern gericht hebben.
Attention economie,
Attention economy letterlijk vertaald ‘’Aandacht economie’’ is een aanpak van het beheer van de informatie die door menselijke aandacht wordt geproduceerd en behandeld. Deze informatie wordt door een groot deel van de wereld gezien als schaars goed. Voor een kleine groep is deze informatie heel interessant en wordt deze informatie wel gebruikt. Als een item ons bewustzijn bereikt wordt er door ons bewustzijn op gereageerd. Reactie of niet, de informatie is relevant want het zegt wat over de persoonlijkheid. Op het moment dat de content van de informatie steeds gerichter en directer wordt, wordt de aandacht van de gebruiker steeds groter.
Betrek dit tot de informatie van een applicatie, als het bedrijf achter de applicatie, wil je dat er door de gebruiker zo veel mogelijk gebruik wordt gemaakt van applicatie. Als de app niet voldoet aan de vraag van de bezoeker gaat de bezoeker het ergens anders zoeken. Om dit te voorkomen wordt er gebruik gemaakt van de door de bezoeker geproduceerde data. De data van de bezoeker word gebruikt om de aandacht van de bezoeker te vestigen op de des betreffende app. Als de eerste content van de app relevant is voor de gebruiker, is de kans op een reactie groter. En is er meer aandacht gevestigd op de applicatie. Hoe meer reacties van de gebruiker hoe meer data er wordt geproduceerd voor het bedrijf. Met deze data kan het bedrijf weer opnieuw zijn content aan passen. Om zo nog meer aandacht te kunnen genereren bij de gebruiker.
De aandacht van de gebruiker bevind zich hierdoor steeds meer in een digitaal werkveld die zich bevind in een wereld ook wel bekend als cyber space. Via sommige applicaties kan je binnen een paar keer klikken zien wat er aan de ander kant van de wereld gebeurt. Of je laat je eten thuis bezorgen via thuisbezorg, zonder je huis te hoeven verlaten. Beide acties zijn data voor het bedrijf en creëren een afstand tussen de gebruiker en de wereld om hem heen. Omdat de aandacht van de gebruiker gericht wordt op beelden waarover hij zelf niet kan bepalen, heeft dit effect op de gerichtheid van de aandacht van de gebruiker. Hierdoor wordt de aandacht van de gebruiker beïnvloed door de applicatie. Op het moment dat de gebruiker het beeld weg klinkt geeft hij als nog een reactie en wordt het beeld bij het volgende bezoek aan de applicatie aangepast.
Attention en beeldmakers
Als illustrator wil je soms het zelfde bereiken als sommige applicatie's. En wil je dat mensen zo lang mogelijk naar jouw werk kijken. Een illustrator stopt makkelijk dagen in sommige gevallen zelfs maanden tijd in een illustratie. Het liefst zou je als beeldmaker zien dat de kijker ook goed naar jou werk kijkt en er niet zomaar aan voorbij loopt. Maar als kijker wil je misschien helemaal niet geconfronteerd worden met al deze beelden. En wil je dat het werk pas zichtbaar wordt wanneer je je aandacht er op richt.
Op het moment dat de kijker een beeld wil bekijken hoeft hij er alleen maar op te focussen hoe meer hij op het beeld focust hoe beter het beeld zichtbaar wordt. Zo krijgt de beeld maker de gevraagde aandacht voor zijn illustratie en wordt de kijker niet dood gegooid met beelden die hij misschien helemaal niet wil zien.
Concepten:
In mijn concept wil ik reageren op aspecten uit de mijn research door gebruik te maken van verschillende installaties. Ik leg vergelijkingen tussen het werk en de besproken theorie. De data van de Apha hersengolven worden gemeten aan de hand van de gebruiker zijn aandacht/focus. De gemeten data word omgezet via een arduino/prossecing. De input van de data word omgezet naar visuele output.
Concept 1, Attention.
De gebruiker krijgt de Mindwave mobile op zijn hoofd. voor de gebruiker is een muur waarop een afbeelding wordt geprojecteerd. De scherpte van deze projectie wordt bepaald door de aandacht van de gebruiker. focust de gebruiker op de afbeelding wordt deze scherper, zo kan de gebruiker de afbeelding beter bekijken on of aanschouwen.
Concept 2, De spiegel. Zelfbeeld
De gebruiker krijgt de Mindwave mobile op zijn hoofd. Op het moment dat de headset data binnen krijgt gaat er een groen led lichtje branden, de gebruiker weet nu dat zijn hersen golven worden gemeten en kan naar de eerste installatie lopen. De gebruiker komt tegen over een transparant scherm te staan waar de hij zich zelf op geprojecteerd ziet. Op het moment dat de gebruiker zijn aandacht richt op zijn spiegelbeeld verdwijnt het beeld. Als de gebruiker stopt met focussen komt het beeld terug. Als de gebruiker tijden het richten van zijn aandacht op het scherm knippert veranderd het spiegelbeeld, als de gebruiker nu focus wordt het beeld scherper.
Concept 3, Object gericht, Afstand.
Opnieuw krijgt de gebruiker de headset op. Dit keer komt de gebruiker tegen over een object te staan. Op dit object worden kleuren geprojecteerd met een beamer. De aandacht/focus van het persoon is gekoppeld aan de vakjes van het object. Hoe meer de gebruiker focus hoe meer vakjes er worden geprojecteerd. Als de gebruiker knippert veranderen de kleuren van de vakjes.
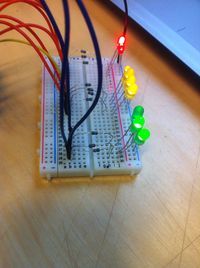
Codes Arduino:
Arduino codes voor de Mindwave Moblibe x LED lichtjes
//////////////////////////////////////////////////////////////////////// // Arduino Bluetooth Interface with Mindwave // // This is example code provided by NeuroSky, Inc. and is provided // license free. ////////////////////////////////////////////////////////////////////////
- define LED 13
- define BAUDRATE 57600
- define DEBUGOUTPUT 0
- define GREENLED1 3
- define GREENLED2 4
- define GREENLED3 5
- define YELLOWLED1 6
- define YELLOWLED2 7
- define YELLOWLED3 8
- define YELLOWLED4 9
- define REDLED1 10
- define REDLED2 11
- define REDLED3 12
- define powercontrol 10
// checksum variables byte generatedChecksum = 0; byte checksum = 0; int payloadLength = 0; byte payloadData[64] = {0}; byte poorQuality = 0; byte attention = 0; byte meditation = 0;
// system variables long lastReceivedPacket = 0; boolean bigPacket = false;
////////////////////////// // Microprocessor Setup // ////////////////////////// void setup()
{
 pinMode(GREENLED1, OUTPUT);
 pinMode(GREENLED2, OUTPUT);
 pinMode(GREENLED3, OUTPUT);
 pinMode(YELLOWLED1, OUTPUT);
 pinMode(YELLOWLED2, OUTPUT);
 pinMode(YELLOWLED3, OUTPUT);
 pinMode(YELLOWLED4, OUTPUT);
 pinMode(REDLED1, OUTPUT);
 pinMode(REDLED2, OUTPUT);
 pinMode(REDLED3, OUTPUT);
 pinMode(LED, OUTPUT);
 Serial.begin(BAUDRATE);           // USB
}
//////////////////////////////// // Read data from Serial UART // //////////////////////////////// byte ReadOneByte()
{
 int ByteRead;
 while(!Serial.available());
 ByteRead = Serial.read();
- if DEBUGOUTPUT
Serial.print((char)ByteRead); // echo the same byte out the USB serial (for debug purposes)
- endif
return ByteRead;
}
///////////// //MAIN LOOP// ///////////// void loop()
{
 // Look for sync bytes
 if(ReadOneByte() == 170)
 {
   if(ReadOneByte() == 170)
   {
       payloadLength = ReadOneByte();

       if(payloadLength > 169)                      //Payload length can not be greater than 169
       return;
       generatedChecksum = 0;
       for(int i = 0; i < payloadLength; i++)
       {
       payloadData[i] = ReadOneByte();            //Read payload into memory
       generatedChecksum += payloadData[i];
       }
       checksum = ReadOneByte();                      //Read checksum byte from stream
       generatedChecksum = 255 - generatedChecksum;   //Take one's compliment of generated checksum
       if(checksum == generatedChecksum)
       {
         poorQuality = 200;
         attention = 0;
         meditation = 0;
         for(int i = 0; i < payloadLength; i++)
         {                                          // Parse the payload
         switch (payloadData[i])
         {
         case 2:
           i++;
           poorQuality = payloadData[i];
           bigPacket = true;
           break;
         case 4:
           i++;
           attention = payloadData[i];
           break;
         case 5:
           i++;
           meditation = payloadData[i];
           break;
         case 0x80:
           i = i + 3;
           break;
         case 0x83:
           i = i + 25;
           break;
         default:
           break;
         } // switch
       } // for loop
- if !DEBUGOUTPUT
// *** Add your code here ***
       if(bigPacket)
       {
         if(poorQuality == 0)
            digitalWrite(LED, HIGH);
         else
           digitalWrite(LED, LOW);
         /*
         Serial.print("PoorQuality: ");
         Serial.print(poorQuality, DEC);
         Serial.print(" Attention: ");
         Serial.print(attention, DEC);
         Serial.print(" Time since last packet: ");
         Serial.print(millis() - lastReceivedPacket, DEC);
         lastReceivedPacket = millis();
         Serial.print("\n");
         */
         Serial.write(attention);

         switch(attention / 10)
         {
         case 0:
           digitalWrite(GREENLED1, HIGH);
           digitalWrite(GREENLED2, LOW);
           digitalWrite(GREENLED3, LOW);
           digitalWrite(YELLOWLED1, LOW);
           digitalWrite(YELLOWLED2, LOW);
           digitalWrite(YELLOWLED3, LOW);
           digitalWrite(YELLOWLED4, LOW);
           digitalWrite(REDLED1, LOW);
           digitalWrite(REDLED2, LOW);
           digitalWrite(REDLED3, LOW);
           break;
         case 1:
           digitalWrite(GREENLED1, HIGH);
           digitalWrite(GREENLED2, HIGH);
           digitalWrite(GREENLED3, LOW);
           digitalWrite(YELLOWLED1, LOW);
           digitalWrite(YELLOWLED2, LOW);
           digitalWrite(YELLOWLED3, LOW);
           digitalWrite(YELLOWLED4, LOW);
           digitalWrite(REDLED1, LOW);
           digitalWrite(REDLED2, LOW);
           digitalWrite(REDLED3, LOW);
           break;
         case 2:
           digitalWrite(GREENLED1, HIGH);
           digitalWrite(GREENLED2, HIGH);
           digitalWrite(GREENLED3, HIGH);
           digitalWrite(YELLOWLED1, LOW);
           digitalWrite(YELLOWLED2, LOW);
           digitalWrite(YELLOWLED3, LOW);
           digitalWrite(YELLOWLED4, LOW);
           digitalWrite(REDLED1, LOW);
           digitalWrite(REDLED2, LOW);
           digitalWrite(REDLED3, LOW);
           break;
         case 3:
           digitalWrite(GREENLED1, HIGH);
           digitalWrite(GREENLED2, HIGH);
           digitalWrite(GREENLED3, HIGH);
           digitalWrite(YELLOWLED1, HIGH);
           digitalWrite(YELLOWLED2, LOW);
           digitalWrite(YELLOWLED3, LOW);
           digitalWrite(YELLOWLED4, LOW);
           digitalWrite(REDLED1, LOW);
           digitalWrite(REDLED2, LOW);
           digitalWrite(REDLED3, LOW);
           break;
         case 4:
           digitalWrite(GREENLED1, HIGH);
           digitalWrite(GREENLED2, HIGH);
           digitalWrite(GREENLED3, HIGH);
           digitalWrite(YELLOWLED1, HIGH);
           digitalWrite(YELLOWLED2, HIGH);
           digitalWrite(YELLOWLED3, LOW);
           digitalWrite(YELLOWLED4, LOW);
           digitalWrite(REDLED1, LOW);
           digitalWrite(REDLED2, LOW);
           digitalWrite(REDLED3, LOW);
           break;
         case 5:
           digitalWrite(GREENLED1, HIGH);
           digitalWrite(GREENLED2, HIGH);
           digitalWrite(GREENLED3, HIGH);
           digitalWrite(YELLOWLED1, HIGH);
           digitalWrite(YELLOWLED2, HIGH);
           digitalWrite(YELLOWLED3, HIGH);
           digitalWrite(YELLOWLED4, LOW);
           digitalWrite(REDLED1, LOW);
           digitalWrite(REDLED2, LOW);
           digitalWrite(REDLED3, LOW);
           break;
         case 6:
           digitalWrite(GREENLED1, HIGH);
           digitalWrite(GREENLED2, HIGH);
           digitalWrite(GREENLED3, HIGH);
           digitalWrite(YELLOWLED1, HIGH);
           digitalWrite(YELLOWLED2, HIGH);
           digitalWrite(YELLOWLED3, HIGH);
           digitalWrite(YELLOWLED4, HIGH);
           digitalWrite(REDLED1, LOW);
           digitalWrite(REDLED2, LOW);
           digitalWrite(REDLED3, LOW);
           break;
         case 7:
           digitalWrite(GREENLED1, HIGH);
           digitalWrite(GREENLED2, HIGH);
           digitalWrite(GREENLED3, HIGH);
           digitalWrite(YELLOWLED1, HIGH);
           digitalWrite(YELLOWLED2, HIGH);
           digitalWrite(YELLOWLED3, HIGH);
           digitalWrite(YELLOWLED4, HIGH);
           digitalWrite(REDLED1, HIGH);
           digitalWrite(REDLED2, LOW);
           digitalWrite(REDLED3, LOW);
           break;
         case 8:
           digitalWrite(GREENLED1, HIGH);
           digitalWrite(GREENLED2, HIGH);
           digitalWrite(GREENLED3, HIGH);
           digitalWrite(YELLOWLED1, HIGH);
           digitalWrite(YELLOWLED2, HIGH);
           digitalWrite(YELLOWLED3, HIGH);
           digitalWrite(YELLOWLED4, HIGH);
           digitalWrite(REDLED1, HIGH);
           digitalWrite(REDLED2, HIGH);
           digitalWrite(REDLED3, LOW);
           break;
         case 9:
           digitalWrite(GREENLED1, HIGH);
           digitalWrite(GREENLED2, HIGH);
           digitalWrite(GREENLED3, HIGH);
           digitalWrite(YELLOWLED1, HIGH);
           digitalWrite(YELLOWLED2, HIGH);
           digitalWrite(YELLOWLED3, HIGH);
           digitalWrite(YELLOWLED4, HIGH);
           digitalWrite(REDLED1, HIGH);
           digitalWrite(REDLED2, HIGH);
           digitalWrite(REDLED3, HIGH);
           break;
         case 10:
           digitalWrite(GREENLED1, HIGH);
           digitalWrite(GREENLED2, HIGH);
           digitalWrite(GREENLED3, HIGH);
           digitalWrite(YELLOWLED1, HIGH);
           digitalWrite(YELLOWLED2, HIGH);
           digitalWrite(YELLOWLED3, HIGH);
           digitalWrite(YELLOWLED4, HIGH);
           digitalWrite(REDLED1, HIGH);
           digitalWrite(REDLED2, HIGH);
           digitalWrite(REDLED3, HIGH);
           break;
         }
       }
- endif
       bigPacket = false;
     }

     else {
       // Checksum Error
     }  // end if else for checksum
   } // end if read 0xAA byte
 } // end if read 0xAA byte
}
Codes Processing:
Processing Code voor Mindwave mobile x Opacity
/**
* Simple Read
*
* Read data from the serial port and change the color of a rectangle
* when a switch connected to a Wiring or Arduino board is pressed and released.
* This example works with the Wiring / Arduino program that follows below.
*/
import processing.serial.*;
Serial myPort; // Create object from Serial class byte[] val = new byte[1]; // Data received from the serial port PImage img1;
void setup()
{
 // I know that the first port in the serial list on my mac
 // is always my  FTDI adaptor, so I open Serial.list()[0].
 // On Windows machines, this generally opens COM1.
 // Open whatever port is the one you're using.
 println(Serial.list());
 String portName = Serial.list()[0];
 myPort = new Serial(this, portName, 57600);
 img1 = loadImage("illu 4.21.jpg");
 size(img1.width, img1.height);
}
void draw() {
background(000); // Set background to black // If the serial value is not 0,
 if ( myPort.available() > 0) {  // If data is available,
   myPort.readBytes(val);         // read it and store it in val
   println("val: " + val[0]);
 }
 int alpha = int(map(val[0], 0, 100, 0, 255));
 tint(255, alpha);
 image(img1, 0, 0);
}
/*
// Wiring / Arduino Code // Code for sensing a switch status and writing the value to the serial port.
int switchPin = 4; // Switch connected to pin 4
void setup() {
 pinMode(switchPin, INPUT);             // Set pin 0 as an input
 Serial.begin(9600);                    // Start serial communication at 9600 bps
}
void loop() {
 if (digitalRead(switchPin) == HIGH) {  // If switch is ON,
   Serial.write(1);               // send 1 to Processing
 } else {                               // If the switch is not ON,
   Serial.write(0);               // send 0 to Processing
 }
 delay(100);                            // Wait 100 milliseconds
}
- /
Proces transparant scherm:
De projectie op het transparante scherm verliep niet helemaal volgens plan het maken van een transparant scherm was eenvoudig maar het afstellen van de beamer op het scherm was een behoorlijke uitdaging. de reflexie van het licht van de beamer verscheen op de meest rare plekken en ook het licht wat door het scherm heen scheen vervormde op de meest rare manieren. Door al deze extra reflecties en lichtbronnen had het scherm helemaal niet het effect wat ik hoopte dat het zou hebben.


Video van reflecterend licht: https://www.youtube.com/watch?v=fS0Skkz3vpA&feature=youtu.be
video van test 1: https://www.youtube.com/watch?v=46-1JkAKnKg
Video van Test 2: https://www.youtube.com/watch?v=4RdPeTXZBHg
Proces cardboard istallation:
Voor het maken van de cardboard installatie heb ik verschillende vormen met de hand uit kartonnen platen gesneden. Voor de installatie wilde ik driehoekige vormen gebruiken. Elke vorm heb ik 2 x uitgesneden zodat ik de compositie van de vormen kon spiegelen. Toen ik alle vormen had uitgesneden ging ik opzoek naar de juiste compositie. Ik heb gepeuzeld met de vormen tot ik de voor mij juiste compositie had gevonden. toen ik de juiste compositie had gevonden heb ik deze met een lijmpistool vast gemaakt aan een pallet die ik kon bevestigen aan een muur.


Proces video mapping:
Voor het mappen van de installatie heb ik gebruik gemaakt van Mapio editor en Resolume. Mapio heb ik gebruikt om de installatie in te mappen of te masken. En Resolume heb ik gebruikt om de visuals te maken en te VJen.
Het is mij in het proces niet meer gelukt om de video mapping te koppelen aan de headset. Hier door heb ik er voor gekozen om het project nu niet verder uit te werken maar om er mee verder te gaan wanneer ik hier mee tijd voor heb.


Video van Video mapping: https://www.youtube.com/watch?v=7rGDf2p9RTM
Video Project:
Voor het video project wilde ik een cynische video creëren waarin het bereik van de Mindwave mobile veel groter is als hij daadwerkelijk is.
In this project I extend the brain using a mind wave mobile. When people set up the device. they can control things with their focus. If you have enough attention things will change. Nowadays this changes are small, like putting lights on or off. But Alex sees a future where the mind will be controling or be controlled more and more.
cynische video: https://www.youtube.com/watch?v=F1X_hT1PnqU