Difference between revisions of "User:AstridvanLoon"
| Line 109: | Line 109: | ||
[[File:Workshopeindwerk.jpg|Caption]] | [[File:Workshopeindwerk.jpg|Caption]] | ||
| − | ===''' | + | ==='''Final project: Puzzle '''=== |
| + | |||
| + | After the test project made in the workshop i decided to use different kinds of wood to give it a more professional look. The materials i decided on were birchwood and walnutwood. Before using this i had to prepare the wood by making the surface smooth for a better finish and consistency after milling. The changes i made to the design were some digital changes with the program Adobe Illustrator to make it more like a puzzle. At first the design was made up of one line for using the milling machine, but because i wanted to create a puzzle i had to make all the different puzzle pieces seperatly. While making the alterations to the design i noticed the design wasnt symmetrical which is why i chose to mill the first design and cut the puzzle pieces by hand. | ||
| − | |||
[[File:Workshopeindwerk5.jpg|Caption]] | [[File:Workshopeindwerk5.jpg|Caption]] | ||
[[File:Workshopeindwerk4.jpg|Caption]] | [[File:Workshopeindwerk4.jpg|Caption]] | ||
Revision as of 20:03, 16 April 2016
Astrid van Loon | 0896899 | DBKV VT2B | Email: astridvanloon_1991@hotmail.com
_____________________________________________________________________________________________________________________________________________________________

Contents
- 1 Experiments:
- 2 Etching
- 3 History of the technique
- 4 What i did
- 5 Soapstone carving
- 6 History
- 7 What i did
- 8 Soap carving
- 9 Carving daily objects
- 10 Wood carving
- 11 History of the technique
- 12 What i did
- 13 Workshop milling machine
- 14 The design:
- 15 Technical aspect:
- 16 What i did:
- 17 Final project: Puzzle
Experiments:
Etching
Etching is traditionally the process of using strong acid or mordant to cut into the unprotected parts of a metal surface to create a design in the metal. I really wanted to try this method for a pretty long time, and i thought now was the perfect opportunity. It is a method of print making, but i feel like the copper plate itself is already very special. I love how the plates of old master pieces often still exist because the material will last very long. I first tried the basic method. Using wax to cover the plate and scratch that off. Then i had to soak the plate in acid so it was engraved because the parts that are not covered with wax will dissolve.
History of the technique
The process as applied to printmaking is believed to have been invented by Daniel Hopfer (circa 1470–1536) of Augsburg, Germany. Hopfer was a craftsman who decorated armour in this way, and applied the method to printmaking, using iron plates (many of which still exist). Apart from his prints, there are two proven examples of his work on armour: a shield from 1536 now in the Real Armeria of Madrid and a sword in the Germanisches Nationalmuseum of Nuremberg. An Augsburg horse armour in the German Historical Museum, Berlin, dating to between 1512 and 1515, is decorated with motifs from Hopfer's etchings and woodcuts, but this is no evidence that Hopfer himself worked on it, as his decorative prints were largely produced as patterns for other craftsmen in various media. The switch to copper plates was probably made in Italy, and thereafter etching soon came to challenge engraving as the most popular medium for artists in printmaking. Its great advantage was that, unlike engraving where the difficult technique for using the burin requires special skill in metalworking, the basic technique for creating the image on the plate in etching is relatively easy to learn for an artist trained in drawing. On the other hand, the handling of the ground and acid need skill and experience, and are not without health and safety risks, as well as the risk of a ruined plate.
What i did
Before i started i had to prepare my plate. I had to use fine steel wool and a piece of cloth and rub copper oil on to the plate till the surface was super shiny and smooth. With a hand file i beveled the edges of the plate. This is because otherwise the sharp edges can damage the paper when it goes trough the press. After that i degreased the plate. I did that with soy sauce and a piece of spunge. Then i washed the plate under running water, and put it in an oven for a few minutes to dry. When the plate was fat fry i was started with etching the plate. The design i already make earlier. After 3 hours i was done with the design. I first tried the basic method. I used wax to cover the plate, baked it in the oven and scratch that off. Then i had to soak the plate in acid so it was engraved because the parts that are not covered with wax will dissolve. It was a very long proces because every time when you bring an other layer on the plate you needed to wait. First time 1 minut in the acid 15 minutes in the oven, second time 2 minutes in the acid 15 minutes in the oven, third time 4 minutes in the acid 15 minutes in the oven en the fourth en last step was 8 minutes 15 minutes in the oven. I also used the dry needle technique.

Soapstone carving
History
Soapstone varies in different kinds of hardness based on the amount of talc it contains. When soapstone has a talc density around 70-80% it is relativly soft and easy to carve. When the density of talc gets lower it becomes more like a regular rock which is used in architecural structures. When u cant carve the stone with a knife the stone can not be called soapstone anymore. Architectural use is currently the most common application of soapstone. There is currently one active soapsone mine in America and other soapstone mines are located in Brazil, India and Finland.
Soapstone can be used to craft different kinds of objects like sculptures, kitchen countertops and sinks and other daily objects. Because of the heat resistent properties of the soapstone it has also been used to make ovens, molds and smoking pipes. The use of soapstone started in the late Archaic archeological period. In the 19th century in Georgia, USA, the locally quarried soapstone was used for mortuary tablets and tombs. The early vikings hewed soapstone directly from the stone face and made it into cooking-pots. In the 5th-3rd millennia BC, the ancient trading city of Tepe Yahya in Iran was the center of production and distribution of soapstone. In a state in Brazil, Minas Gerais, soapstone is still commonly used to produce objects like pots and pans, wine glasses, jewel boxes and statues. This is because of the abundance of soapstone mines in this brazilian state. A well known sculpture is the Christ the Redeemer statue in Rio de Janeiro.
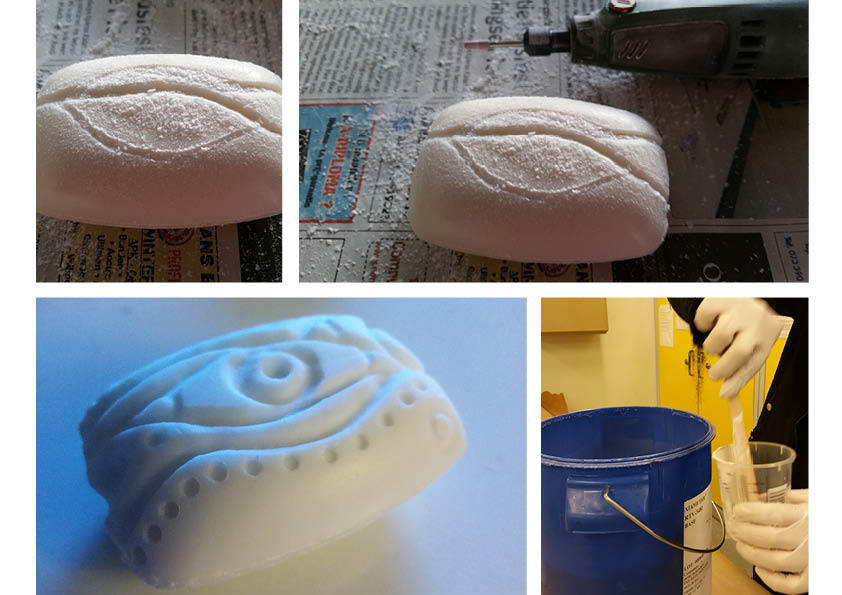
What i did
I was inspired by nature to start carving this soapstone sculpture. The concept for the design is that everything starts by observing your surroundings. I like soapstone because it has a very organic form which you can also find in nature. The design i used for this project was already created by me for the etching project. I took a piece of the design and altered it to fit the stone. Before I started carving the stone i had to make the surface of the stone smooth. For this i used sandpaper with different kinds of grains. starting with the biggest grain paper and ended with the smallest grain paper to make the surface as smooth as possible. The backside of the stone still has the original surface to preserve a part of the original organic form. For carving the stone i used a handheld milling machine with different kinds of bits. The different kinds of bits allowed me to make a smooth surface and also create different layers of relief on the sculpture. You can also alter the speed at which the machine spins to make it easier to apply the finishing touches. Even while using the milling machine it took me a lot more time then expected, wich gave me insights into the effort people had to put in while working with soapstone without modern day tools.
Soap carving
Carving daily objects
Carving in soap, create forms and you can use it as a mold to multiply the object.
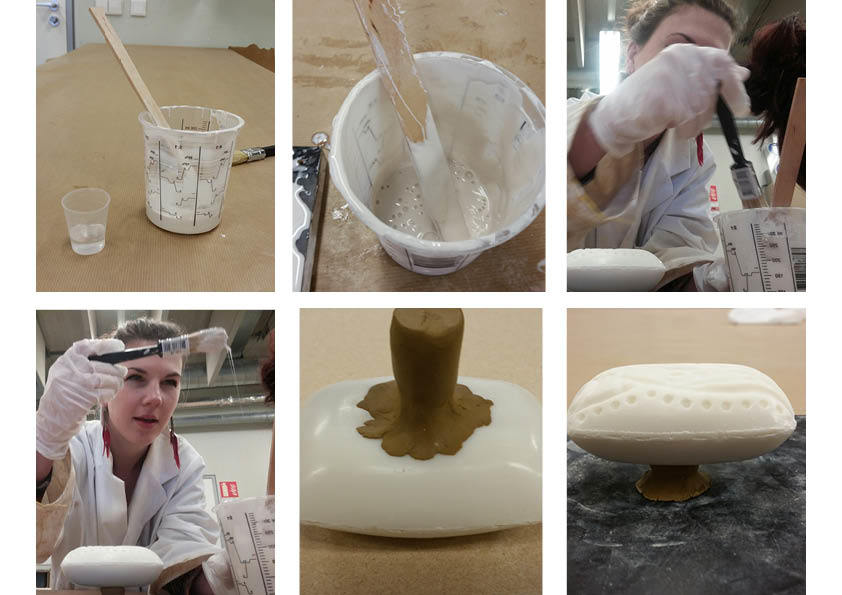
Together with Simone and Marieke I carved three different soaps. After this we went to the ceramic station, where we greased the form with silicone to make a mold. While creating the mold we encountered some problems regarding the silicone layers needed to craft it. The first 3 'soft' layers of silicone were a succes and needed 24 hours to dry before the next layer could be added. While applying the fourth and last layer, which is the strongest needed to finish the mold, we found out that the last layer did not bind with the other layers. The soap and previous silicone layers had a chemical reaction which caused this.


Wood carving
Woodturning is a form of woodworking that is used to create wooden objects on a lathe. Woodturning differs from most other forms of woodworking in that the wood is moving while a stationary tool is used to cut and shape it. Many intricate shapes and designs can be made by turning wood. There are two distinct methods of turning wood: spindle turning and bowl or faceplate turning. Their key difference is in the orientation of the wood grain, relative to the axis of the lathe. This variation in orientation changes the tools and techniques used. In spindle turning, the grain runs lengthways along the lathe bed, as if a log was mounted in the lathe. Grain is thus always perpendicular to the direction of rotation under the tool. In bowl turning, the grain runs at right angles to the axis, as if a plank were mounted across the chuck. When a bowl blank rotates, the angle that the grain makes with the cutting tool continually changes between the easy cuts of lengthways and downwards across the grain to two places per rotation where the tool is cutting across the grain and even upwards across it. This varying grain angle limits some of the tools that may be used and requires additional skill in order to cope with it. In spindle turning, the wood is fixed between 2 points. The spur center digs into the wood and is powered by a motor. The other, a hard center or a live center may be a point or set of points in the tail-stock. In face plate turning, the wood is secured with screws to a faceplate or in a chuck or jig. the tail stock and a center may also be used for added support on large pieces with a faceplate. Most bowls, platters and many vessels are face plate turned, while pens, furniture legs, spindles, and some vessels are spindle turned. The method used may differ depending on the shape of the blank and the technique of the turner, and both methods may be used on the same piece.
When wood is cut in such a way that the fibre being cut is not supported by the fibre below it, it tends to separate and tear. This “tear out” exhibits a rough, highly damaged looking surface texture and greatly reduces the value of any product exhibiting it. The direction of cut is different in spindle turning and faceplate turning because cutting in the wrong direction can cause tear out. Spindle turning cuts are made from high points toward the axis on the outside of the piece, and from the axis toward the outside when hollowing. When faceplate turning, the opposite applies.
History of the technique
The origin of woodturning dates to around 1300 BC when the Egyptians first developed a two-person lathe. One person would turn the wood with a rope while the other used a sharp tool to cut shapes in the wood. The Romans improved the Egyptian design with the addition of a turning bow. Early bow lathes were also developed and used in Germany, France and Britain. Sometime after the turning bow was developed, a lathe was created that spun when a lever was pumped by hand. Early lathe workers would sometimes use their bare feet to hold cutting tools in place while using their hand to power the lathe. In the Middle Ages a pedal replaced hand-operated turning, freeing both the craftsman’s hands to hold the woodturning tools. The pedal was usually connected to a pole, often a straight-grained sapling. The system today is called the “spring pole” lathe (see Polelathe). Spring pole lathes were in common use into the early 20th Century. Up to this point in history, the lathe operated in a reciprocal manner with the workpiece rotating back and forth as the drive mechanism reset to the loaded position in preparation for the next stroke. This required the turner to alternately apply the tool as the blank spun toward the operator and remove it from the blank as it spun away from him. A two-person lathe, called a “great lathe”, allowed a piece to turn continuously (like today’s power lathes). A master would cut the wood while an apprentice turned the crank on a huge wheel, often several feet in diameter.
During the industrial revolution the lathe was motorized, allowing turned items to be created in less time. The motor also produced a greater rotational speed for the wood, making it easier to quickly produce high quality work. Today most commercial woodturning is done by computer-operated machinery allowing for mass-production that can be created with precision and without the cost of employing craftsmen. Modern professional woodturners are typically either “production” turners producing large quantities of functional pieces, or artistic turners producing smaller numbers of pieces, often enhanced after turning by carving, piercing, coloring, applying pyrography, gilding, or a number of other techniques to produce objects for the art market. From the 1930s, the field of wood turning grew from this hobbyist movement in the 1930s to fine artists in the 1970s, experimenting with super object forms and other fine craft concepts. The Center for Art in Wood, founded in 1986 as The Wood Turning Center, houses a collection in Philadelphia with over 1,000 objects from international artists as well as a research library and gallery.
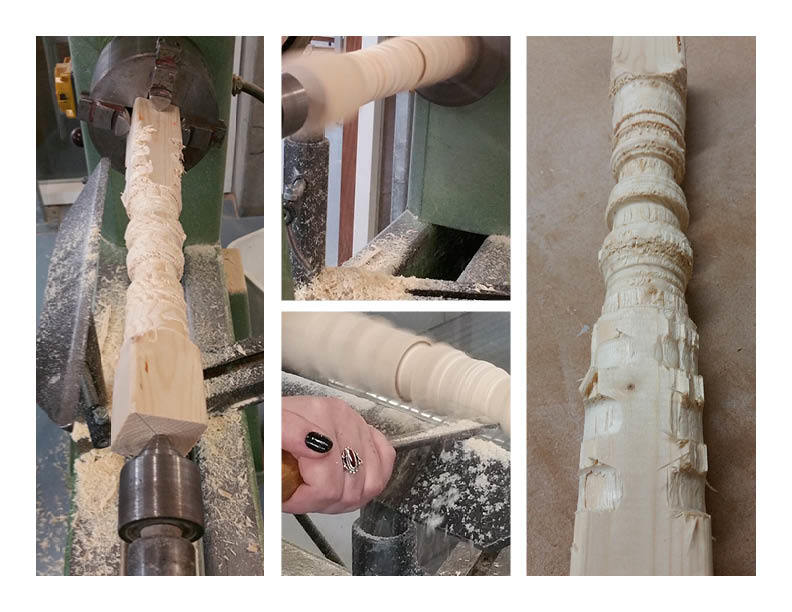
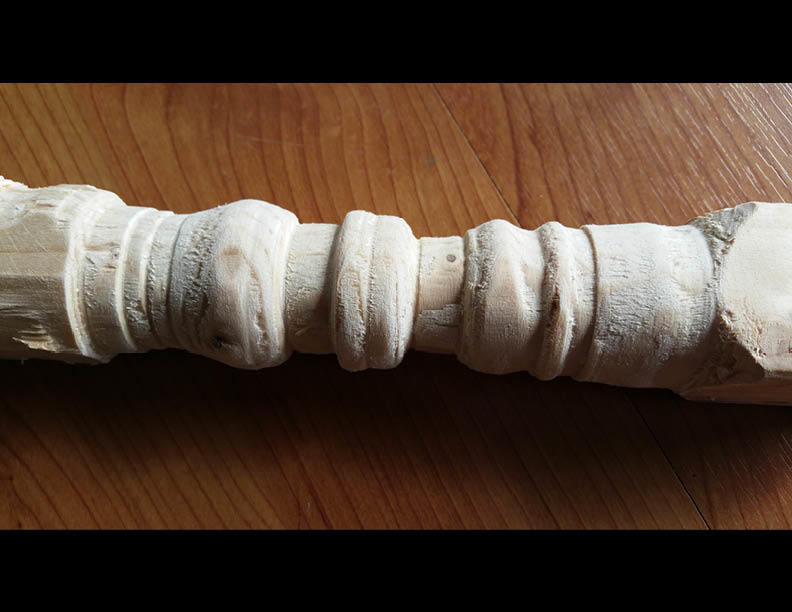
What i did
Together with Simone I went to the wood station. We did not know how to use the wood turn machine so we asked for explanations about how we could use the machine. The supervisor helped us understand the workings of the machine and explained the safety rules to us. Furthermore he taught us some techniques and the best workposture for applying pressure to the tools. We used a piece of hard whitewood and found that it was very difficult to get the right finish because the nerve was sideways. This resulted in a rugged surface and made us see that its better to use a different kind of wood.


Workshop milling machine
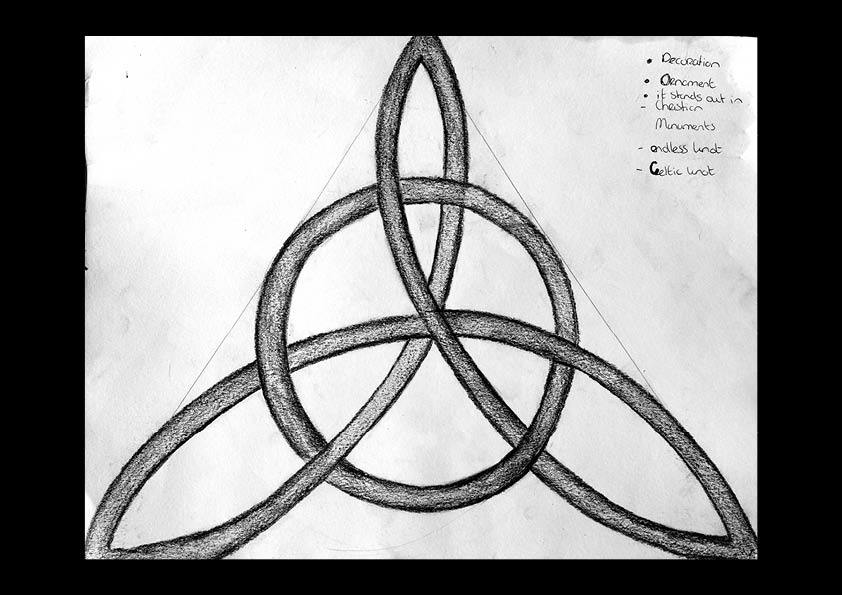
The design:
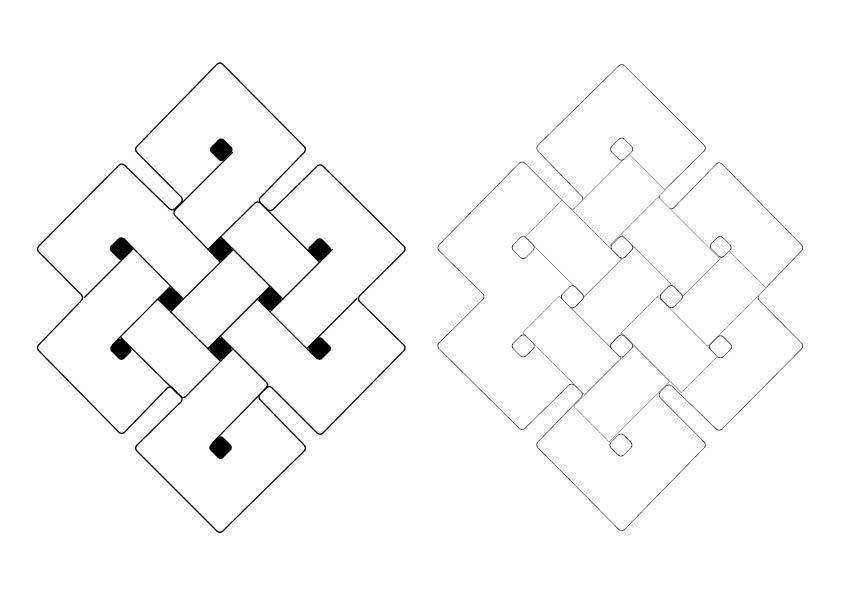
Before I started working with the milling machine I had to create a design for it. I had already prepared a design for my endwork in the program Adobe Illustrator and thought it would be a good challange to produce this with the milling machine. The design consisted of several lines which was not possible to produce with the milling machine in one go. The design had to be adapted to consist of 1 contour line because it is a 2d design. To produce different layers is possible but this will take much more time since i dont possess the skill needed to achieve this. My solution to this problem was to simplify the design and produce two seperate parts which can fit onto eachother.
Technical aspect:
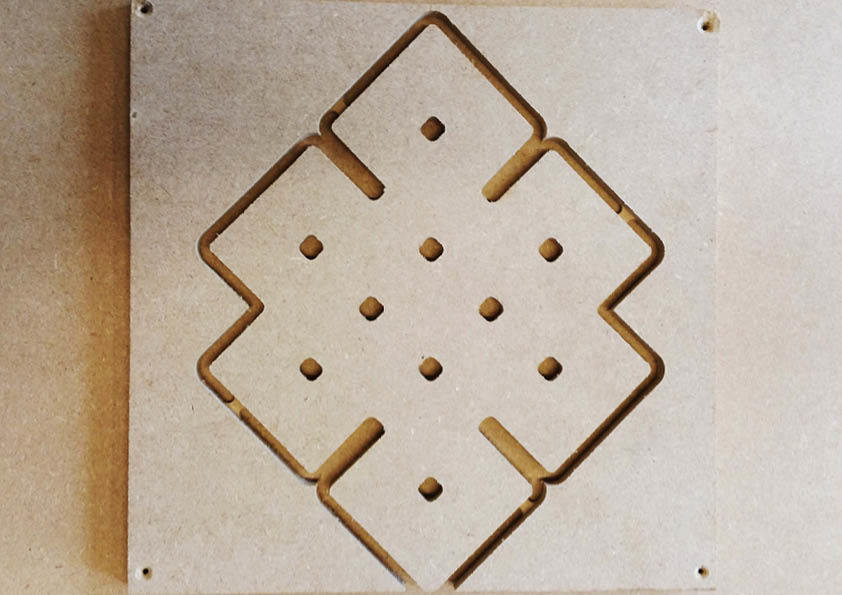
Before I could start working with the milling machine(CNC) I had to put in the settings of the machine with a program specifically designed for milling. The program is called VCarve Pro, you can use this to enter the size of the object, center it and select the right material with the given lenght of the bit you are using. After this is done you save the settings and you can view the model in 2D and 3D, the pattern the machine is going to use for milling is also visible. The Bit I picked for this project has a diameter of 5,7 millimeter. The reason i picked this bit is because of the big surface we had to mill and with this size it takes the least amount of time. When the setup with the program was done I mounted the wooden plate on the milling machine using screws so the plate wont move during the milling. Afterwards you need to determine the X-point of the wooden plate to start at the right point. When you have completed the above setup, the machine and air-extractor can be started.
What i did:
The workshop was about making conections with wood, this gave me an advantage because i had already decided on my final project and this workshop provided me with a lot of information about how to realise my project. The design i realised during the workshop was a test for my final project, hence the choice for MDF because it is a relativly soft material and easy to craft. The first and second part are milled controversial which created a contrashape so they fit together perfectly. I expressly made the cleats stand out because this defines the two layers better. The downside to using MDF is that it is a soft and vulnerable material and during the millings the cleats broke off. This was a good learningpoint because it gave me the insight to use different materials for my final project and slightly alter my design. The advice i recieved when making the design was to make 2 notches on the side so I could easily pick up the top layer.


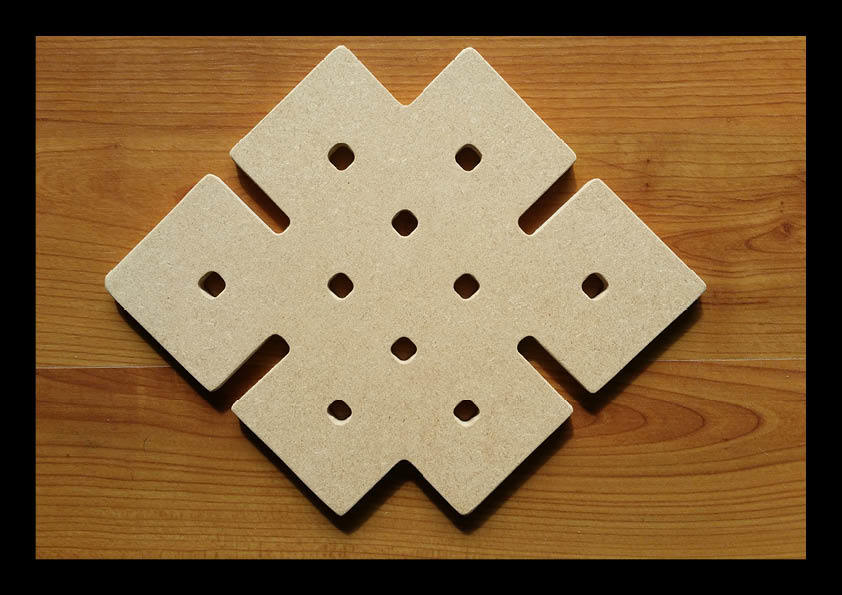

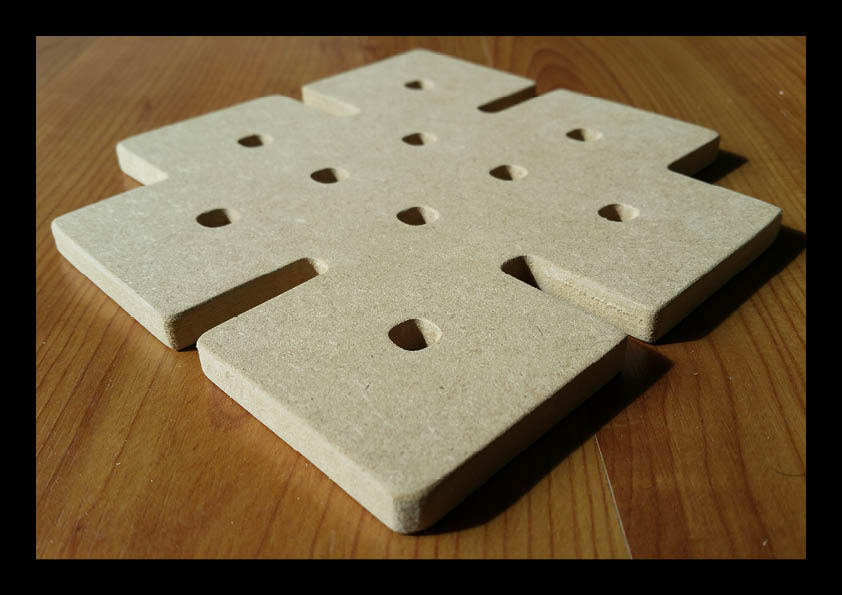

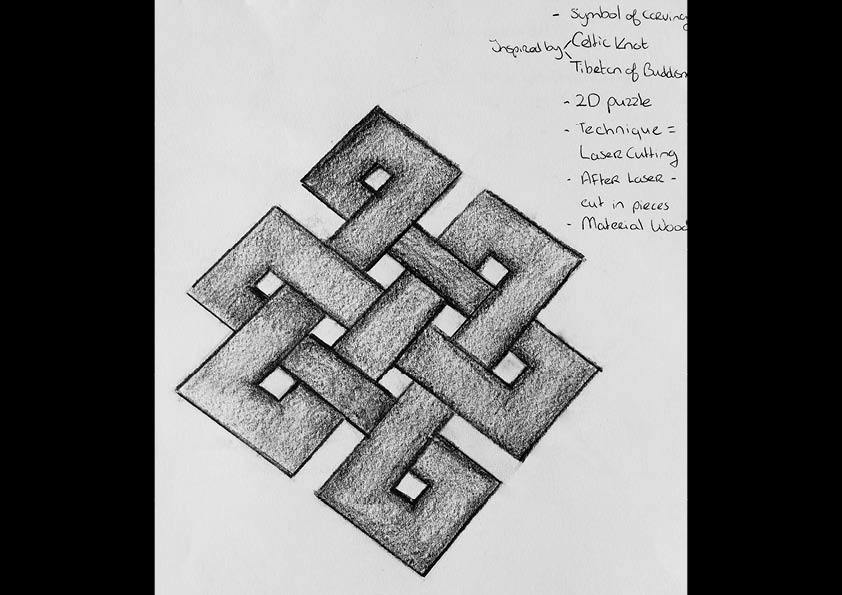
Final project: Puzzle
After the test project made in the workshop i decided to use different kinds of wood to give it a more professional look. The materials i decided on were birchwood and walnutwood. Before using this i had to prepare the wood by making the surface smooth for a better finish and consistency after milling. The changes i made to the design were some digital changes with the program Adobe Illustrator to make it more like a puzzle. At first the design was made up of one line for using the milling machine, but because i wanted to create a puzzle i had to make all the different puzzle pieces seperatly. While making the alterations to the design i noticed the design wasnt symmetrical which is why i chose to mill the first design and cut the puzzle pieces by hand.