Difference between revisions of "User:Chantal Nassef"
| Line 41: | Line 41: | ||
Process: | Process: | ||
| − | Printing the empty board at the Print Studio | + | # Printing the empty board at the Print Studio |
| − | Etching with acid the printed board at the Public Station | + | # Etching with acid the printed board at the Public Station |
<gallery mode="slideshow"> | <gallery mode="slideshow"> | ||
| Line 49: | Line 49: | ||
===Personal Project: Visual Controller=== | ===Personal Project: Visual Controller=== | ||
| + | |||
| + | (in progress...) | ||
| + | |||
| + | During my last year I started building visual controllers and work with them in my AV (AudioVisual) projects. | ||
| + | |||
| + | The electronic and programming part was designed reprogramming a Mickey Mickey board, which is a very basic one. | ||
| + | |||
| + | |||
| + | |||
==Mimicking Machines== | ==Mimicking Machines== | ||
Revision as of 14:13, 31 May 2017
||||||||| PAGE IN PROGRESS |||||||
Hello!
My name is Chantal and I am a student from the AudioVisual design department. In this wiki page you will see both of my "digital Craft" and "Mimicking Machine" projects which are two separate courses having a lot in common. Following year: 2016/2017

Contents
Digital Craft
Group representative performance: Electricity
During class lesson we performed the Electron exchange all together: a choreography representing a valence electron becoming a free electron and becoming a valence electron again after smashing with the valence electron next to it.
After this work we formed smaller group choosing a more complex example of electricity. We choose a simple circuit: Illuminating a Light Bulb.

Schematic: A battery (left) connecting to a lightbulb (right), the circuit is completed when the switch (top) closes. With the circuit closed, electrons can flow, pushed from the negative terminal of the battery through the lightbulb, to the positive terminal. [1]
Pictures from our coreography:
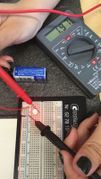
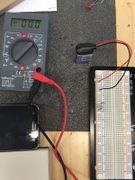
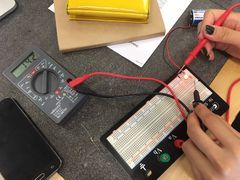
Measuring volts, current and resistance
After learning together how to use a breadboard and the Digital Multi Meter, we created a simple circuit and started measuring.
Documentation:
led
resistance
parallel circuit
group of resistance


Circuit making
Process:
- Printing the empty board at the Print Studio
- Etching with acid the printed board at the Public Station
Personal Project: Visual Controller
(in progress...)
During my last year I started building visual controllers and work with them in my AV (AudioVisual) projects.
The electronic and programming part was designed reprogramming a Mickey Mickey board, which is a very basic one.
Mimicking Machines
References: