Difference between revisions of "User:Jessica Rijkers"
| Line 33: | Line 33: | ||
| − | [[File:hec.jpg|200px|test]] [[File:hec2.jpg|200px]] [[File:hec3.jpg|200px]] [[File:hec8.jpg| | + | [[File:hec.jpg|200px|test]] [[File:hec2.jpg|200px]] [[File:hec3.jpg|200px]] [[File:hec8.jpg|300px]] <br> |
==COMPARATIVE EXAMPLE== | ==COMPARATIVE EXAMPLE== | ||
Revision as of 18:17, 29 March 2017
JESSICA RIJKERS

FASHION DESIGNER

0908513@hr.nl
Contents
Printing Technices
HISTORICAL EXAMPLE
Hectograph
The hectograph is a printing process that involves the transfer of an original, prepared with special inks, to a pan of gelatin or a gelatin pad pulled tight on a metal frame.
[1]
It is also used to create unique acrylic paint prints. The gelatine hectograph has been commercialized by Joan Bess and Lou Ann Gleason. The hectograph has been plasticized and made more resilient.
The basic printing technique is simple. One spreads paint over the plate with a brayer, lays a sheet of paper over the paint, rubs the back of the paper a bit and pulls it up. The wet paint adheres to the paper. The interest and uniqueness of the prints come in by the marks made in the paint before laying the paper down.
The materials used for printing on are almost as limitless. Any paper can be used. Fabric, plastic/acetate sheets, different types of tape, cardboard, wooden boards, sheet metal, almost anything that paint will stick to can be used. The prints are used in many different artistic applications.
For the recipe I used gelatin powder | 100 grams
Warm Water 1-5/8 cups | 375 ml
Glycerin 2-3/8 cups | 715 grams
after 30 minutes in the freezer, the plate was ready and I could start.
I made some drawings with different kind of inks. Pencil, pen, lead, and carbon paper ink. I put the drawings upside down on the gelatin plate, the ink has to soak into the gelatine before you can use it to print.
I found out that the pencil and carbon paper ink works the best to sock in the gelatin. When the ink is in the gelatin you can use a new paper to print the exact copy of the original.
In the info, I found they were seeing that you can print again up till 100 times, but with the print I made is was only possible to print 2 or 3 times and the ink was not clear.


COMPARATIVE EXAMPLE
Collograph
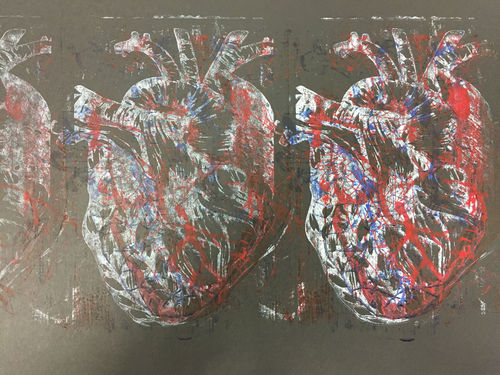
Voor het comparative example heb ik opnieuw mijn gelatine plaat gebruikt maar deze in gesmeerd met Acryl verf. dit noemt men een monoprint. door verschillende verflagen en materialen over elkaar te leggen krijg je dan een mooie print. als 2de wil ik een collagraph maken , deze werkt op de soort gelijke manier alleen komt hier doormiddel van diepdruk de vorm anders over . I also used the painting technique , with this technique u get a unique print each time you use it. It's also really easy to make new forms with this and prints.


NEW SKILL
Blindly Press
This is a printing technique without using ink. you only use a mold where the print is cut out. Its the best for the mold to be cut out of perspex, its a hard material and dont have wood grain, like when you use a wooden plate. With a big press and a lot of wait you can print the cut out in the paper. You lay the cut out on the press, put a paper on it an than you can roll. How deep the print will be in the paper depents on the sort of paper and the many times you roll over the paper.
First i tryed with a detailed cut out of a tree. After getting some feedback i tryed to use a text to make it more interesting. I used my statement as the text to print.


SHARED EXAMPLE
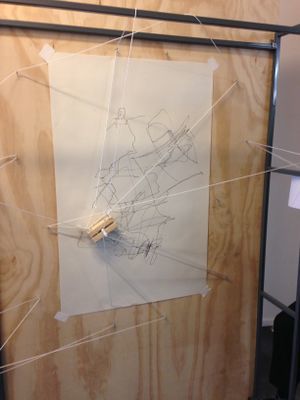
For the shared example, we started separately to make a printing tool. it was the idea to don't tell each other what we made so that the next day the other people of the group had to find out what was made and how it has to be used. For this part, i made a printing roll.
Media:roller.ogg


After we tried all the tools, we planned to make a tool that only works when we work together. So we made a drawing machine with a lot of angels, every angle had his own side that moves the pencil. You really have to work together to make a nice drawing out of it. In the beginning, it was very difficult to work together like this. but after a few times trying we found a nice way to cooperate together and make the pencil draw in a good way.

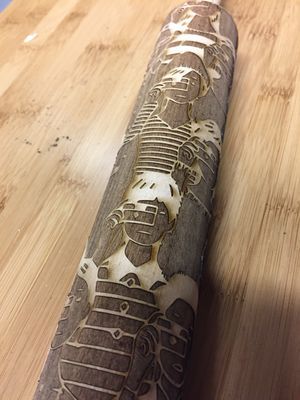
PRINTING ON ROLL


Why I make?
When you think in details perfection don't have to be the outcome.
When I started this project I thought I was a maker because I like to build and work with my hand. We made a 5 sentence list of things why was a maker:
I am a maker because I want to create with my hands
I am a maker because I'm inspired by all kind of materials
I am a maker because I want to develop myself to learn new technics
I am a maker because I'm inspired by the details in every kind of product
I am a maker because I want to communicate with visual things
I thought the main sentence for me was “I'm inspired by all kind of materials” it is indeed a big part of my inspiration en trigger to make. but not my biggest. From when I was little I got a big interested to know how things are put together. With my grandma, i disassemble old products to see how they looked from within. The details that are inside every product got my big interest. After that, i started making, I'm a fashion designer so mostly I make a lot of clothing. In clothing, there are a lot of details visual, the kind of thread, the way of the grain of the fabric, wich button u choose. every aspect has his details.
What I like so much about crafted objects, is that they are unique. Not one of them is the same, every object has a different kind of detail. Even when it supposed to be the same object, when you put them next to each other you see the different in detail.
I think that is why making is so important to me, the uniqueness in an object. The handcrafted feeling you get when you see it and feel it. That's why I chose Digital Craft as a practice.
When we got separated in groups we got the subject printing. t first, I was a lot of thinking about the techniques how to print on fabrics. but I eventually didn't choose for that, making is for me also a way to develop myself to learn new techniques. so I wanted to combine a real material with a digital print. a normal flat print is not that exciting I think. for me, it was important to give it a 3d effect. I wanted to bring details in a 3d printing tool so that the print will come off the paper.
So I started with some engravings, I wanted to trigger the machine to go deeper into detail. I engraved 4 different rolls, each of them has the same print but the other way of detailing. the first one is really graphic, only lines show the form, each roll goes deeper into detail and the last was ends it. the rolls separately give a form, but when you connect them together it supposes to give a new perspective of a detailed print.
Also, a blind print got me really inspired. I saw a lot of examples but never experienced it myself so I started to try this as well. Because you only print with forms and height gets the print really interesting in a way of shadow you see the differents in height. At first, i only used a flat print of a tree. the twigs where really small cut so this gave a nice detail in the print. After that, i started with a text. The perspective of text gave a whole different kind of detail on the print. Before you can read the text you have to get the right angle in light so the shadow shows the whole text.
For me, as a maker, it is also important to see the imperfection in things. Every detail has his goods and fails. That's what makes them so interesting, a detail can change a lot in visual communication.
Of course, i always learn from the mistakes I make en try every time to do it better. Every project has its goals and mistakes. And I'm glad a make that mistakes, as a maker you can't be happy with the end result. There is always something you would have don different if you did it again or what you would have left out or put in at the end. For me, as a designer and maker, it is important to learn. This way I develop myself each time in a new way.
I am a maker that works with details, but also uses the fails that come out of these details.