Difference between revisions of "User:Sjoerdlegue"
Sjoerdlegue (talk | contribs) |
Sjoerdlegue (talk | contribs) |
||
| Line 13: | Line 13: | ||
To reach people personally for this concept I want to process a live video feed (that is positioned on the first floor of Rotterdam Station) and track traveling people that are at the station. The video feed is going to be beamed on a canvas that is visible for everyone who walks at the station, or is visiting the website of our foundation (omaspopup.nl). For the project I am going to use a small single-board computer like the Raspberry Pi and it's compatible camera. I have chosen for this method because the entire project has to be small in size, to be able to fit underneath the canvas. | To reach people personally for this concept I want to process a live video feed (that is positioned on the first floor of Rotterdam Station) and track traveling people that are at the station. The video feed is going to be beamed on a canvas that is visible for everyone who walks at the station, or is visiting the website of our foundation (omaspopup.nl). For the project I am going to use a small single-board computer like the Raspberry Pi and it's compatible camera. I have chosen for this method because the entire project has to be small in size, to be able to fit underneath the canvas. | ||
| − | = | + | =Documentation= |
| − | === | + | ===Hardware=== |
[[File:Raspberrypi3b.jpg|200px|thumb|right|Raspberry Pi 3B]] | [[File:Raspberrypi3b.jpg|200px|thumb|right|Raspberry Pi 3B]] | ||
'''Raspberry Pi (model 3B+):'''<br/> | '''Raspberry Pi (model 3B+):'''<br/> | ||
| Line 39: | Line 39: | ||
'''Matplotlib:'''<br/> | '''Matplotlib:'''<br/> | ||
For the creation of the GIF image, additional libraries were needed. Matplotlib is a plotting library that supports the animation of GIF's. Although the dependency can be quite slow, it has excellent native support for OpenCV and PiCamera. Installing it did not take very long, I used [http://www.nooganeer.com/his/projects/image-processing/making-a-gif-with-opencv-and-scikit-image-in-python/ this small tutorial] for installing the libraries. Do not forget to install ImageMagick library too when using this, it is not described anywhere in the tutorial. Small topic on the subject [https://www.raspberrypi.org/forums/viewtopic.php?f=26&t=31793 here]. | For the creation of the GIF image, additional libraries were needed. Matplotlib is a plotting library that supports the animation of GIF's. Although the dependency can be quite slow, it has excellent native support for OpenCV and PiCamera. Installing it did not take very long, I used [http://www.nooganeer.com/his/projects/image-processing/making-a-gif-with-opencv-and-scikit-image-in-python/ this small tutorial] for installing the libraries. Do not forget to install ImageMagick library too when using this, it is not described anywhere in the tutorial. Small topic on the subject [https://www.raspberrypi.org/forums/viewtopic.php?f=26&t=31793 here]. | ||
| + | |||
| + | '''Python, JSON:'''<br/> | ||
| + | All installed native, I think. If not, just give the error a Google search and browse some forums. | ||
| + | |||
| + | ===Process=== | ||
| + | |||
| + | ===Code=== | ||
| + | '''Setup:'''<br/> | ||
| + | All used code files are within this .zip file. Just extract them, navigate to the location and run motion.py as administrator. | ||
| + | <div style="padding: 5px 10px; font-family: Courier, monospace; background-color: #F3F3F3; border: 1px solid #C0C0C0;"> | ||
| + | cd motion/<br/> | ||
| + | sudo python motion.py | ||
| + | </div><br/> | ||
| + | |||
| + | '''Files:'''<br/> | ||
| + | [[Media:Motion.zip]] (bestandgrootte: 2Mb) | ||
===Brainstorm=== | ===Brainstorm=== | ||
| Line 67: | Line 83: | ||
File:Magic-Mirror-1.jpg|Magic Mirror Photo | File:Magic-Mirror-1.jpg|Magic Mirror Photo | ||
</gallery> | </gallery> | ||
| + | |||
| + | =Results= | ||
Revision as of 01:01, 21 June 2016
Contents
Project Awareness
By Sjoerd Legué (sjoerdlegue@gmail.com)
Individual Project
Change of Direction:
In the brainstorm section, I've described that I wanted to do something with Open Data. This has changed, the current project does have stuff to do with data, but more with the processing of it. In september there is "De week van de Eenzaamheid" in Rotterdam. This event addresses the fact that loneliness is a serious issue in the Netherlands and thus requires needful attention. For this event, I have been asked to come up with a digital installation that makes people aware of the fact that loneliness can be something very close to everyone.
Concept:
The concept of my project is to address people personally, through a live videofeed and animation, that people themselves can help prevent loneliness amongst elderly around them. This is addressed through asking people personal questions about (for instance) when they have called their own grandma or grandpa.
Medium:
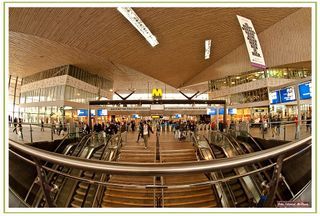
To reach people personally for this concept I want to process a live video feed (that is positioned on the first floor of Rotterdam Station) and track traveling people that are at the station. The video feed is going to be beamed on a canvas that is visible for everyone who walks at the station, or is visiting the website of our foundation (omaspopup.nl). For the project I am going to use a small single-board computer like the Raspberry Pi and it's compatible camera. I have chosen for this method because the entire project has to be small in size, to be able to fit underneath the canvas.
Documentation
Hardware
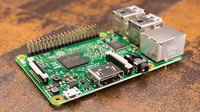
Raspberry Pi (model 3B+):
As described above, using a small processing computer allows me to use the installation in a narrow space. I also won't prefer placing a very expensive computer like a Mac to be placed in such a public space.
RasPi Camera (rev. 1.3):
This is the native supported webcam for the Raspberry Pi. This on-board camera can be connected to the computer very easily and is broadly supported across all of it's software.
RasPi 7" Touchscreen Display:
I use this touchscreen to display and read information directly from the Raspberry Pi itself. The computing board is attached on the back of the display, which makes the format of the installation even smaller.
Software
Python:
The entire program that drives the camera, and the recording/generating of the images, is written in Python. This programming language is quite easy to learn and is also very readable. I do have a lot of experience with other web-based programming languages, but I have never worked in Python before. So as an unexperienced programmer in Python, the language is very much recommendable for people who are new in programming.
Dependencies
OpenCV 3:
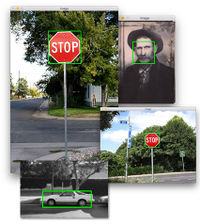
OpenCV is a library that allows easy access for image manipulation and processing. Installing it for the Raspberry Pi takes quite some time and can be difficult for people who are new into Linux. I used this tutorial for the complete installation. This website (pyimagesearch.com is also very helpful and has an extensive set of tutorials about OpenCV + Python on the Raspberry Pi.
PiCamera:
This is the driver of the on-board camera. No need for installing the package, it comes natively with Raspberry OS Jessie.
Matplotlib:
For the creation of the GIF image, additional libraries were needed. Matplotlib is a plotting library that supports the animation of GIF's. Although the dependency can be quite slow, it has excellent native support for OpenCV and PiCamera. Installing it did not take very long, I used this small tutorial for installing the libraries. Do not forget to install ImageMagick library too when using this, it is not described anywhere in the tutorial. Small topic on the subject here.
Python, JSON:
All installed native, I think. If not, just give the error a Google search and browse some forums.
Process
Code
Setup:
All used code files are within this .zip file. Just extract them, navigate to the location and run motion.py as administrator.
cd motion/
sudo python motion.py
Files:
Media:Motion.zip (bestandgrootte: 2Mb)
Brainstorm
The moment I knew what I wanted to do:
For a long time I have known that Product Design was the right decision for me to choose. This also means that there was or is not a certain kind of image that reflects this moment for me. But IKEA has always inspired me to look at products (in the literal term) in a very different way. For instance the IKEA Concept Kitchen (IKEA Concept Kitchen 2025).
What do I make?
Although I have chosen for product design, my background lays in graphic- and digital design. Together with Emmy Jaarsma, I have made several hat designs over the course of a few years. Our best work even won the International Hat Designer of the Year award in 2013. For the hat, I mainly designed the digital pattern for the laser-cutter.
Topic of Interest:
For this practice I want to explore the concept of Open Data. It fascinates me that a lot of information is freely accessible on the internet to be used and processed and that everyone can contribute to this gigantic heap of information. Almost everything is on the internet, at least when you search for it with the right parameters.
Medium:
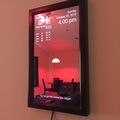
The main component I wish to use is a microcontroller (or small computer) with access to the internet. It should be able to search for the information by itself and process that into a visual attractive element that is easily readable by human beings. A good example of a very cool project is the Magic Mirror. It's just like a regular mirror, but it displays important information for the consumer to know.


