User:Kayl
Expanded Toolbox 2017
17-04-2017
Kaylee Nieuwenhuizen
Welcome on my page. My name is Kaylee and my email is 0912721@hr.nl.
I will post about my proces of the digital craft minor 2017 Q8 - WDKA
––––––––––––––––––––––––––––––––––––––––––––––––––––––––––––––––––––––––––––––––––––––––––––––––––––––––––––––––––––––––––––––––––––––––––––––––––––––––––––––––––––––––
Contents
First Class: Group exercise 20-04-2017
––––––––––––––––––––––––––––––––––––––––––––––––––––––––––––––––––––––––––––––––––––––––––––––––––––––––––––––––––––––––––––––––––––––––––––––––––––––––––––––––––––––––
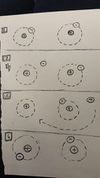
We are the Electrons. We learned that '+ and -' came together, in a dance we showed this with shaking our body but when '- and -' came together they would clash. How the Electrons react is explained further in the drawing that we made, on the left.
––––––––––––––––––––––––––––––––––––––––––––––––––––––––––––––––––––––––––––––––––––––––––––––––––––––––––––––––––––––––––––––––––––––––––––––––––––––––––––––––––––––––
No Class: Holidays 27-04-2017
––––––––––––––––––––––––––––––––––––––––––––––––––––––––––––––––––––––––––––––––––––––––––––––––––––––––––––––––––––––––––––––––––––––––––––––––––––––––––––––––––––––––
No Class: Hacking 04-05-2017
––––––––––––––––––––––––––––––––––––––––––––––––––––––––––––––––––––––––––––––––––––––––––––––––––––––––––––––––––––––––––––––––––––––––––––––––––––––––––––––––––––––––
Second Class: Measuring 11-05-2017
–––––––––––––––––––––––––––––––––––––––––––––––––––––––––––––––––––––––––––––––––––––––––––––––––––––––––––––––––––––––––––––––––––––––––––––––––––––––––––––––––––––––– In this class we started with a summary of the first class. In a battery the elektrons go from the + side to the - side. A Led light has a long and a short, the long side is the + side and is called Anode, the short side is the - side and is called Cathode. A resistor is to limit the presure of the battery for a Led light for example. A resistor = Ohm. You can calculate how much the resistor resists with a dutch"donkey bridge": Zij bracht rozen op gerrits graf bij vies grauw weer
1-2-X-------
Zij = Zwart = 0-0-1
Bracht = Bruin = 1-1-10
Rozen = Rood = 2-2-100
Op = Oranje = 3-3-1000
Gerrits = Geel = 4-4-10K
Graf = Groen = 5-5-100K
Bij = Blauw = 6-6-1M
Vies = Violet = 7-7-10M
Grauw = Grijs = 8-8-100M
Weer = Wit = 9-9-1000M
Further in this class we did some small experiments in a group. We made a circuit on a plugboard with a 9 volt battery, a resistor and a LED. the rest of the experiments were about measuring with a volt meter.
What you need (ask at the Interaction Station):
* Multimeter
* 9 Volt battery (5V in the tutorial)
* 9 Volt battery clip for in a breadboard
* 470 Ohm resistor (1K Ohm in the tutorial)
* LED
* breadboard
Outcome: Voltage 7
Resistance 465
Ampere 19.3
Measuring resistance
What you need (ask at the Interaction Station):
* Multimeter
* 3 random resistors
* 3 resistors of the same value
* breadboard
Series Resistance Outcome: Volt 1th restitor 2.38
Volt 2nd/3th 2.39
Volt 1th + 2nd together 4.77
Volt 2nd + 3th together 4.78
Volt 1th +2nd +3th together 7.16
I = V/R
9,11: 2,38 = 3,83
9,11 : 7,16 = 1,27
Parallell Resistance Outcome
Voltage van de drie restitors 8.41
Measuring Current
What you need (ask at the Interaction Station):
* Multimeter
* 9 Volt battery (5V in the tutorial)
* 9 Volt battery clip for in a breadboard
* 470 Ohm resistor (1K Ohm in the tutorial)
* LED
* breadboard
Outcome Voltage 7
Resistance 465
Ampere 19.3
Measuring voltage and current in a series circuit
What you need (ask at the Interaction Station):
* Multimeter
* 9 Volt battery (5V in the tutorial)
* 9 Volt battery clip for in a breadboard
* 3 resistors random resistors
* breadboard
Outcome Volt 9.11
Ampere 3.82
I = V/R
9,11: 2,38 = 3,83
9,11 : 7,16 = 1,27
Measuring voltage and current in a parallel circuit
What you need (ask at the Interaction Station):
* Multimeter
* 9 Volt battery (5V in the tutorial)
* 9 Volt battery clip for in a breadboard
* 3 resistors random resistors
* breadboard
Outcome:
Battery voltage: 8.58
Voltage van de drie restitors : 8.41
I=V/R
8.58/8.41 = 1.02
––––––––––––––––––––––––––––––––––––––––––––––––––––––––––––––––––––––––––––––––––––––––––––––––––––––––––––––––––––––––––––––––––––––––––––––––––––––––––––––––––––––––
Third Class: Keyboard 18-05-2017
––––––––––––––––––––––––––––––––––––––––––––––––––––––––––––––––––––––––––––––––––––––––––––––––––––––––––––––––––––––––––––––––––––––––––––––––––––––––––––––––––––––––
In the third class we had to make a Keyboard. in this assignment we could show what we have learned about circuits with resistors and LEDs, and about measuring voltage. we also learned new things about how to adjust a copper plate, and how to solder a microchip. First we picked a schematic. Axel Verwee and I had schematic 1 so we teamed up for this assignment. We had to draw the circuit on a copper plate. Ad first we tried to iron a printed image on the copper. if the ink would have sticked on the copper we could have put the copper in a gemecal bath but this only worked for half of the image. Then we grinded our version of the schematic on the copper plate. The soldering of the chip was the hardest part, this went wrong the first time as the paws of the chip broke when we tried to attach the treads to other componends and on the copper plate. The second time we first connected all the paws of the chip to other threads. then we soldered all the other componends on the copper plate, and at last we connected te threads from the chip to other parts on the plate untill everything was connected. We designed our keyboard in such a way that the chip was floating in the air. It was very nice to look at and it worked! you only had to hold the speaker up because we placed it upside down; the metal part under the speaker made contact to the copper plate which we could solve with a small piece of tape underneed the speaker.
––––––––––––––––––––––––––––––––––––––––––––––––––––––––––––––––––––––––––––––––––––––––––––––––––––––––––––––––––––––––––––––––––––––––––––––––––––––––––––––––––––––––
No Class: Holiday ‘Hemelvaart’ 25-05-2017
––––––––––––––––––––––––––––––––––––––––––––––––––––––––––––––––––––––––––––––––––––––––––––––––––––––––––––––––––––––––––––––––––––––––––––––––––––––––––––––––––––––––
Fourth Class: Own Assignment 01-06-2017
––––––––––––––––––––––––––––––––––––––––––––––––––––––––––––––––––––––––––––––––––––––––––––––––––––––––––––––––––––––––––––––––––––––––––––––––––––––––––––––––––––––––
This class was about brainstorming for our independent presentation and using drawings to come up with fast ideas. We had to choose some experiment we've done in the lessons before which we liked, to work on further as your own project. At first i tought about the keyboard experiment but what i found more interesting is that energy flows through our bodies. I liked the way we measured energy by holding eachothers hand. In this class we had to make 5 drawings, based on 5 steps, how to realise this project from what we've learned in class till what it can be as in exhibition for the presentations. The 5 steps:
1. Make an illustration of your most memorable insight of what you have learned/discovered; I made an illustration of people holding hands with a measuring device inbetween.
2. Make a drawing of how this insight can be made into a physical artefact; I made a drawing of an installation with on both sides a softbutton. Without a conductive intermediate piece between the buttons the installation would not work. Spectators would have to hold hands around the big object for it to connect and start working.
3. Make a drawing of an independent idea you would like to build/construct; I made a drawing of a Landscape With the same softbuttons on both ends with the same idea behind it as in drawing two. spectators would have to hold hands and come together.
4. Make a drawing of this idea in its most minimal/essential form;The most minimalistic form of this idea was that two people have to work together to make a LED light work.
5. Make a drawing of this idea in its most expansive/immersive form. The most immersive form of this idea was a huge painting which will light up and start moving when people hold hands and work together.
The idea behind these options/ideas is that we use technologie to bring people together. in most causes people watch and observe art on there own in a museum and then they come home. I thought that if people have to work together to make the art work and for that purpose have to hold hands it will become easier to make contact with strangers and have a conversation with them, get to know new people and step out of you comfort zone. Maxime wanted to make something where contact between people creates something. Because our ideas were so semilair at the brainstorming session, we decided to work together So that we could strengthen each other's ideas. As Maxime is doing Graphic design, and i'm doing fashion design, we started brainstorming about a project where we both could bring imput from our majors and learn from each others skills.
––––––––––––––––––––––––––––––––––––––––––––––––––––––––––––––––––––––––––––––––––––––––––––––––––––––––––––––––––––––––––––––––––––––––––––––––––––––––––––––––––––––––


