Making a printable PDF: Difference between revisions
No edit summary |
No edit summary |
||
| (7 intermediate revisions by the same user not shown) | |||
| Line 1: | Line 1: | ||
'''Making a printable PDF''' | '''Making a printable PDF''' | ||
In general, save or export as a PDF/X a:2001 file. | |||
To '''print a magazine''', your document should have a total amount of pages which is decidable by four. So the smallest magazine is 8 pages, then comes 12, 16, 20, 24 and so on. The Canon c600i printer can staple up to 24 pages, that is 6 sheets. Do not staple more, to prevent a major paper jam. | |||
For magazines always save as separate pages. The Fiery Command Workstation software on our macs, PrintL and PrintR, will automatically order your pages if you use the “booklet” option. Page 1 should be your cover. | When using InDesign, export your document as a PDF/X a:2001. This PDF integrates all fonts and pictures, makes it CMYK and flattens it. | ||
For magazines always save as '''separate''' pages. The Fiery Command Workstation software on our macs, PrintL and PrintR, will automatically order your pages if you use the “booklet” option. Page 1 should be your cover. If you are gluebindig your magazine or book, you don't have to use the booklet option. Just print double-sided. Then make a separate cover, where the front is on the right side, and the back of your cover on the left side. If you have a lot of pages (more than 20) also make a spine in your design for the cover. | |||
'''No InDesign?''' | '''No InDesign?''' | ||
If you made your magazine in another programme than InDesign, you should convert it to a ''PDF/X a: | If you made your magazine in another programme than InDesign, you should convert it to a ''PDF/X a:2001''. You can do that if you open your PDF in Acrobat. Go to ''edit > Preflight'' . Go to PDF/X and choose the first option (coated Fogra 39). | ||
[[File:preflight.png |590x590px]]<br> | [[File:preflight.png |590x590px]]<br> | ||
| Line 16: | Line 18: | ||
Now you have to rename your converted document. | Now you have to rename your converted document. | ||
I normally add xa to the name. If there are still red crosses in the conversion window, there may be major problems. | I normally add xa to the name. There should be no red crosses visible in this window (see below). | ||
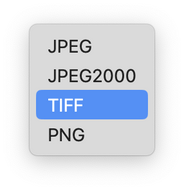
Go to File > export to > image > TIFF. | |||
[[File:converted_right.png |390x390px]]<br> | |||
If there are still red crosses in the conversion window, there may be major problems. | |||
Go to File > export to > image > TIFF.<br> | |||
[[File:export_to.png |390x390px]][[File:save_as_image.png |290x290px]][[File:screen_tiff.png |190x190px]]<br> | [[File:export_to.png |390x390px]][[File:save_as_image.png |290x290px]][[File:screen_tiff.png |190x190px]]<br> | ||
Now every page will separately saved as a TIFF file. TIFF files are pixels, while PDF files can be vector and pixels and layers. Pixels rarely give problems when printing. Go to the window where are your new TIFF files are located, put the window on ‘order by name’, select them all and use the quick actions (right mouse click in the finder, select your files) to create a new PDF. | Now every page will separately saved as a TIFF file. TIFF files are pixels, while PDF files can be vector and pixels and layers. Pixels rarely give problems when printing. Go to the window where are your new TIFF files are located, put the window on ‘order by name’, select them all and use the quick actions (right mouse click in the finder, select your files) to create a new PDF. | ||
| Line 25: | Line 33: | ||
Using crop marks is not recommended. Only if you have a text document that is not A4 or A5 you must use cropmarks. Do not forget to set the ‘increase gutter’ value in the Layout > booklet tab on a negative value of -0.14 mm. | Using crop marks is not recommended. Only if you have a text document that is not A4 or A5 you must use cropmarks. Do not forget to set the ‘increase gutter’ value in the Layout > booklet tab on a negative value of -0.14 mm. | ||
For more detailed information about printing a book with cropmarks, go to the page https://ps.wdka.nl/wiki/Print_a_Booklet_with_the_Canon. | For more detailed information about printing a book with or without cropmarks, go to the page https://ps.wdka.nl/wiki/Print_a_Booklet_with_the_Canon. | ||
Latest revision as of 12:24, 9 February 2024
Making a printable PDF
In general, save or export as a PDF/X a:2001 file.
To print a magazine, your document should have a total amount of pages which is decidable by four. So the smallest magazine is 8 pages, then comes 12, 16, 20, 24 and so on. The Canon c600i printer can staple up to 24 pages, that is 6 sheets. Do not staple more, to prevent a major paper jam.
When using InDesign, export your document as a PDF/X a:2001. This PDF integrates all fonts and pictures, makes it CMYK and flattens it.
For magazines always save as separate pages. The Fiery Command Workstation software on our macs, PrintL and PrintR, will automatically order your pages if you use the “booklet” option. Page 1 should be your cover. If you are gluebindig your magazine or book, you don't have to use the booklet option. Just print double-sided. Then make a separate cover, where the front is on the right side, and the back of your cover on the left side. If you have a lot of pages (more than 20) also make a spine in your design for the cover.
No InDesign?
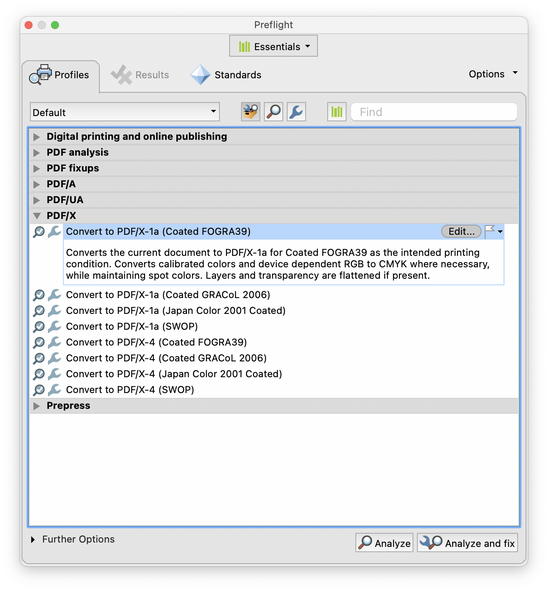
If you made your magazine in another programme than InDesign, you should convert it to a PDF/X a:2001. You can do that if you open your PDF in Acrobat. Go to edit > Preflight . Go to PDF/X and choose the first option (coated Fogra 39).
Now you have to rename your converted document.
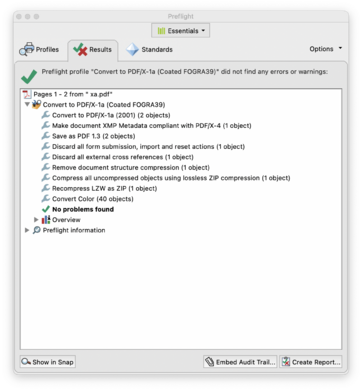
I normally add xa to the name. There should be no red crosses visible in this window (see below).
If there are still red crosses in the conversion window, there may be major problems.
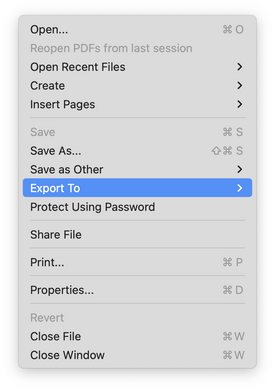
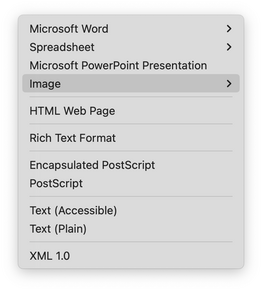
Go to File > export to > image > TIFF.
Now every page will separately saved as a TIFF file. TIFF files are pixels, while PDF files can be vector and pixels and layers. Pixels rarely give problems when printing. Go to the window where are your new TIFF files are located, put the window on ‘order by name’, select them all and use the quick actions (right mouse click in the finder, select your files) to create a new PDF.
Using crop marks is not recommended. Only if you have a text document that is not A4 or A5 you must use cropmarks. Do not forget to set the ‘increase gutter’ value in the Layout > booklet tab on a negative value of -0.14 mm.
For more detailed information about printing a book with or without cropmarks, go to the page https://ps.wdka.nl/wiki/Print_a_Booklet_with_the_Canon.
