Photo to etch: Difference between revisions
From Publication Station
Created page with "== Preparation in photoshop == Open image in Photohop<br> Make the image black and white -in the layers pannel <Adjustments - Black & White>  Make negative <Adjustments - adjust curve> bring the right top of the curver down and right side of the cuve 4/5 up. Convert to greyscale Mode >> Greyscale Flatten image <OK> Discard color information? <Discard> Image size (the size of your copper plate) Resolution 150 PPI resample: <automatic>  Convert to bitmap..." |
|||
| (7 intermediate revisions by the same user not shown) | |||
| Line 1: | Line 1: | ||
== Preparation in photoshop == | == Preparation in photoshop == | ||
Open image in Photohop | === Open image in Photohop === | ||
Make the image | === Make the image Black & White === | ||
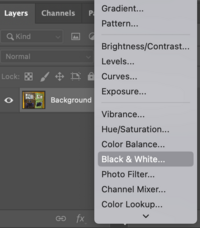
Choose an adjustment layer <Black & White> in the bottom of the layers panel. <br> | |||
Make negative < | Here you can adjust the black & white contrast to your liking. | ||
Convert to greyscale | [[File:Ps bw .png|200px]] | ||
Flatten image <OK> | |||
Discard color information? <Discard> | === Make negative === | ||
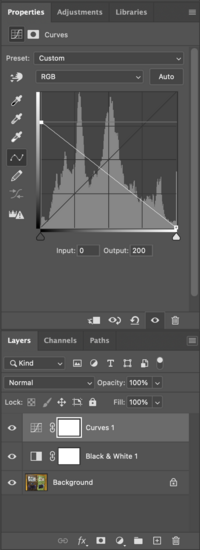
Choose an adjustment layer <curves> in the bottom of the layers panel. Bring the right top of the curve down and right side of the curve 4/5 up. | |||
[[File:Ps curves.png|200px]] | |||
=== Convert to greyscale === | |||
Choose in menu: Image>>Mode>>Greyscale <br> | |||
Flatten image <OK> <br> | |||
Discard color information? <Discard> <br> | |||
Image size | === Image size === | ||
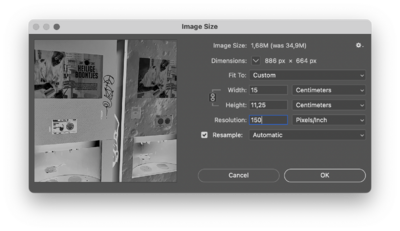
Make the size of your copper plate) <br> | |||
Resolution 150 PPI <br> | |||
resample: <automatic> | |||
 |  | ||
[[File:Ps imagesize.png|400px|left]] | |||
Convert to bitmap | === Convert to bitmap === | ||
output <300 PPI> | |||
Method <Diffusion Dither> | |||
Inverse image (negative) | Inverse image (negative) | ||
Flip canvas Horizontal | Flip canvas Horizontal | ||
 |  | ||
Save as tiff | === Save as tiff === | ||
 |  | ||
== Raster link == | |||
Open | === Open === | ||
Place | === Place === | ||
Make special layer | |||
=== Make special layer === | |||
primer 100% | |||
valit pixel | |||
Rip and Print primer <start> | === Rip and Print === | ||
primer <start> | |||
== On the mimaki == | |||
=== clean copper plate === | |||
with alcohol place on the right corner of the table | |||
=== place the machine in remote mode === | |||
== After printing == | |||
=== Cover the back of the plate === | |||
with tape | |||
=== Put the copper plate in the etching liquid === | |||
for ±30 minutes | |||
=== Rinse with water === | |||
== Ready to Print == | |||
Latest revision as of 06:49, 22 April 2024
Preparation in photoshop
[edit]Open image in Photohop
[edit]Make the image Black & White
[edit]Choose an adjustment layer <Black & White> in the bottom of the layers panel.
Here you can adjust the black & white contrast to your liking.

Make negative
[edit]Choose an adjustment layer <curves> in the bottom of the layers panel. Bring the right top of the curve down and right side of the curve 4/5 up.

Convert to greyscale
[edit]Choose in menu: Image>>Mode>>Greyscale
Flatten image <OK>
Discard color information? <Discard>
Image size
[edit]Make the size of your copper plate)
Resolution 150 PPI
resample: <automatic>


Convert to bitmap
[edit]output <300 PPI> Method <Diffusion Dither> Inverse image (negative) Flip canvas Horizontal 
Save as tiff
[edit]
Raster link
[edit]Open
[edit]Place
[edit]Make special layer
[edit]primer 100% valit pixel
Rip and Print
[edit]primer <start>
On the mimaki
[edit]clean copper plate
[edit]with alcohol place on the right corner of the table
place the machine in remote mode
[edit]After printing
[edit]Cover the back of the plate
[edit]with tape
Put the copper plate in the etching liquid
[edit]for ±30 minutes
