Difference between revisions of "Photo to etch"
From Publication Station
| (6 intermediate revisions by the same user not shown) | |||
| Line 2: | Line 2: | ||
=== Open image in Photohop === | === Open image in Photohop === | ||
=== Make the image Black & White === | === Make the image Black & White === | ||
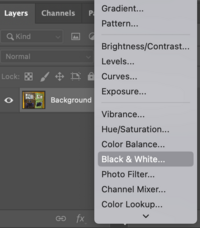
Choose an adjustment layer <Black & White> in the bottom of the layers panel. <br> | |||
Here you can adjust the black & white contrast to your liking. | |||
[[File:Ps bw .png|200px]] | [[File:Ps bw .png|200px]] | ||
=== Make negative === | === Make negative === | ||
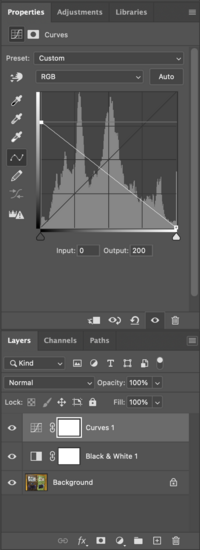
Choose an adjustment layer <curves> in the bottom of the layers panel. Bring the right top of the curve down and right side of the curve 4/5 up. | |||
[[File:Ps curves.png|200px]] | |||
=== Convert to greyscale === | === Convert to greyscale === | ||
Choose in menu: Image>>Mode>>Greyscale <br> | |||
Flatten image <OK> | Flatten image <OK> <br> | ||
Discard color information? <Discard> | Discard color information? <Discard> <br> | ||
=== Image size === | === Image size === | ||
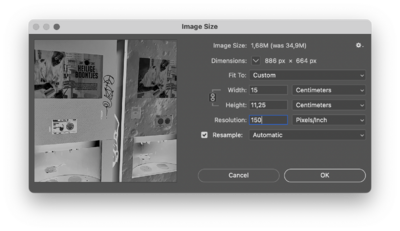
Make the size of your copper plate) <br> | |||
Resolution 150 PPI <br> | |||
resample: <automatic> | |||
 |  | ||
[[File:Ps imagesize.png|400px|left]] | |||
=== Convert to bitmap === | === Convert to bitmap === | ||
output <300 PPI> | |||
Method <Diffusion Dither> | |||
Inverse image (negative) | Inverse image (negative) | ||
Flip canvas Horizontal | Flip canvas Horizontal | ||
| Line 28: | Line 31: | ||
 |  | ||
== | == Raster link == | ||
=== Open === | === Open === | ||
=== Place === | === Place === | ||
=== Make special layer === | === Make special layer === | ||
primer 100% | |||
valit pixel | |||
=== Rip and Print === | === Rip and Print === | ||
primer <start> | |||
== On the mimaki == | == On the mimaki == | ||
=== clean copper plate === | === clean copper plate === | ||
with alcohol place on the right corner of the table | |||
=== place the machine in remote mode === | === place the machine in remote mode === | ||
== After printing == | == After printing == | ||
=== Cover the back of the plate === | === Cover the back of the plate === | ||
with tape | |||
=== Put the copper plate in the etching liquid === | === Put the copper plate in the etching liquid === | ||
for ±30 minutes | |||
=== Rinse with water === | === Rinse with water === | ||
== Ready to Print == | == Ready to Print == | ||
Latest revision as of 06:49, 22 April 2024
Preparation in photoshop
Open image in Photohop
Make the image Black & White
Choose an adjustment layer <Black & White> in the bottom of the layers panel.
Here you can adjust the black & white contrast to your liking.

Make negative
Choose an adjustment layer <curves> in the bottom of the layers panel. Bring the right top of the curve down and right side of the curve 4/5 up.

Convert to greyscale
Choose in menu: Image>>Mode>>Greyscale
Flatten image <OK>
Discard color information? <Discard>
Image size
Make the size of your copper plate)
Resolution 150 PPI
resample: <automatic>

Convert to bitmap
output <300 PPI> Method <Diffusion Dither> Inverse image (negative) Flip canvas Horizontal 
Save as tiff

Raster link
Open
Place
Make special layer
primer 100% valit pixel
Rip and Print
primer <start>
On the mimaki
clean copper plate
with alcohol place on the right corner of the table
place the machine in remote mode
After printing
Cover the back of the plate
with tape
Put the copper plate in the etching liquid
for ±30 minutes
