Difference between revisions of "Quickstartguide:C600i"
| (48 intermediate revisions by 3 users not shown) | |||
| Line 1: | Line 1: | ||
{{Template:Quickstartguide}} | |||
== 1. Drag to Held == | |||
[[File:Canon_Held.jpeg]] | |||
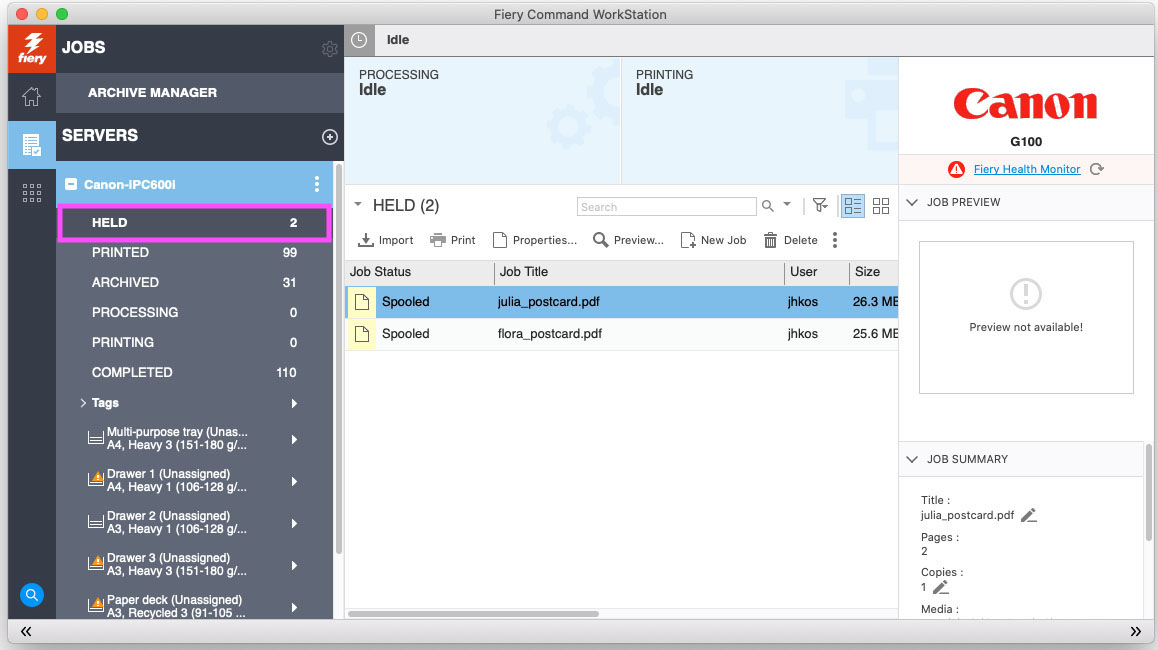
* drag your pdf from the desktop to the line called "Held" | |||
* double-click your file to open the options window | |||
== 2. Fill in the Quick Access == | |||
[[File: Canon_QuickAccess.jpeg]] | |||
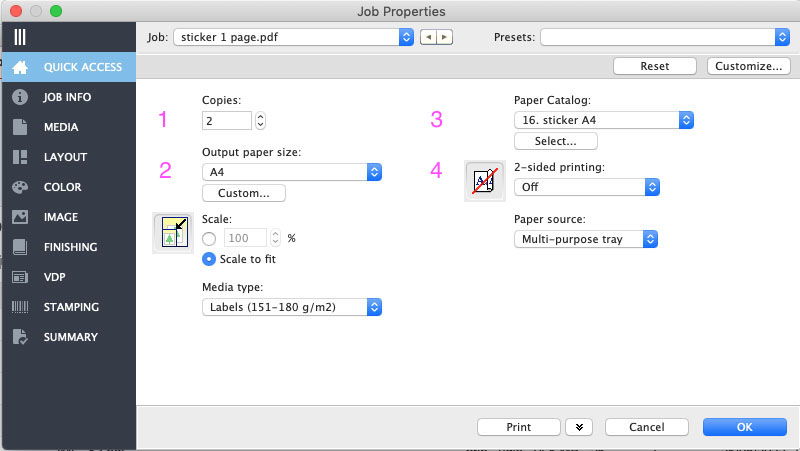
'''Fill in the fields according to your design'''<br> | |||
<br> | |||
For thin paper (100-160 grams) you start with '''PRESETS'''. <br> | |||
120 gram A4 and A3, 160 gram and 100 gram green label are already in the machine, <br> | |||
we named the trays 1,2,3 and paper deck<br> | |||
For paper from our own collection (drawer 1 - drawer 22) you start with the '''PAPER CATALOG'''.<br> | |||
if you brought your own paper, use '''MEDIA TYPE''' and find a description that suits.<br> | |||
'''< | 1. How many copies do you need?<br> | ||
< | 2. choose your desired paper-size (A4, A3)<br> | ||
3. what kind of paper would you like to print on? <br> | |||
- The numbers in the paper catalogue match the numbers on our paper drawers.<br> | |||
- Media type will automatically change.<br> | |||
4. The orientation, or 2-sided printing has to be chosen. You can choose between ''Short Edge'' and ''Long Edge''. <br> | |||
'''Landscape''' files should be ''Short Edge'' <br> | |||
'''Portrait''' files should be ''Long Edge''.<br> | |||
== 3. Send to Print == | |||
<br> | |||
[[File:Canon_ok_print.jpeg]]<br> | |||
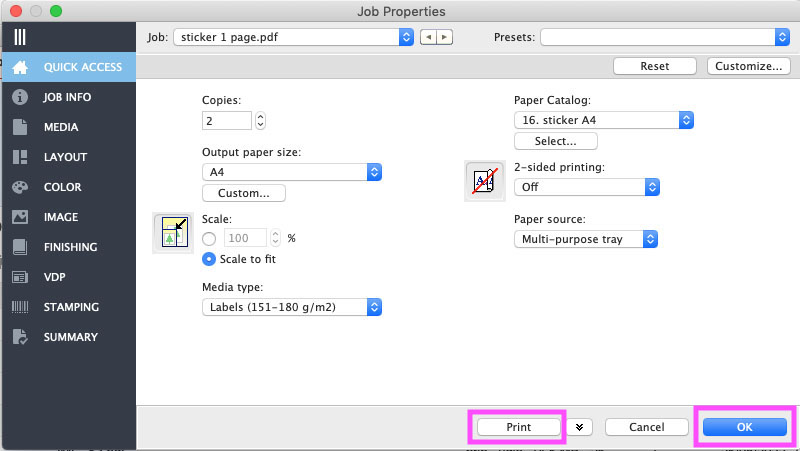
- click 'OK' to save your setting<br> | |||
- if the printer is free you can click "print"<br> | |||
== 4. Adding paper manually == | |||
If you bought paper somewhere else, beware of three aspects of the paper: the weight, the size and if it is glossy or matte. Try to find the most similar paper in our own paper selection, using our '''paper catalog'''. If there is no such paper in our drawers, go to '''Media Type''' and find the right description there. | |||
The | - Make sure to check the package of you paper for the weight of the paper:<br> | ||
The Canon C600i can print on '''up to 300 grams''' paper.<br> | |||
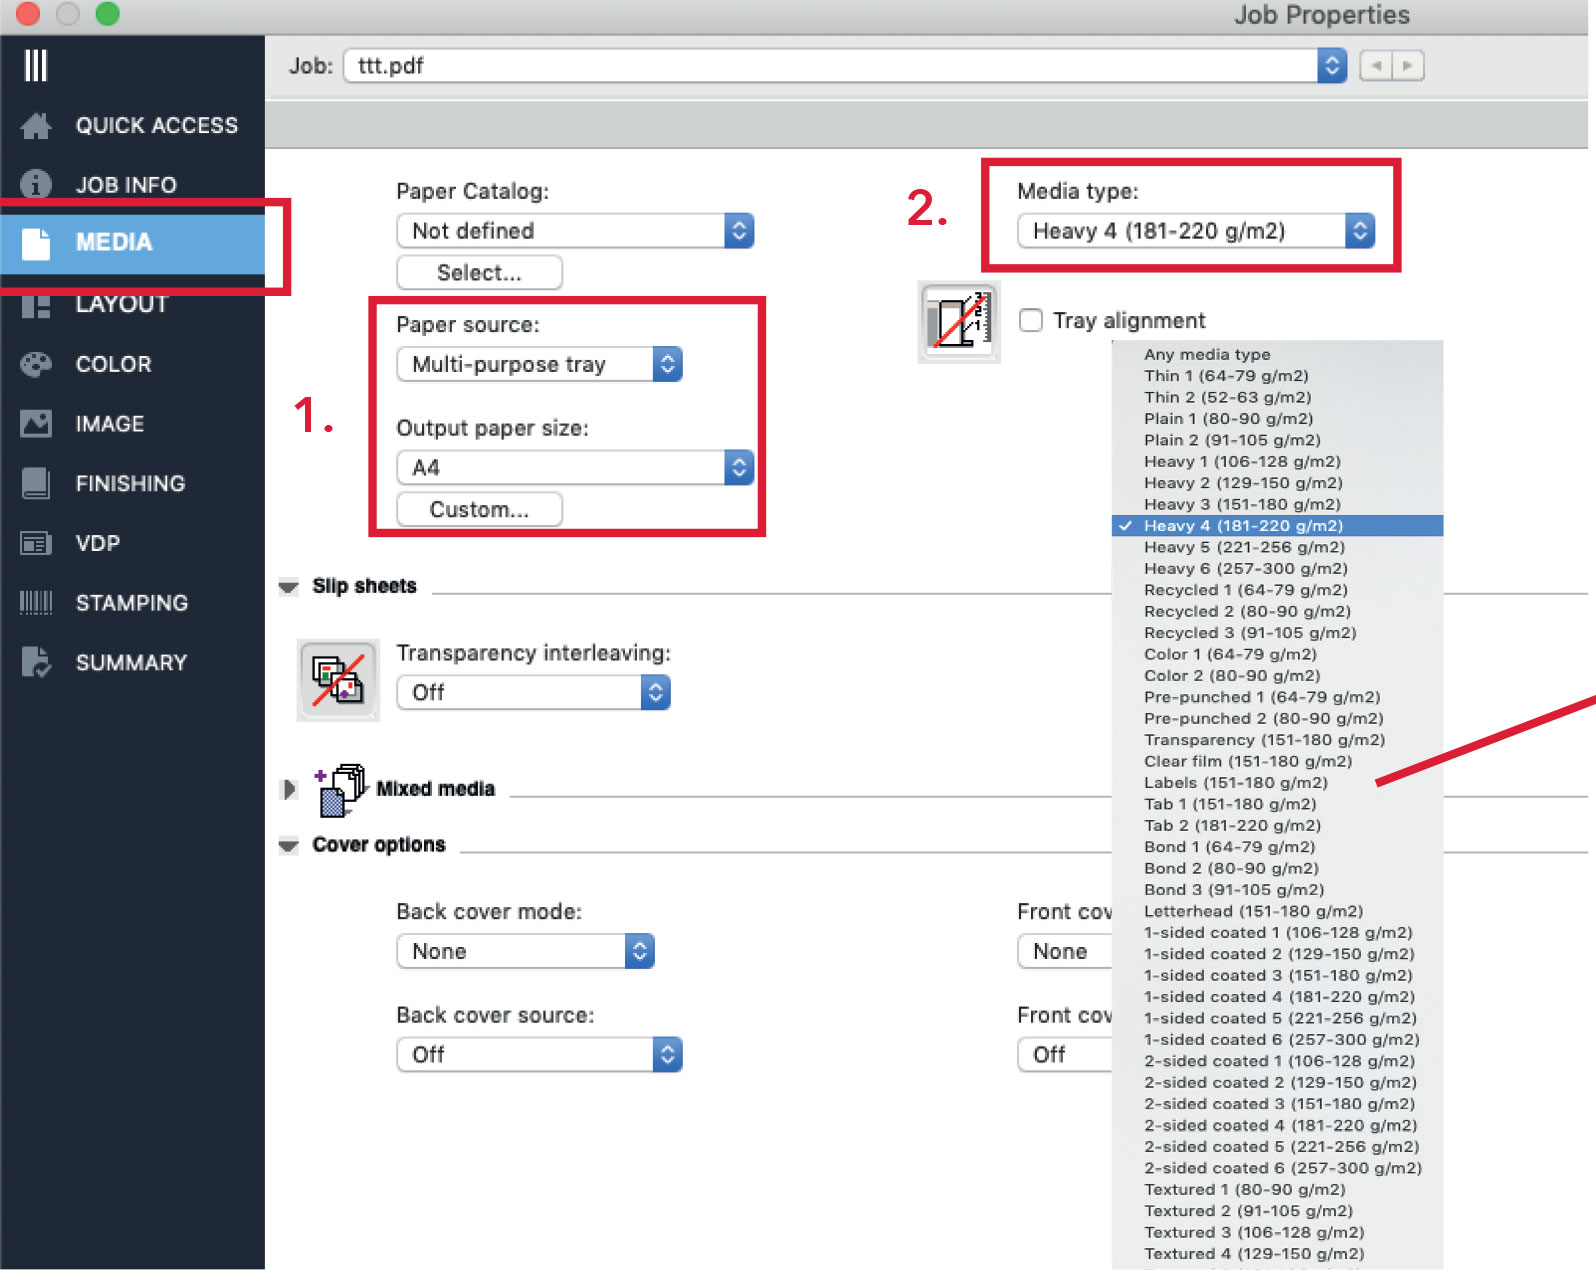
- Upload your pdf 2001 file as always into the Fiery Command workstation Held folder and double click your file to open the properties/setup window. Select MEDIA in the left column. <br> | |||
[[File: Canon_Paperguide1.jpg]] | |||
1. Manually select the multi-purpose tray as paper source and chose your paper size.<br> | |||
2. Instead of using the paper catalog, you use the '''media type menu''' to select the weight of your paper.<br><br> | |||
For matt paper use the “heavy” settings, for glossy and coated paper use the “2-sided coated” settings. <br><br> | |||
'''When in doubt ask the station instructor for help.'''<br> | |||
<br> | |||
== 5. printing a magazine == | |||
You need to have a PDF (PDF/X: a:2001) with single pages, so no spreads.<br> | |||
Preferably a total amount of pages that is devidable by 4, so 8, 12, 16, 20, 24 etc.<br> | |||
Otherwise you will have blank pages in your magazine.<br> | |||
Drag it to the '''held folder''' and choose a '''Preset''' that begins with Booklet.<br> | |||
The standard setting is for a "self cover" magazine. Then the cover is the same paper as the rest.<br> | |||
If you have less or as much as 24 pages (= 6 sheets), you can have it stapled by the machine. Go to "Finishing" and choose "Saddle Stitch". With all the presets you can click Print now and the complete magazine falls out of the machine, only the "Booklet_manual_Feed" asks for more settings.<br> | |||
<br> | |||
'''Booklet on other paper than the papers already in the Canon printer'''<br> | |||
You can choose paper from our collection (drawers 1-22) or even buy your own paper somewhere else. In these cases you have to pick the right paper from the Paper Catalog or pick a Media Type. Do not forget to Define Cover in the Layout Menu. The printer will first print the cover, also when it is a self cover. So when you cover is a separate document, you also have to go to "Define Cover". For stapling, see above.<br> | |||
<br> | |||
'''Gluebinding'''<br> | |||
When you want a gluebinded book, ask us to turn the machine on. That will take at least a half hour. | |||
You can use the booklet function as well, but now turn off the folding and stapling in Finishing. You can cut the printed sheets in half and make one pile. Remember that, if you have a lot of pages (<100) you need a spine in your cover. Make two carves with a folding bone for the spine. In the glue binder, the line close to the back of your cover should align with the arrow on the glue binder where you put your cover.<br> | |||
You can also print on A4 if you are making an A4 booklet. Now you have to cut off the paper on the left side before glue binding. It is cheaper though to print on A3 and cut in half. To be save, print the booklet smaller than A4 (95% or lower) so there is still a flexible margin for the cover.<br><br> | |||
== 6. avoid paper jams == | |||
It will happen! <br><br> | |||
But when you follow these rules, you can '''avoid''' or minimise the paper jams.<br><br> | |||
1. Do not mix up Clear Film with Tracing Paper.<br> | |||
2. Put '''at least 10 sheets''' more than you are printing in the multi purpose tray. <br> | |||
3. Let the pile of paper breathe. Take the ends, hold firm and twist a little. Now some air gets in between the sheets to prevent them to get stuck to another sheet.<br> | |||
4. Do not print double sided on paper thicker than 250 grams. Glossy goes fine, Greenlabel not. If it gets stuck more than two times in a row, print your paper twice single sided.<br> | |||
5. Glossy 115 A3 with a full black print on it will get stuck frequently in the fuser. Maybe because the machine heatens up too much there. Wait a minute before trying again. Do not print a lot of very black images full size A3 directly after each other. <br> | |||
6. Do not let the printer staple more than 6 sheets 120 grams (24 page magazine), 4 sheets 160 grams, 2 sheets 250 gram.<br> | |||
7. '''With 'YOUR OWN PAPER' we try twice'''. So if it does not print after the second try, or it gets jammed, we skip your paper. <br> | |||
8. Textured aquarel paper will be likely to jam. Also already rolled up paper or damaged paper.<br> | |||
9. Do not print paper that is not cut properly. A paper that is 21 cm X 28 cm will jam if you send it as an A4. | |||
At the printer's paper tray<br> | |||
[[File: Canon_Paperguide2.jpg]]<br> | |||
Put your paper in the multi-purpose tray and close the slides until the printer recognises | |||
your paper size. <br> | |||
Press ''change'' at paper type.<br> | |||
[[File: Canon_Paperguide3.jpg]]<br> | |||
To find the paper type menu you need for your own paper, select ''standard paper type'' in the drop-down menu on the left.<br> | |||
[[File: Canon_Paperguide4.jpg]]<br> | |||
Use the menu to select ''the same paper type'' you selected in the printing program.<br> | |||
Press ok twice and you are ready to go. | |||
Latest revision as of 12:36, 1 November 2023
1. Drag to Held
- drag your pdf from the desktop to the line called "Held"
- double-click your file to open the options window
2. Fill in the Quick Access
Fill in the fields according to your design
For thin paper (100-160 grams) you start with PRESETS.
120 gram A4 and A3, 160 gram and 100 gram green label are already in the machine,
we named the trays 1,2,3 and paper deck
For paper from our own collection (drawer 1 - drawer 22) you start with the PAPER CATALOG.
if you brought your own paper, use MEDIA TYPE and find a description that suits.
1. How many copies do you need?
2. choose your desired paper-size (A4, A3)
3. what kind of paper would you like to print on?
- The numbers in the paper catalogue match the numbers on our paper drawers.
- Media type will automatically change.
4. The orientation, or 2-sided printing has to be chosen. You can choose between Short Edge and Long Edge.
Landscape files should be Short Edge
Portrait files should be Long Edge.
3. Send to Print
- click 'OK' to save your setting
- if the printer is free you can click "print"
4. Adding paper manually
If you bought paper somewhere else, beware of three aspects of the paper: the weight, the size and if it is glossy or matte. Try to find the most similar paper in our own paper selection, using our paper catalog. If there is no such paper in our drawers, go to Media Type and find the right description there.
- Make sure to check the package of you paper for the weight of the paper:
The Canon C600i can print on up to 300 grams paper.
- Upload your pdf 2001 file as always into the Fiery Command workstation Held folder and double click your file to open the properties/setup window. Select MEDIA in the left column.
1. Manually select the multi-purpose tray as paper source and chose your paper size.
2. Instead of using the paper catalog, you use the media type menu to select the weight of your paper.
For matt paper use the “heavy” settings, for glossy and coated paper use the “2-sided coated” settings.
When in doubt ask the station instructor for help.
5. printing a magazine
You need to have a PDF (PDF/X: a:2001) with single pages, so no spreads.
Preferably a total amount of pages that is devidable by 4, so 8, 12, 16, 20, 24 etc.
Otherwise you will have blank pages in your magazine.
Drag it to the held folder and choose a Preset that begins with Booklet.
The standard setting is for a "self cover" magazine. Then the cover is the same paper as the rest.
If you have less or as much as 24 pages (= 6 sheets), you can have it stapled by the machine. Go to "Finishing" and choose "Saddle Stitch". With all the presets you can click Print now and the complete magazine falls out of the machine, only the "Booklet_manual_Feed" asks for more settings.
Booklet on other paper than the papers already in the Canon printer
You can choose paper from our collection (drawers 1-22) or even buy your own paper somewhere else. In these cases you have to pick the right paper from the Paper Catalog or pick a Media Type. Do not forget to Define Cover in the Layout Menu. The printer will first print the cover, also when it is a self cover. So when you cover is a separate document, you also have to go to "Define Cover". For stapling, see above.
Gluebinding
When you want a gluebinded book, ask us to turn the machine on. That will take at least a half hour.
You can use the booklet function as well, but now turn off the folding and stapling in Finishing. You can cut the printed sheets in half and make one pile. Remember that, if you have a lot of pages (<100) you need a spine in your cover. Make two carves with a folding bone for the spine. In the glue binder, the line close to the back of your cover should align with the arrow on the glue binder where you put your cover.
You can also print on A4 if you are making an A4 booklet. Now you have to cut off the paper on the left side before glue binding. It is cheaper though to print on A3 and cut in half. To be save, print the booklet smaller than A4 (95% or lower) so there is still a flexible margin for the cover.
6. avoid paper jams
It will happen!
But when you follow these rules, you can avoid or minimise the paper jams.
1. Do not mix up Clear Film with Tracing Paper.
2. Put at least 10 sheets more than you are printing in the multi purpose tray.
3. Let the pile of paper breathe. Take the ends, hold firm and twist a little. Now some air gets in between the sheets to prevent them to get stuck to another sheet.
4. Do not print double sided on paper thicker than 250 grams. Glossy goes fine, Greenlabel not. If it gets stuck more than two times in a row, print your paper twice single sided.
5. Glossy 115 A3 with a full black print on it will get stuck frequently in the fuser. Maybe because the machine heatens up too much there. Wait a minute before trying again. Do not print a lot of very black images full size A3 directly after each other.
6. Do not let the printer staple more than 6 sheets 120 grams (24 page magazine), 4 sheets 160 grams, 2 sheets 250 gram.
7. With 'YOUR OWN PAPER' we try twice. So if it does not print after the second try, or it gets jammed, we skip your paper.
8. Textured aquarel paper will be likely to jam. Also already rolled up paper or damaged paper.
9. Do not print paper that is not cut properly. A paper that is 21 cm X 28 cm will jam if you send it as an A4.
At the printer's paper tray
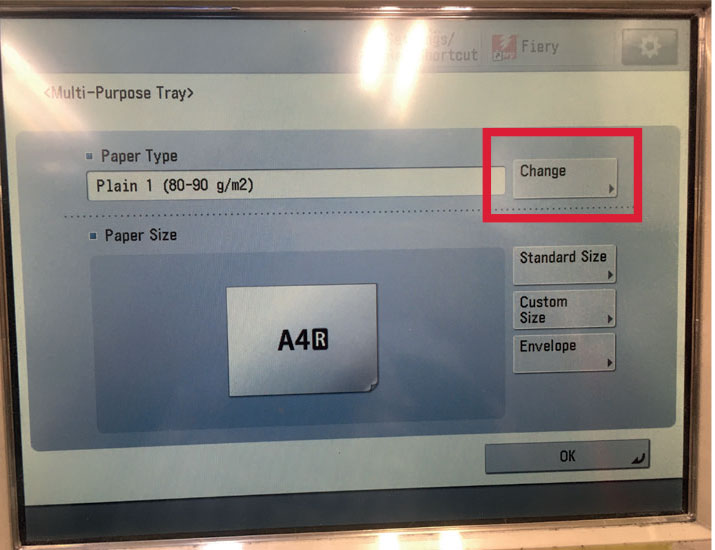
Put your paper in the multi-purpose tray and close the slides until the printer recognises
your paper size.
Press change at paper type.
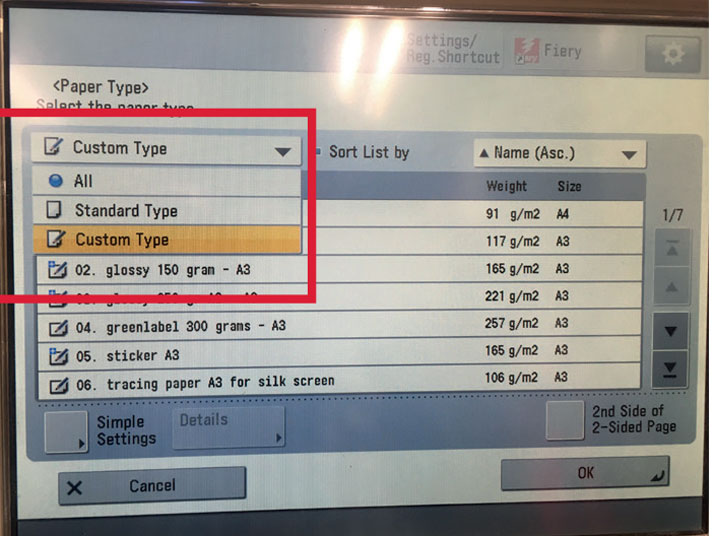
To find the paper type menu you need for your own paper, select standard paper type in the drop-down menu on the left.
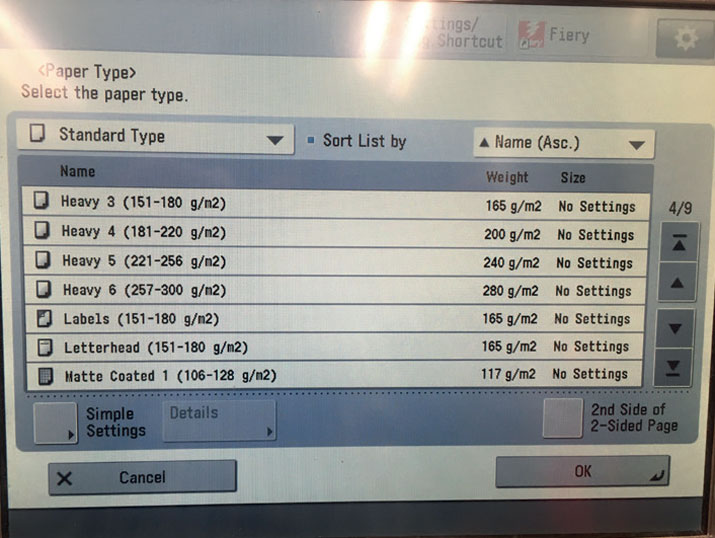
Use the menu to select the same paper type you selected in the printing program.
Press ok twice and you are ready to go.
