Printing booklets: Difference between revisions
Created page with " {{Template:Quickstartguide}} === Printing a Single Signature === When printing a book made with folded paper, Indesign has the function to set pages in the right order. <br> Please be aware that your document should have a total page count that is dividable by 4. <br> This is because a single sheet of paper that is folded in half, has 4 pages on it. <br> In this example the file has a total of 24 pages.<br><br> == 1. Drag to Held == File:Canon_Held.jpeg * d..." |
|||
| (6 intermediate revisions by one other user not shown) | |||
| Line 2: | Line 2: | ||
{{Template:Quickstartguide}} | {{Template:Quickstartguide}} | ||
== Printing a Single Signature == | |||
When printing a book made with folded paper, Indesign has the function to set pages in the right order. <br> | When printing a book made with folded paper, Indesign has the function to set pages in the right order. The instructions below will help you print your booklet directly to the HR Printers. To print on the Cannon, please use our PDF exporting instructions. <br> | ||
Please be aware that your document should have a total page count that is dividable by 4. | Please be aware that your document should have a total page count that is dividable by 4. This is because a single sheet of paper that is folded in half, has 4 pages on it. <br> | ||
This is because a single sheet of paper that is folded in half, has 4 pages on it. <br> | |||
In this example | You can print a booklet also from Acrobat. This disadvantage is that pages will not touch each other in the spine, but there will be a gap. So only do this when there are no full page photo's in your design.<br> | ||
In Indesign you will not have this gap.<br> | |||
<br> | |||
In this example you print directly from InDesign. This file has a total of 24 pages.<br><br> | |||
=== 1. Step one === | |||
[[File:indesign_SigBooklet_Step1.png]] | |||
First we will go over the steps when printing a single signature booklet. <br> | |||
Go to '''File > Print Booklet'''. | |||
The menu that pops-up has a couple of rele-vant options. Make sure the Booklet Type (1) is set to '''2-up Saddle Stitch'''. <br> | |||
Click '''Print Settings''' (2) to make more detailed settings. | |||
=== 2. Step Two === | |||
[[File:indesign_SigBooklet_Step2.png]] | |||
First select the right printer (3) - in our case '''HR-FollowMe'''. <br> | |||
In the lower half of the menu you should select '''Print Blank Pages''' (4) <br> | |||
=== 3. Step Three === | |||
<br> | |||
[[File:indesign_SigBooklet_Step3.png]]<br> | |||
First select the '''size of paper''' you are going to print on (5)<br> | |||
Set the '''Orientation''' (6) to landscape <br> | |||
Set the page '''position''' (7) to Centered. <br> | |||
Scale if necessary. <br> | |||
If necessary (and your paper has enough space left over) you can print Crop Marks and Bleed in '''Marks and Bleed''' (8)<br> | |||
Now we need to do the settings for the printer (9) - click it.<br> | |||
=== 4. Step Four === | |||
[[File:indesign_SigBooklet_Step4.png]]<br> | |||
[[File:indesign_SigBooklet_Step4.png]]<br> | |||
Switch Layout (10) to '''Finishing''' from the drop-down menu.<br> | |||
Make sure that you here select one of the two '''Short Edge''' options (11). | |||
It does not matter which one, but if it is set to Long Edge, every second page will be printer upside down.<br> | |||
=== 5. Step Five === | |||
Click '''Print> OK''' <br> | |||
Now we are back in the menu we started with. Click '''Preview''' (left top corner) to see if everything is set properly. | |||
In our example, the first preview page should show both page 1 and 24, the last one page 12 and 13. <br> | |||
You can now press '''Print'''. | |||
== Printing a Multiple Signatures Booklet == | |||
When printing a book made with folded paper, Indesign has the function to set pages in the right order. The instructions below will help you print your booklet directly to the HR Printers. To print on the Cannon, please use our PDF exporting instructions. <br> | |||
Please be aware that your document should have a total page count that is dividable by 4. This is because a single sheet of paper that is folded in half, has 4 pages on it. <br> | |||
In this example the file has a total of 24 pages.<br><br> | |||
== 1. | === 1. Step one === | ||
[[File: | [[File:indesign_MultiBooklet_Step1.png]]<br> | ||
First we will go over the steps when printing a single signature booklet. <br> | |||
Go to '''File > Print Booklet'''<br> | |||
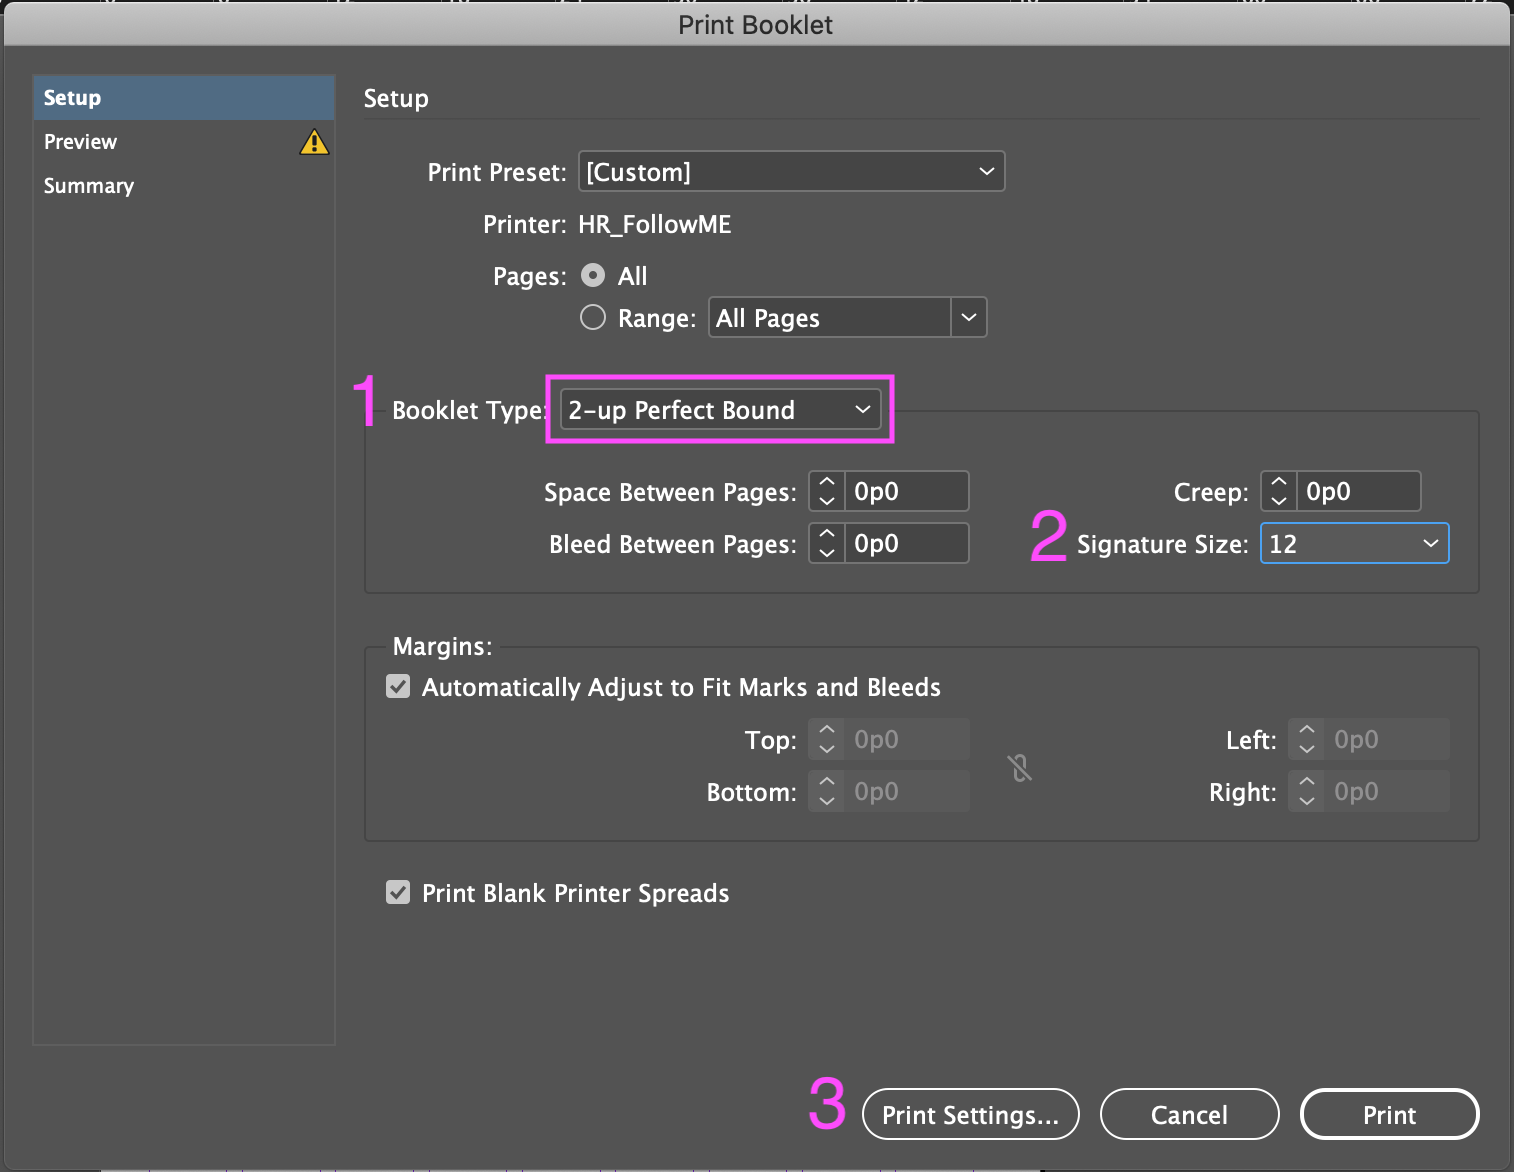
Now we need to switch the Booklet Type to '''2-up Perfect Bound''' (1). <br> | |||
Set the '''Signature Size''' (2) to what ever works for your book. <br> | |||
In our example we can make two signatures of 12 pages, because our total page count is 24. | |||
Click '''Print Settings''' (3) to make more detailed settings.<br> | |||
=== 2. Step Two === | |||
2. | |||
[[File:indesign_MultiBooklet_Step2.png]]<br> | |||
First select the right printer (4) - in our case '''HR-FollowMe'''.<br> | |||
In the lower half of the menu you should select '''Print Blank Pages''' (5).<br> | |||
== 3. | === 3. Step Three === | ||
<br> | <br> | ||
[[File: | [[File:indesign_SigBooklet_Step3.png]]<br> | ||
First select the '''size of paper''' you are going to print on (5)<br> | |||
Set the '''Orientation''' (6) to landscape <br> | |||
Set the page '''position''' (7) to Centered. <br> | |||
Scale if necessary. <br> | |||
If necessary (and your paper has enough space left over) you can print Crop Marks and Bleed in '''Marks and Bleed''' (8)<br> | |||
Now we need to do the settings for the printer (9) - click it.<br> | |||
=== 4. Step Four === | |||
[[File:indesign_SigBooklet_Step4.png]]<br> | |||
[[File:indesign_SigBooklet_Step4.png]]<br> | |||
Switch Layout (10) to '''Finishing''' from the drop-down menu.<br> | |||
''' | Make sure that you here select one of the two '''Short Edge''' options (11). | ||
It does not matter which one, but if it is set to Long Edge, every second page will be printer upside down.<br> | |||
=== 5. Step Five === | |||
Click '''Print> OK''' <br> | |||
Now we are back in the menu we started with. Click '''Preview''' (left top corner) to see if everything is set properly. | |||
In our example, the first preview page should show both page 1 and 24, the last one page 12 and 13. <br> | |||
You can now press '''Print'''. | |||
Latest revision as of 10:25, 1 September 2023
Printing a Single Signature
When printing a book made with folded paper, Indesign has the function to set pages in the right order. The instructions below will help you print your booklet directly to the HR Printers. To print on the Cannon, please use our PDF exporting instructions.
Please be aware that your document should have a total page count that is dividable by 4. This is because a single sheet of paper that is folded in half, has 4 pages on it.
You can print a booklet also from Acrobat. This disadvantage is that pages will not touch each other in the spine, but there will be a gap. So only do this when there are no full page photo's in your design.
In Indesign you will not have this gap.
In this example you print directly from InDesign. This file has a total of 24 pages.
1. Step one
First we will go over the steps when printing a single signature booklet.
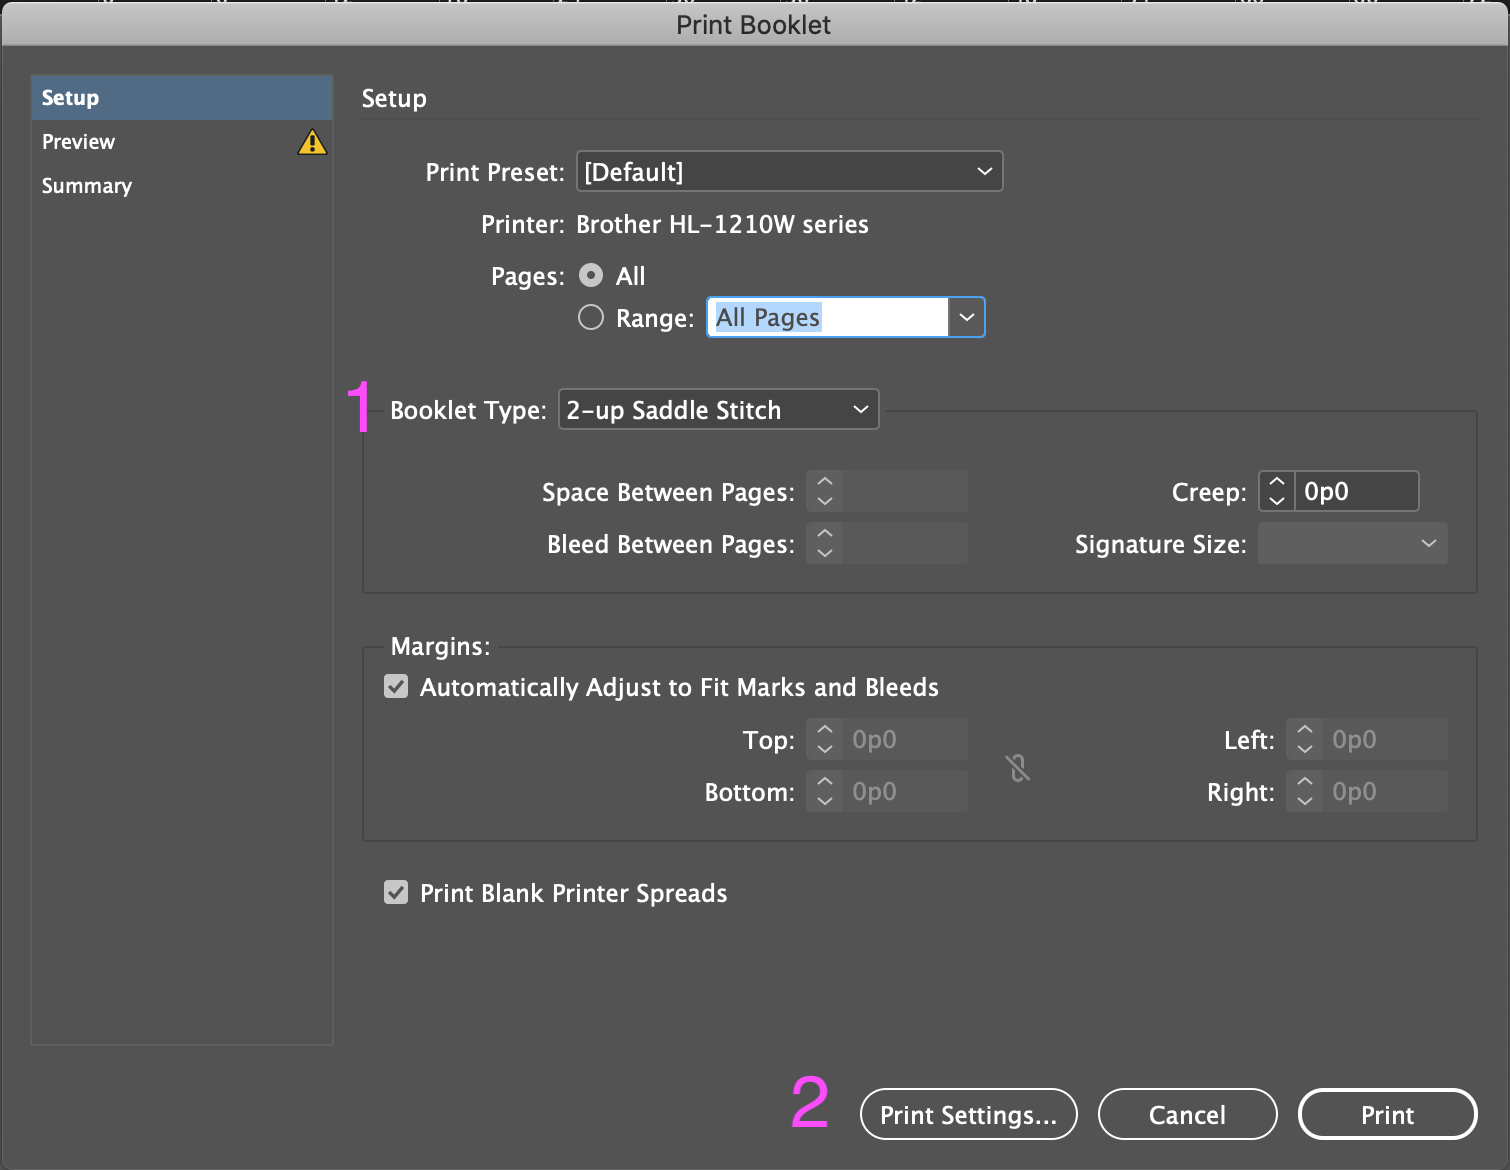
Go to File > Print Booklet.
The menu that pops-up has a couple of rele-vant options. Make sure the Booklet Type (1) is set to 2-up Saddle Stitch.
Click Print Settings (2) to make more detailed settings.
2. Step Two
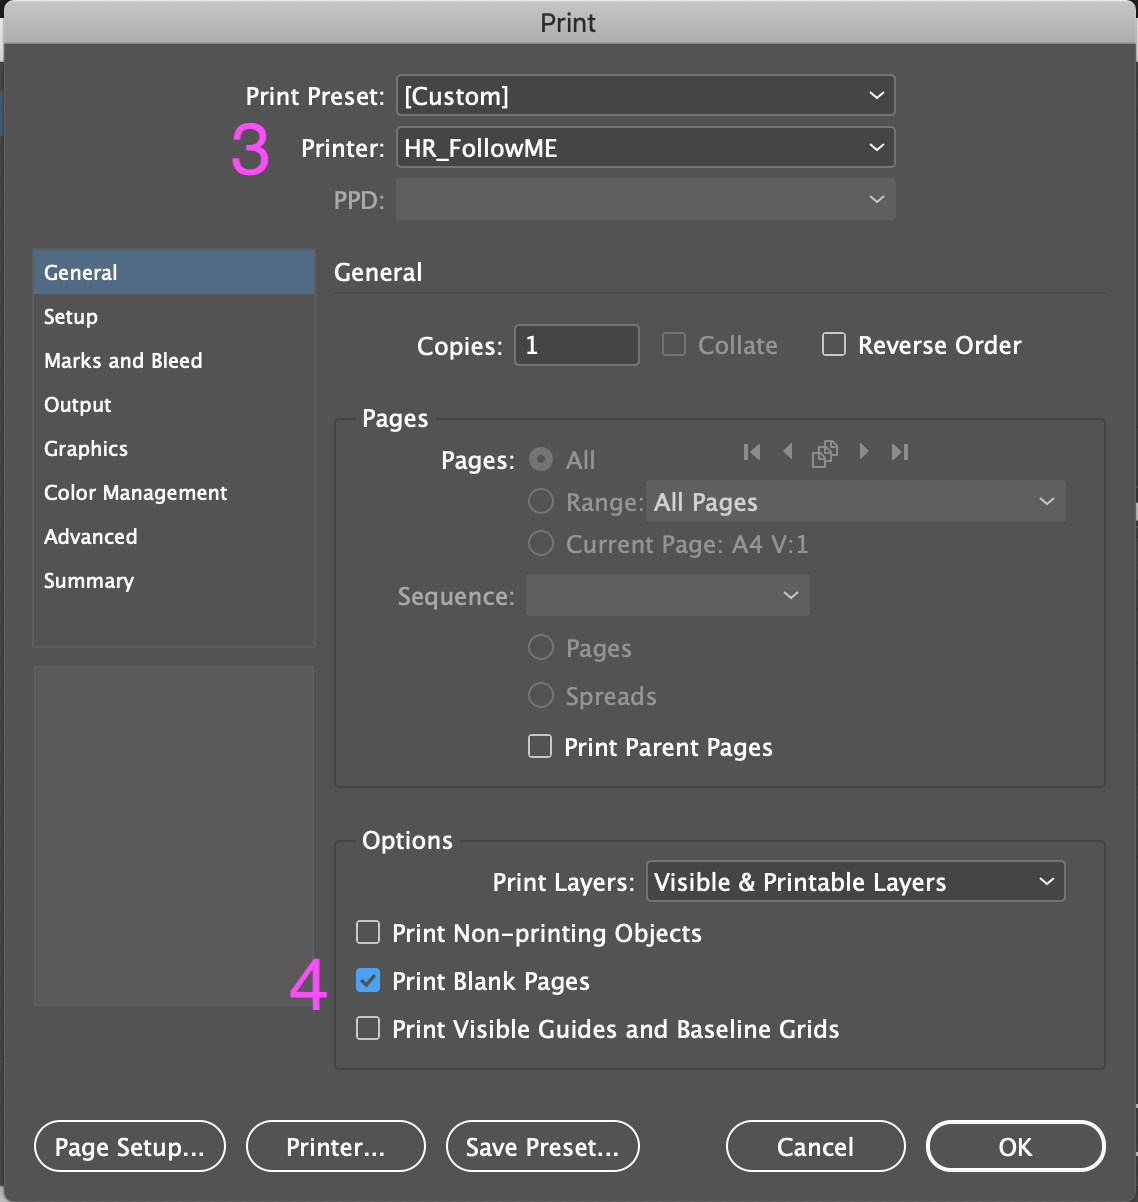
First select the right printer (3) - in our case HR-FollowMe.
In the lower half of the menu you should select Print Blank Pages (4)
3. Step Three
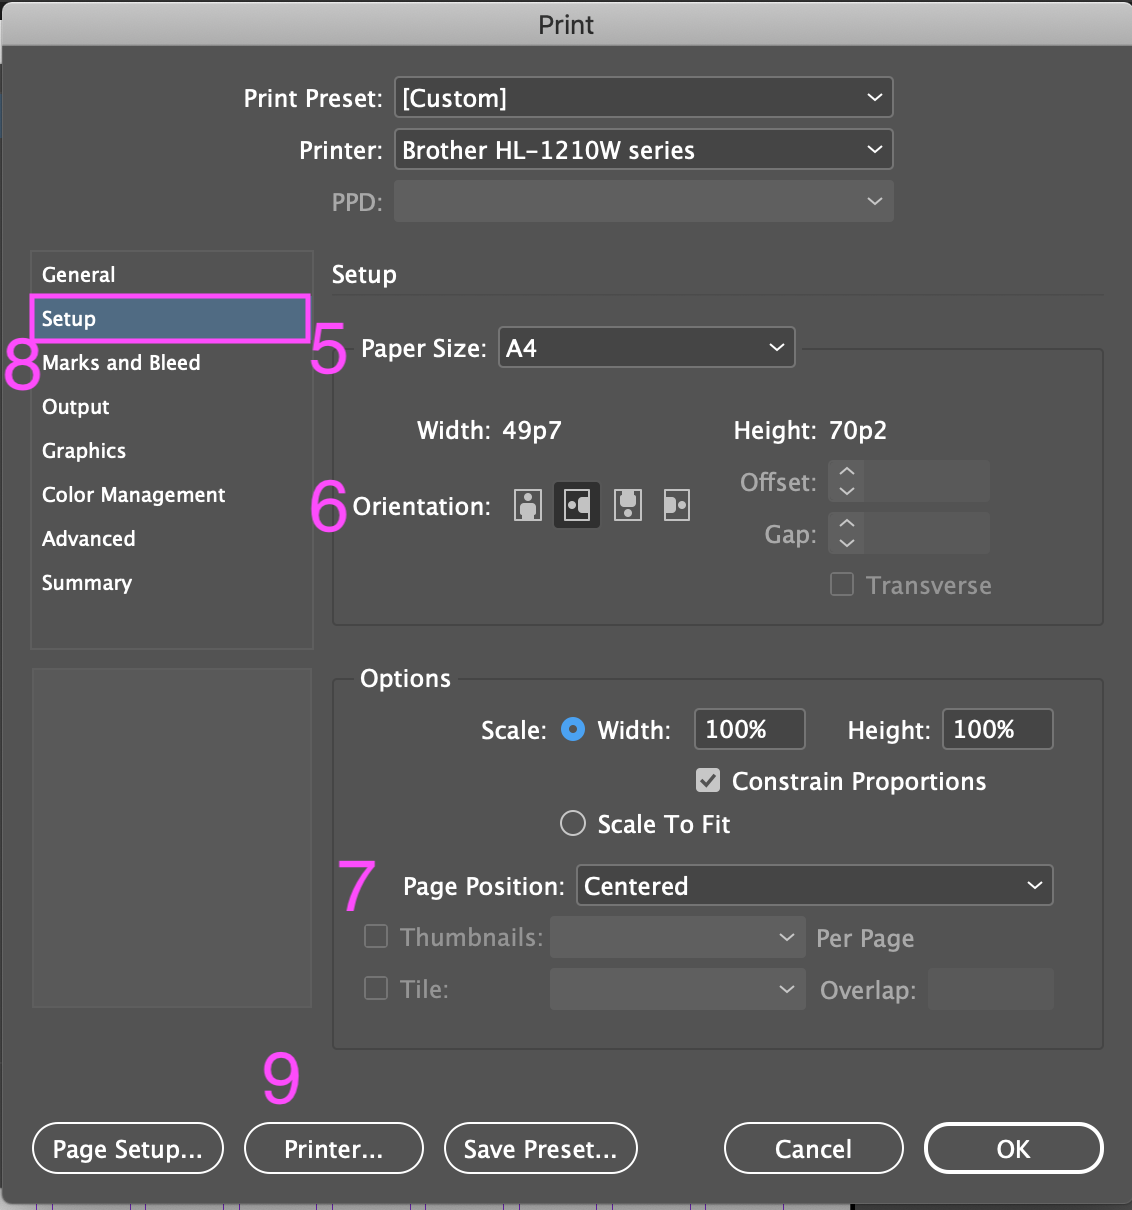
First select the size of paper you are going to print on (5)
Set the Orientation (6) to landscape
Set the page position (7) to Centered.
Scale if necessary.
If necessary (and your paper has enough space left over) you can print Crop Marks and Bleed in Marks and Bleed (8)
Now we need to do the settings for the printer (9) - click it.
4. Step Four
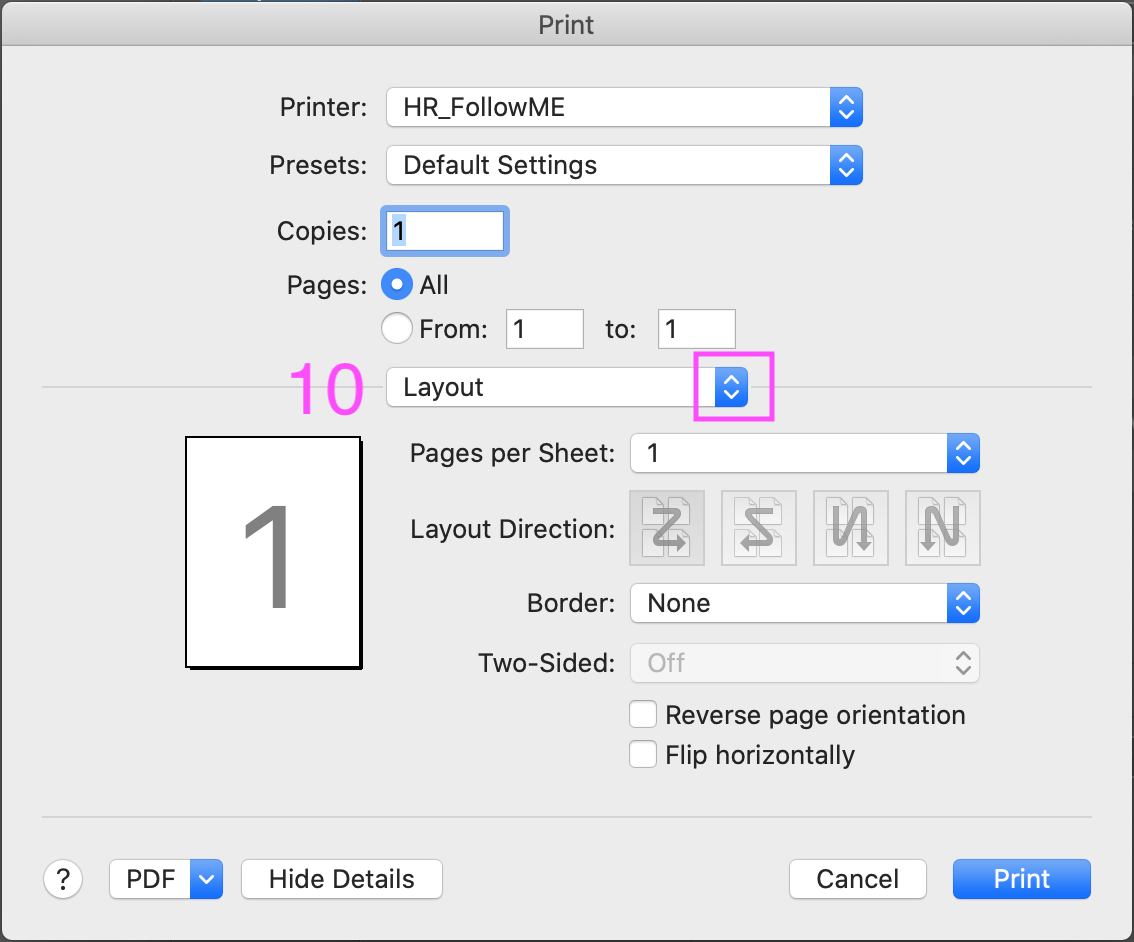
Switch Layout (10) to Finishing from the drop-down menu.
Make sure that you here select one of the two Short Edge options (11).
It does not matter which one, but if it is set to Long Edge, every second page will be printer upside down.
5. Step Five
Click Print> OK
Now we are back in the menu we started with. Click Preview (left top corner) to see if everything is set properly.
In our example, the first preview page should show both page 1 and 24, the last one page 12 and 13.
You can now press Print.
Printing a Multiple Signatures Booklet
When printing a book made with folded paper, Indesign has the function to set pages in the right order. The instructions below will help you print your booklet directly to the HR Printers. To print on the Cannon, please use our PDF exporting instructions.
Please be aware that your document should have a total page count that is dividable by 4. This is because a single sheet of paper that is folded in half, has 4 pages on it.
In this example the file has a total of 24 pages.
1. Step one
First we will go over the steps when printing a single signature booklet.
Go to File > Print Booklet
Now we need to switch the Booklet Type to 2-up Perfect Bound (1).
Set the Signature Size (2) to what ever works for your book.
In our example we can make two signatures of 12 pages, because our total page count is 24.
Click Print Settings (3) to make more detailed settings.
2. Step Two
File:Indesign MultiBooklet Step2.png
First select the right printer (4) - in our case HR-FollowMe.
In the lower half of the menu you should select Print Blank Pages (5).
3. Step Three
First select the size of paper you are going to print on (5)
Set the Orientation (6) to landscape
Set the page position (7) to Centered.
Scale if necessary.
If necessary (and your paper has enough space left over) you can print Crop Marks and Bleed in Marks and Bleed (8)
Now we need to do the settings for the printer (9) - click it.
4. Step Four
Switch Layout (10) to Finishing from the drop-down menu.
Make sure that you here select one of the two Short Edge options (11).
It does not matter which one, but if it is set to Long Edge, every second page will be printer upside down.
5. Step Five
Click Print> OK
Now we are back in the menu we started with. Click Preview (left top corner) to see if everything is set properly.
In our example, the first preview page should show both page 1 and 24, the last one page 12 and 13.
You can now press Print.
