Courses/Essential HTML: Difference between revisions
No edit summary |
|||
| Line 205: | Line 205: | ||
* Move the HTML file to a different directory | * Move the HTML file to a different directory | ||
* Try to make all the local files are '''not broken''' in HTML file | * Try to make all the local files are '''not broken''' in HTML file | ||
| Line 239: | Line 233: | ||
== | =Day 3: audio,video,canvas= | ||
In the latest version of HTML, HTML5 audio-visual media became supported by HTML, without the need for flash plug-ins. Audio and video became as common to HTML, as images. | |||
==How to: codecs== | |||
In order to play audio or video you need to make sure the audio and videos of your pages are readable by all browsers. This means you need to correctly '''choose the codecs you'll use to encode your audio/video'''. | |||
The safest option is to encode: | |||
* audio as: mp3 or aac | |||
* video as: mp4(h.264) | |||
To convert your files according to these codecs you can use the online conversion site: http://hdconvert.com/ | |||
==How to: audio tag== | |||
https://developer.mozilla.org/en-US/docs/Web/HTML/Element/audio | |||
<pre> | |||
<audio src="myaudio.mp3"></audio> | |||
</pre> | |||
===<nowiki><audio></nowiki> arguments=== | |||
Besides the src other arguments can be given to audio tag: | |||
* autoplay: starts playing as the page loads | |||
* controls: will show the controls for the audio player | |||
* loop: audio will loop | |||
* volume: playback volume, it ranges from 0.0 (silent) to 1.0 (loudest). | |||
==How to: video== | |||
https://developer.mozilla.org/en-US/docs/Web/HTML/Element/video | |||
<pre> | |||
<video src="myvideo.mp4"></video> | |||
</pre> | |||
===<nowiki><video></nowiki> arguments=== | |||
same as audio tag arguments | |||
==tracks== | |||
https://developer.mozilla.org/en-US/docs/Web/HTML/Element/track | |||
Both audio and video tags allow for a child <nowiki><track></nowiki> tag. | |||
Track lets you specify timed text tracks, such as a subtitle track. | |||
tracks can be: | |||
* [http://en.wikipedia.org/wiki/SubRip SubRip] .srt | |||
* [https://developer.mozilla.org/en-US/docs/Web/API/Web_Video_Text_Tracks_FormatWebVTTT] .vtt | |||
<track kind="captions" src="foo.en.vtt" srclang="en" label="English"> | |||
'''Knowing all this can you transform you browser in a karaoke machine using an mp3 or mp4 and the corresponding .srt file''' | |||
==<span style="background:yellow">canvas<span>== | |||
https://developer.mozilla.org/en-US/docs/Web/API/HTMLCanvasElement | |||
https://developer.mozilla.org/en-US/docs/Web/API/Canvas_API/Tutorial/Basic_usage | |||
[http://www.html5canvastutorials.com/ canvas tutorial] | |||
[http://cheatsheetworld.com/programming/html5-canvas-cheat-sheet/ canvas cheat sheet] | |||
<nowiki><canvas></nowiki> creates a fixed-size drawing surface in one or more rendering contexts (2D or 3D), which are used to create and manipulate the content shown. | |||
drawing with code (01) | |||
Canvas, like the name indicates, is a blank canvas where images can be drawn. | |||
You can '''draw''' by choosing '''a drawing context,''' which can either be 2D or 3D and '''draw through instructions'''. | |||
=== 2D Drawing Context=== | |||
My context | |||
var ctx = canvas.getContext("2d"); | |||
My drawing instructions to create a rectangle. | |||
ctx.fillStyle = "rgba(0, 0, 200, 0.5)"; | |||
ctx.fillRect (30, 30, 55, 50); | |||
All '''2D''' drawing methods are described in https://developer.mozilla.org/en-US/docs/Web/API/CanvasRenderingContext2D. | |||
For an example of a 2D canvas drawing see [[#2D sample]]. | |||
=== 3D Drawing Context=== | |||
To create '''3D''' drawings [https://www.khronos.org/webgl/ WebGL] 3D graphics API is used. | |||
Here are a few tutorials and and guides on it: | |||
http://learningwebgl.com/blog/ | |||
https://dev.opera.com/articles/introduction-to-webgl-part-1/ | |||
===canvas samples=== | |||
====2D sample==== | |||
<source lang="html4strict"> | |||
<!DOCTYPE html> | |||
<html> | |||
<head> | |||
<meta charset="utf-8"/> | |||
<script type="application/javascript"> | |||
function draw() { | |||
var canvas = document.getElementById("canvas"); | |||
if (canvas.getContext) { | |||
var ctx = canvas.getContext("2d"); | |||
//rectangle | |||
ctx.fillStyle = "rgba(0, 0, 200, 0.5)"; | |||
ctx.fillRect (30, 30, 55, 50); | |||
// text | |||
ctx.fillStyle = "black"; | |||
ctx.font = "48px serif"; | |||
ctx.fillText('Test', 10, 100); | |||
// path | |||
ctx.beginPath(); | |||
ctx.moveTo(0,0); | |||
ctx.lineWidth = 10; | |||
ctx.lineTo(0, 150); | |||
ctx.stroke(); | |||
== | } | ||
} | |||
</script> | |||
</head> | |||
<body onload="draw();"> | |||
<canvas id="canvas" width="150" height="150"></canvas> | |||
</body> | |||
</html> | |||
</source> | |||
Revision as of 10:12, 3 December 2014
<slidy theme="aa" />
Day 1 the Wold Wide Web
WWW (what ?)
HTML developed from the creation of the Wold Wide Web.
- World Wide Web, AKA www, AKA the Web, is not the Internet.
The Internet is essentially the motorway where many vehicles (or protocols) circulate, the Web is simply one of them. Others vehicles on the Internet are email, FTP, torrents, IRC chat, etc.
The Web is a network of interlinked pages, that are accessible through a Web Browser.
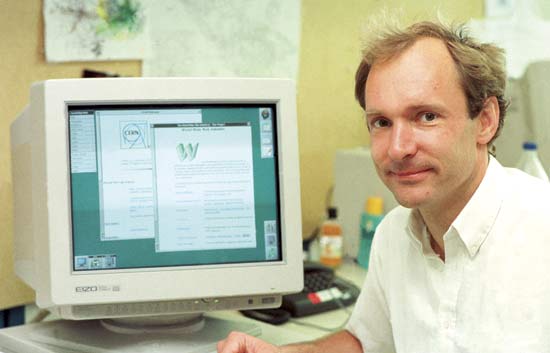
Tim Berners-Lee
The vision for what would become the Web came from Tim Berners-Lee who happened to be working at CERN in the late 1980s
a bloody mess at CERN
Tim Berners-Lee in 1980 worked as a software developer at CERN.
He was faced with a few facts that would make him muse about what would later become the Web.
- CERN's incredible abundance of knowledge and research
- CERN's equally abundance of different computer hardware/software, protocols, file formats, documentation systems
== a bloody mess
Inside CERN
a unified, global documentation system
Berners-Lee wanted to create a unified, global documentation system, that allowed CERN researchers to document and share their progress in both an easily readable easily writable way.
Enquire
Berners-Lee's first efforts went to the development of a program called ENQUIRE, a pet project to help him remember the connections among the various people, computers and projects at CERN.
"In Enquire I could type in a page of information about a person, a device or a program. Each page was a ‘node’ in the program, a little like an index card. The only way to create a new node was to make a link from and old node"
a single information space
The Enquire experiment got him thinking:
"Suppose all the information stored in computers everywhere were linked … Suppose I could program my computer to create a space in which anything could be linked to anything. All the bits of information in every computer at CERN, and on the planet, would be available to me and anyone else. These would be a single information space".
Proposal
In a proposal written to CERN's administration Berner-Lee listed the requirements for this global information space:
- accessible across networks - providing data to different computers
- distributed - allowing anyone to write information
- non hierarchical - no tree structures, but stuff connected to stuff.
http://info.cern.ch/images/proposal.gif
Tim Berner-Lee proposal
Hypertext
Provided an non hierarchical way of connecting pieces of information, by interlinking them, and resulting in a web of content.
Berner-Lee recognized the similarities between his concept for a single information space and the web like structure that hypertext allowed.
HTML
To put his ideas into practice Berner-Lee turned into one of the available markup languages, SGML. A snipped of SGML
He simplified, and added external hyperlink, to allow connection to external documents (in one direction).
<!DOCTYPE html>
<html>
  <head>
    <title>Hello World</title>
  </head>
  <body>
    <h1>Greetings</h1>
    <p>This is my homepage!</p>
  </body>
</html>
The marking is done by enclosing content in the element that will format it <element>content</element>
Editor, Browser, Go
- Editor - your html writing tool
- Browser - the interpreter of html, but also a debug and prototyping space
golden rules
- In HTML the content is given meaning or structure by being with an element or tag.
- An element or tag is formed by angel brackets "<" and ">", like <h1> - the heading1 element
- In order to format content with tags you need to enter the content between an opening and closing element. As in the following case:
<h1>My Title</h1>
- <h1> is the opening tag
- </h1> is the closing tag
- "My Title" is the content that will be formatted by the h1 tag and become a title
- Once open a tag must be closed, either with
- an end tag:
<h1>Closing Heading 1</h1>
- self-closing tag:
<img src="nice_picture.jpg" />
html essential structural elements
- doctype
<!DOCTYPE HTML>- an indication to the browser of what content will be given to it to interpret - html - all the content of an html file
- head - invisible content: page title, character encoding, styles, etc. (not essential)
- body - visible content
essential tags
Comments: <!-- comments -->
Header: <h1>,<h2>,<h3>,<h4>
Paragraph: <p>
Line break: <br />
italics: <i>
bold: <b>
lists: <ul> or <ol>
list items: <li>

div container: <div>
span: <span>

Hyperlink(requires arguments): <a href="http://thecolourclock.co.uk/">a link</a></code>
Image(requires arguments): img src="nice_picture.jpg" />
Resources
Historical: http://home.web.cern.ch/topics/birth-web - on the birth of the Web at CERN from CERN
Technical:
- https://developer.mozilla.org/en-US/docs/Web/HTML - HTML (HyperText Markup Language)
- https://developer.mozilla.org/en-US/docs/Web/HTML/Element - HTML element reference
- http://diveintohtml5.info - HTML 5
Day 2: the URL, linked and embed resources
A template html file, which you can use to build your html pages.
<!DOCTYPE HTML>
<html>
  <head>
    <!-- place meta-content here -->
  </head>
  <body>
    <!-- place content here -->
  </body>
</html>
URL
URL stands for Uniform Resource Locator. It is the global address for documents on the Web.
It is trough URLs that from our computers we request webpages and these appear in our browsers.
A URL , such as: http://mouchette.org/home/chezmoi.html be decomposed in to the following parts:
- http: the protocol
- mouchette.org: the domain name
- /home/chezmoi.html: the file path
Domain name
The domain name, such as https://www.google.com/ is a kind of central address to a website.
It is via the domain name that the user sends a request to the computer (known as server) where the website lives, and as a reply a (html) file is sent back to the user's browser.
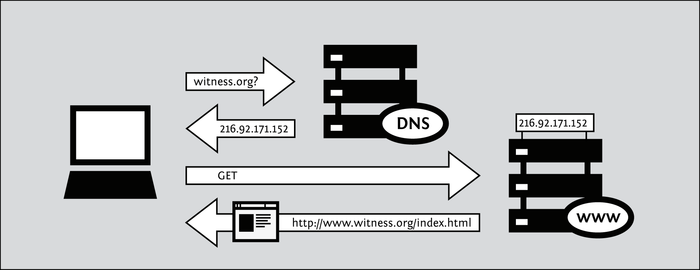
However this request and response journey is not so straight forward. That is because the domain name is not the true address, but an alias to the true address of the website.
The IP is the true address of a web page, or to be more precise, the address of the computer that hosts that website. As in the case of google.com its IP is 74.125.136.138
When a users types for a first time a URL on the browser, her request does not go straight to the computer that hosts that website. Instead the request goes to a central list - DNS server - that has information about what url belongs to each address and sends back to the user's browser the IP corresponding to that URL. That way the user's browser gets to know where (wo which IP) to send its requests, when that URL is typed.
In other words: "[If you want]to access the Witness Web site you would type in the www.witness.org address, also known as a domain name, instead of 216.92.171.152. Your computer then sends a message with this name to a DNS server. After the DNS server translates the domain name into an IP address, it shares that information with your computer. This system makes Web browsing and other Internet applications more human-friendly for humans, and computer-friendly for computers."
From http://en.flossmanuals.net/bypassing-censorship/ch006_chapter-1-how/
file path
The file path indicates the location of page inside the computer (aka server) that hosts this webpage.
In the URL http://mouchette.org/home/chezmoi.html it is indicated that the file we are requesting is inside the "home" folder and it is called "chezmoi.html".

Exercise:
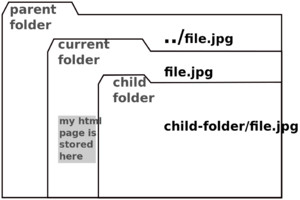
- Create an HTML file, that uses other local files (images, html files, etc), stored in parent, current and child folders.
- Move the HTML file to a different directory
- Try to make all the local files are not broken in HTML file
iframe
https://developer.mozilla.org/en-US/docs/Web/HTML/Element/iframe
The <iframe> Element embeds another HTML page into the current page.
The embedded elements can either be local or remote
iframe with remote content
The following iframe tag embed wdka website onto another html page:
<iframe src="http://wdka.hro.nl/" width="100%" height="300px" scrolling="yes" border="1px"></iframe>
embedding Googles services
https://developers.google.com/maps/documentation/embed/guide
The downside of using proprietary services like Google
De Geuzen's work Google Anxiety is an example of the vulnerability of using proprietary services and depend on them for you work. <youtube>YmkSuZq_azU</youtube> https://www.youtube.com/watch?v=YmkSuZq_azU
De Geuzen's Google Anxiety work broke during an exhibition, due to a change of policy by Google.
Day 3: audio,video,canvas
In the latest version of HTML, HTML5 audio-visual media became supported by HTML, without the need for flash plug-ins. Audio and video became as common to HTML, as images.
How to: codecs
In order to play audio or video you need to make sure the audio and videos of your pages are readable by all browsers. This means you need to correctly choose the codecs you'll use to encode your audio/video.
The safest option is to encode:
- audio as: mp3 or aac
- video as: mp4(h.264)
To convert your files according to these codecs you can use the online conversion site: http://hdconvert.com/
How to: audio tag
https://developer.mozilla.org/en-US/docs/Web/HTML/Element/audio
<audio src="myaudio.mp3"></audio>
<audio> arguments
Besides the src other arguments can be given to audio tag:
- autoplay: starts playing as the page loads
- controls: will show the controls for the audio player
- loop: audio will loop
- volume: playback volume, it ranges from 0.0 (silent) to 1.0 (loudest).
How to: video
https://developer.mozilla.org/en-US/docs/Web/HTML/Element/video
<video src="myvideo.mp4"></video>
<video> arguments
same as audio tag arguments
tracks
https://developer.mozilla.org/en-US/docs/Web/HTML/Element/track
Both audio and video tags allow for a child <track> tag.
Track lets you specify timed text tracks, such as a subtitle track.
tracks can be:
<track kind="captions" src="foo.en.vtt" srclang="en" label="English">
Knowing all this can you transform you browser in a karaoke machine using an mp3 or mp4 and the corresponding .srt file
canvas
https://developer.mozilla.org/en-US/docs/Web/API/HTMLCanvasElement
https://developer.mozilla.org/en-US/docs/Web/API/Canvas_API/Tutorial/Basic_usage
<canvas> creates a fixed-size drawing surface in one or more rendering contexts (2D or 3D), which are used to create and manipulate the content shown.
drawing with code (01)
Canvas, like the name indicates, is a blank canvas where images can be drawn. You can draw by choosing a drawing context, which can either be 2D or 3D and draw through instructions.
2D Drawing Context
My context
var ctx = canvas.getContext("2d");
My drawing instructions to create a rectangle.
 ctx.fillStyle = "rgba(0, 0, 200, 0.5)";
 ctx.fillRect (30, 30, 55, 50);
All 2D drawing methods are described in https://developer.mozilla.org/en-US/docs/Web/API/CanvasRenderingContext2D.
For an example of a 2D canvas drawing see #2D sample.
3D Drawing Context
To create 3D drawings WebGL 3D graphics API is used.
Here are a few tutorials and and guides on it:
http://learningwebgl.com/blog/
https://dev.opera.com/articles/introduction-to-webgl-part-1/
canvas samples
2D sample
<!DOCTYPE html>
<html>
  <head>
    <meta charset="utf-8"/>
    <script type="application/javascript">
      function draw() {
      var canvas = document.getElementById("canvas");
      if (canvas.getContext) {
      var ctx = canvas.getContext("2d");

      //rectangle
      ctx.fillStyle = "rgba(0, 0, 200, 0.5)";
      ctx.fillRect (30, 30, 55, 50);

      // text
      ctx.fillStyle = "black";
      ctx.font = "48px serif";
      ctx.fillText('Test', 10, 100);

      // path
      ctx.beginPath();
      ctx.moveTo(0,0);
      ctx.lineWidth = 10;
      ctx.lineTo(0, 150);
      ctx.stroke();

      }
      }
    </script>
  </head>
  <body onload="draw();">
    <canvas id="canvas" width="150" height="150"></canvas>
  </body>
</html>


