Courses/Design & Technique-Essential Web Design/02: Difference between revisions
div and span moved to next class |
No edit summary |
||
| Line 96: | Line 96: | ||
* Add to your weblog local images and links. | * Add to your weblog local images and links. | ||
* Move the HTML file to a different folder. | * Move the HTML file to a different folder. | ||
* Avoid broken images | * Avoid broken images links | ||
=Home work= | |||
* Start you blog | |||
* Write and/or include images about you, using the knowledge of HTML tags you learned in class | |||
<references/> | <references/> | ||
Revision as of 15:09, 6 September 2016
A Web page
- What is a web-page made of?
- What files do I save when I save a web-page?
Tools to make a web page
- HTML - the (markup) language
- content is marked with different "values"; e.g: paragraph, bold, italic, heading title, etc
- marking is done through tags that wrap the content
- Browser - the interpreter of HTML, but also a debug and prototyping tool. (Read about what goes on behind the scenes in a Web browser [1])
- Text editor - the tool to for designers/developers/programmers tooh write webpages (and programs)tot
essential HTML tags
Title Headers: <h1>,<h2>,<h3>,<h4>
Paragraph: <p>
Line break: <br />
italics: <i>
bold: <b>
hyper-links: <a>
image: <img />
comments: <!-- comments -->
http://publicationstation.wdka.hro.nl/go/kickoff/imgs/html.gif
- In order to format content with tags you need to enter the content between an opening and closing tag. As in the following case:
<h1>My Title</h1>
- <h1> is the opening tag
- </h1> is the closing tag
At times you'll find self-closing tags which have no content inside them, like horizontal rulers
or line breaks <br /> or <img />
Exercise:
- create the structure of your weblog and initial content about yourself - who you are, who you want, etc... , using these tags.
- Find a new tag (in the HTML source of another page or using search ) and use it in your weblog
Homework: Continue adding content (text, imgs, links, divs, etc) to your weblog
See HTML Element Reference[2] for a exhaustive list of the HTML tags.
<a> anchor tag - hyperlinks
remote links: Normally, like in the example above, you use links to point users to other sites. Those are remote links
<a href="http://www.worm.org/">Worm website</a>
<br/>
<a href="http://tentrotterdam.nl/">tentrotterdam.nl</a>
Note: the href (address) of a link has to be a complete URL: beginning with http or https
local links: to links to other files/pages you have created, you use local links. They allow to move within your website.
Go to next <a href="next.html">Next</a> page.
<img> attributes:
<img src="http://www.wdka.nl/wp-content/uploads/sites/4/2015/01/Project-Show_I1.jpeg" title="my pic" height="100px" width="200px"/>
<br/>
<img src="my-img.jpg" />
- src: location of the image
- title: title of the image
- width
- height
Get to know more and more about HTML tags
- https://developer.mozilla.org/en-US/docs/Web/HTML - HTML (HyperText Markup Language)
- https://developer.mozilla.org/en-US/docs/Web/HTML/Element - HTML element reference
- “Introduction to HTML” https://developer.mozilla.org/en-US/docs/Web/Guide/HTML/Introduction
HTML skeleton
The previous tags only provided content formatting, yet to create any working web-page we need to always place the content inside a HTML page skeleton.
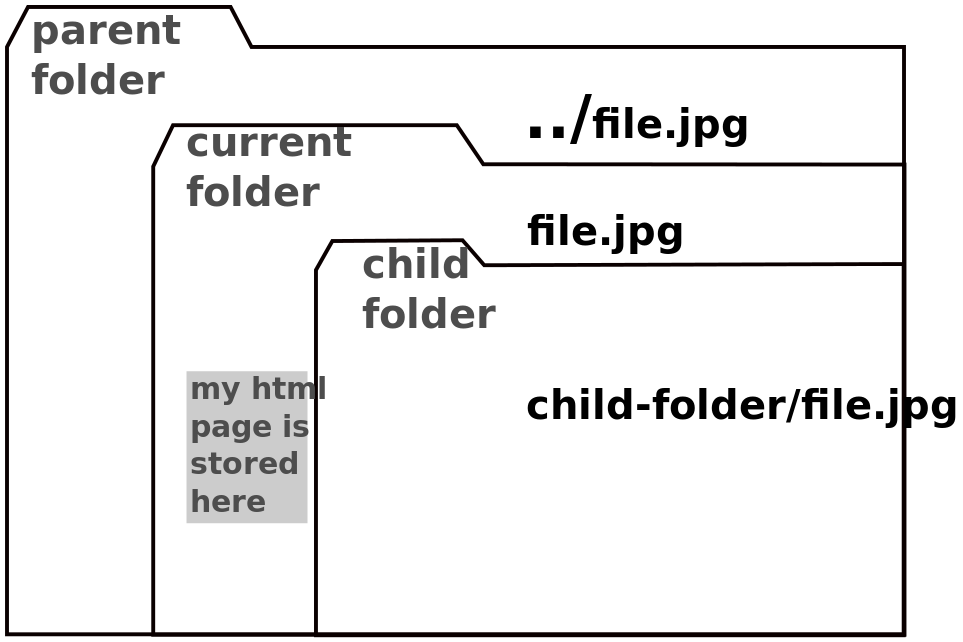
Local file paths
Local links and image are some times in parent or child folders, different from the folder of your webpage.
To get an image to load or link to land on the right file, you have to indicate the correct path to them.
Local file paths exercise
- Add to your weblog local images and links.
- Move the HTML file to a different folder.
- Avoid broken images links
Home work
- Start you blog
- Write and/or include images about you, using the knowledge of HTML tags you learned in class
- ↑ “Introduction to HTML” https://developer.mozilla.org/en-US/docs/Web/Guide/HTML/Introduction.
- ↑ Mozilla Foundation. “HTML Element Reference,” n.d. https://developer.mozilla.org/en-US/docs/Web/HTML/Element.


