User:0900998/year2
Contents
- 1 stephanie nieuwenhuisen // mail@stephanienieuwenhuisen.nl
- 2 circuit making class
- 3 keep-your-kid-in-bed-device
- 4 process > turn the device more into something playful
- 5 connecting the pir sensors and burning the circuit
- 6 new car
- 7 coding
- 8 presentation
- 9 what i would do if i had more time
- 10 what i learned from the project
stephanie nieuwenhuisen // mail@stephanienieuwenhuisen.nl
-Image1: Any picture that fits under the title “ the moment I knew what I wanted to do” there is not one particular moment for me that made me know what i wanted to do; i still don't know exactly what i want to do. things that pushed me into a direction are exhibitions like dismaland, street art (in for exambple berlin), and several museum visits in different countries
-Image 2: What do you make? (Tell us in one image and three sentences about creative background)
as a graphic designer i generally prefer to make physical items like printed objects like books and posters. i prefer to see my practice more widely and also like to expand it to other practices, like photography, fine arts and audiovisual.
-Image 3: What is your topic of interest? Explain a past/current topic or what you wish to explore)
at the moment i am particularly interested in street art/contemporary art. i think the message they usually try to bring across is important and often presented in a clever way to have more impact
-Image 4: What is your medium? (Explain what materials and tools you wish to use)
i don't have one specific tool or material i use; i like to work with things i am not (yet) familiar with. for this practice i hope to use more electronic and mechanical materials/tools to familiarise myself with circuits in order to be able to for example create moving objects that make sounds.


circuit making class


keep-your-kid-in-bed-device

I want to create a device that keeps children from going out of bed at night.
The device will work as following; when a child steps out of bed, a motionsensor/touch sensor will send a trigger to the device.
Through the speaker the monster will warn the child in various ways that it should stay in bed; or else..
The eyes will light up and it will slightly move forward to scare the child back in bed.
It can also make sleeping sounds and register sound and parents could tell their child 'not to wake up the monster'


'hacking' the remote is fairly easy; you take it apart, and you will see the spots where the buttons used to be.
some circuit boards will have it written on it, some don't but generally its pretty straight forward.
you will have to take off the buttons, and the upper one goes forward, the one under backward, left left and right right. in this case they are indicated with a grey/silver circle.
the only other wires you need to connect are the 5v/3.3v and the ground, which are indicated on the circuit board.
For the execution i will need;
- Toy car+remote
- Circuit or arduino
- Speaker
- Motion sensor/touch sensor(makeymakey?)
- Hairy fabric/a monster to put on the toy car
- LEDS as eyes
process > turn the device more into something playful
after the project pitch i wanted to make my idea a bit more playful, so i decided to put a motion sensor on each side of the car to make it always follow you.

a test with a light sensor, next step test with pir motion sensor

soldering plan with 4 pir sensors; the car/monster has a motion sensor on each side and will try to follow/turn towards the direction of the triggered sensor
the ground and the 5v are obviously not connected, but the 5v is connected to the 4 pir's and the ground is connected to the 4 pir's as well, with a different string. see more pictures at 'connecting the pir sensors and burning the circuit' to see how i did that.


re-soldering the connections on the remote with longer wires. unfortunately i didn't buy the female jumper cables for the pir-connections.
tried endlessly to solder them instead but it's just impossible. hope to be able to get them before the weekend!
using the posca markers for colourcoding the wires

trying to figure out how to code; it's starting to make more sense now!
connecting the pir sensors and burning the circuit

I was able to get the cables today, but unfortunately i burned the circuit of the controller by attaching a 9v instead of 2x 1,5v

new car


just got a new car, i hope i'm able to connect and get everything working in time
coding
in the file down here is the code for making the car move when motion is detected through the pir sensors.
to create different movements, change the amount of 'ms' in the code
copy and paste this into the program 'arduino' File:Motion controlled arduino car.pdf
presentation


i didn't know the arduino could operate without the cable, so while doing the presentation i taped it onto the car with a 9 volt block so it could ride without the computer attached.


what i would do if i had more time
- obviously the project is only finished on the technical side.
- i would want to make a cover for the car, in the shape of a monster so the monster would follow you/you can play with it.
- the technical part should be built a bit better, with longer wires so it wouldnt be so hard to connect everything and keep it in the shape it needs for the pir sensors to stay in place without breaking anything.
- the code needs more finetuning so the car will drive shorter bits; i didn't have time for this yet before the presentation because i managed to make it work quite late
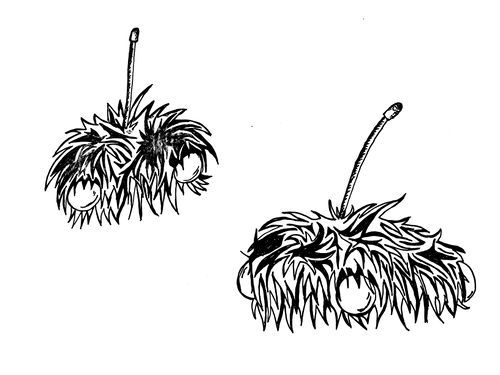
sketch of the monster and an idea of the material i could use for the monster. the pir sensors would function as eyes on all sides


what i learned from the project
- i didn't know a lot about making circuits yet; i understand the theory better now
- coding the arduino is quite hard. i will need to follow a lot more tutorials in order to understand what i'm actually changing or what i need to make something work
- never to connect a battery blindly to a circuit ;)
- how to solder electronics currectly and securely
even though i didn't manage to finish the project in time, i had a lot of fun learning about it and creating it and i'm looking forward to follow digital crafts next year!