User:0927758
Contents
Contact
    Charlotte Birza

    0927758@hr.nl

    Fine Art & Design Teacher Training
Year 2
For my Reflection Document see Osiris or on this link: https://drive.google.com/file/d/18hBzjhVM5DG7yr3JqBK9FnBKDfIHvwLq/view?usp=sharing
Digital Craft: The Birza-chair by Gerrit Rietveld


Gerrit Rietveld and the Birza-family
For this practice, Digital Craft, I chose to work with the Birza-chair by Gerrit Rietveld. I first heard about Rietveld when my father told me that this famous architect designed and built a room for my great-grandparents in their house in Amsterdam.
At the time Rietveld was not yet a famous architect. My great-grandparents enjoyed buying work by young artists. Their son, my grandfather, inherited the Birza-room from his parents. The pieces of furniture included the Birza-chair. This chair was designed in 1927. Rietveld tried to design a chair, made out of one piece of material, that could easily be factory-produced. It is made of fiber. The production-process was so complicated and cost so much time, that only one was built.
The room doesn’t exist anymore. After my great-grandparents moved most of the interior of the Birza-room stood in the house of my grandparents. My father told me it was not suitable for daily use because the furniture was very vulnerable.
In 1986 my grandparents offered the furniture in their possession to the Gemeentemuseum in The Hague. The Gemeentemuseum appeared only moderately interested. On hearing that the furniture would not be put on display and would be kept in storage, my grandparents decided to put it up for auction at Christie’s in Amsterdam. This auction created much publicity, as it was the largest collection of Rietveld-furniture ever to be auctioned.
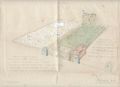
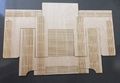
This story about Rietveld and the Birza-family was so interesting that it triggered me to research Rietveld and the part my great-grandparents played in the discovery of this architect. I started my research in our cellar at home. In a box I found various interesting pieces of Rietveld-material. I found correspondence from Rietveld to my great-grandparents, a design for a double grave for my great-grandparents, samples of waterproof wallpaper (very unusual for 1930), a garden-design and a few designs for furniture.
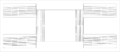
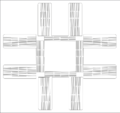
- Letters from Rietveld
15-11-1929
09-04-1930
August 1933
03-05-1940

06-09-1950
18-04-1954

.jpeg)
.jpeg)


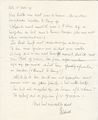
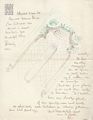
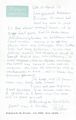
I found correspondence between 1927 and 1958. One can read about the friendly relationship between my great-grandparents and Rietveld. He frequently writes about visiting them. In a letter dated November 15, 1929 Rietveld writes, that ‘The Chair’ has undergone many changes. He has started working on it again. He writes: ‘I hope you are not offended that I started experimenting again on your chair. It has been drastically pruned. I shall finish it shortly and send it to you (it is taking too long).
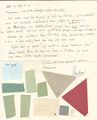
On September 6, 1950 Rietveld writes about the Birza-room: ‘It was one of the coolest interiors I made and when revisiting it I was always surprised by the suggestion of space it gave. I must say you also supported the colouring well with your choice of paintings and drawings. My congratulations on your becoming grandparents. If you ever want to get rid of the fiber chair I would like to make a first offer. R.’ The grandchild he mentions is my father.
On April 18, 1954 Rietveld writes: ‘…. My work for you was of little consequence. Payment is absolutely not necessary; you were one of the few, who in times, when our work was still strange to people, had trust. That has been more than enough payment.’
Who was Gerrit Rietveld?
Gerrit Thomas Rietveld was born on June 24 of 1888. Like his father he was a cabinet maker. Later he became an architect. Al his life he lived in Utrecht. He became famous for The Rietveld –Schröder house and his chairs. Until his death on June 25, 1964 he worked as an architect and designer. He was always in search of new possibilities. It is often thought that Rietveld thought of the red-blue chair and the Rietveld-Schröder house overnight. This is certainly not true. His designs were often the result of much experimentation.
It was important to Rietveld that many people could buy his designs. Therefor he used cheap materials. He tried to find ways in which his furniture could be factory-produced. He experimented with methods too. He wanted to design furniture and houses, that could be produced industrially. Only a few of his houses were ever built. In the twenties and thirties Rietveld was appreciated, as a person, as an architect and as a designer of furniture. The simplicity of his work was seen as liberating. Rietveld was always experimenting with materials. It not always occurred to him, that his designs should also be practical in use. The criticism that was the result did not interest him. He saw the criticism as proof of being on the right track. In the periodical ‘De Stijl’ nr. 46 (1927) he wrote. ‘Every true creation…. changes the insight, the demands and the needs of its time and clashes with the prevailing demands and needs of previous periods. A creation must therefore gain the position instead of falling in with the prevailing demands and the necessity’.
Design characteristics
In his designs Rietveld used straight lines and planes. He didn’t use no ornamentation. Everything was simple. He wanted to show how things are made.
His designs were not always practical. Comfortable use was less important. ‘De Stijl’ and ‘Het Nieuwe Bouwen’ helped Rietveld reduce everything to the simplest elements. In making his furniture Rietveld was in search of different techniques to make connections.

Conclusion
Rietveld is known for his house and his chair. The availability of his furniture and his houses was important to him. Whether they were practical in use was of less interest. He once said when someone complained about the hardness of his chairs: ‘If you are tired you must go to bed’.
With his designs, which were very different from what people were used to at the time, he has made people look differently at furniture and houses.
I think my great-grandparents only contributed a little bit to Rietveld becoming well known. Their commission is only one in a long list of Rietveld’s work. The auctioning of the Birza-room on the other hand caused a lot of publicity because it was exceptional for so many pieces of furniture designed by Rietveld to be sold on a single occasion. I suppose the Gemeentemuseum regrets its decision not to accept the offer of my grandparents because of the condition to put the furniture on display.
Copy and transformation
It was very enjoyable to look though the material of Rietveld we have in our possession. Reading the correspondence was a special experience.
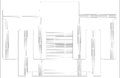
I investigated the Birza-room with special attention to the Birza-chair. This chair is made of one piece of fibre-material. I asked myself how I would be able to make a chair like that. Is it easier with modern techniques? Is it possible with the use of a laser cutter? The copy I made of the chair is also made from one piece of material. I took the design of the chair from the site of the Stedelijk Museum in Amsterdam and started thinking of a way to fabricate this chair with the use of a laser cutter. During this process I discovered I did not know how big the flexible parts in the chair should be to be able to bend the plywood. When I made the first model I made the flexible parts to small. As a result the plywood could not be bent far enough.

For the next model I made the flexible parts bigger. This model could be bent far enough but it was still difficult to put it all together. I am sure Gerrit Rietveld also encountered this problem.
I also found that the blueprint I used did not correspond completely with the chair we now know. The seat is to deep causing it to stick out.
- Copy Birza-chair
Illustrator file 1
Illustrator file 2
Laser cutter


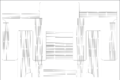
Finally I wanted to make a flexible design following Rietveld’s idea for the Birza-chair. To transform the chair I decided to make a stool. The most difficult part turns out to be making a design with big flexible parts and still make it strong enough to stand firm. The flexible parts make the material fragile. I understand Rietveld’s idea about experimenting with furniture made out of one piece of material. I immediately understood the difficulty in making a stool and easy to assemble design. I now see why only one Birza-chair was made. After having built the Birza-chair cabinet maker V.d. Groenekan is supposed to have said: ‘Never again! I gave it a go but I think Ikea is better.

- Transformation Stool

Illustrator file 1
Illustrator file 2
Illustrator file 3


Year 3
Project 1: Critical Making exercise
Flupsel
— Project from Daphne, Marije, Charlotte & Charlotte —

The first assignment, a critical making excercise.
Our provided set of cards were:
- Advanced information visualisation (Infoviz)
- Use fabric to design this object as a wearable or soft thing
- Highlight a distopic future that could result from…
Our first idea was to make a ‘’stress sweater’’, something that would show the outside world how ‘’safe’’ it would be to approach you in that moment. Also it related to the way we as a society wish to hide such emotions.
However, when we were further discussing the distopic future aspect of it, the sweater idea did not hold up to the story element we prefer to work with.
Then our focus swifted to things like the 90’s ‘’moodring’’ and other exciting products which portray information on your body. Like the smart sports t-shirt that tracks your heartbeat and sweat. Also technologies like Alexa and the movie ‘’Her’’ gave us insight in what direction we wanted to go.
One of our big influences was the distopic Netflix show Black Mirror. In season 3, the episode ‘’Nosedive’’, a point system was used to show an individual ‘’socioeconomical status’’. (for more info see the Wiki + trailer)

In a distopic future, such as in the society we live in now, certain products, services and even rights are depended on your social status.
We wanted to use the fabric as a tool and chain to the individual comparable to our smartphone now.
The Flupsel’s main goal is to eradicate human’s most basic flaw and instinct. The ability to lie and bend the truth. In a world where fake news is consumed daily, the idea is to purify the complicated web of information that flows around us. However, such as many systems in the past, over time it becomes corrupted by greed. An individual receives his/her Flupsel by birth. And over time becomes conditioned into always striving for the ultimate truth. (We were inspired by brave new world’s conditioning)
To try and simply show our idea, we have composed a scene that gives the viewer an idea of how the Flupsel can affect many aspects of your life. The Scene: A job interview at a lawyer’s firm. Click here to see the video.
Reflection
The idea that people should always take a Flupsel with them and that the Flupsel will save all your data and keep this information forever is a horrible idea. The Flupsel will score everything about you and with this information invites you to always speak the truth. With the Flupsel you will live your life trying to please everyone. You will portray and project the image of yourself to others. Points given to you by the Flupsel define your value. Everyone would be terrified of getting a low score because the consequences could be very unpleasant.
We cooperated very well during this project. We had thorough discussions and agreed on the idea. The idea comes form the Critical Making Cards. We figured out something the world is basically already doing. The world is becoming more digital. All our information is on the internet: Big brother is watching you.
Because we attend different courses, making appointments was difficult. In addition there was little time. In the little time we had I think the creation of the Flupsel went well. If I would continue this assignment I would find it really fantastic to make the Flupsel work. The idea makes me curious though the technology is tricky. I wouldn’t know how I would have to deal with it. Actually I will need someone who is at home in engineering and robotics. I think at this time it’s no option to make this project really work.
Project 2: Cybernetic Prosthetics
The Wingman
— Project from Daphne, Marije, Charlotte & Charlotte —

For our second assignment, cybernetic prosthetics, we tried to improve an existing system within a biological framework.
Our prototype was very rudimentary, luckily, our concept was not.
Looking at existing feedback loops within the animal world, we became enthralled with the Paradise Birds from Papua New Guinea. In total there are 39 species. (See the birds of paradise webpage for more information)
Instead of the existing system of natural selection (Charles Darwin), also known as survival of the fittest, the birds strive within sexual selection. In ‘’ David Attenborough's Why Do Birds of Paradise Dance’’ a Colins short book, The idea of sexual selection is easily explained. In short, the females choose from many suiters whom they would like to mate with. Therefore the best male dancer, with the most beautiful feathers will pass on its genes to the next generation. (click here and here for examples of their mating dance)
One of the problems with this very complex and fragile system, is that like many species, they are endangered. The females pickiness in mates is good for the preservation of the most beautiful birds, but bad for the size of the population.
In this we, as blind human saviours, will try and improve nature’s way. Hoping that we will not eventually be it’s very doom.
Our idea:
Step 1: Gps Tracking System
At the nature reserve we wish to have each bird chipped with a gps signal. Then, within the computer system, the biologist can keep track of where the birds are and speculate when a mating dance might take place. Once a male and female of the same species are within range of each other, the computer system will send of a drone.


Step 2: Drone ‘’The Wingman’’
Once the drone is fired, it will head over to the mating scene. There the drone will circle the male during the dance. Making the reflection of the feathers stronger and thus increasing the chances that the female will choose the male. The drone will be small, equipped with lights, a gps signal and a live camera feed. For flight and design we were inspired by dragonflies and the HP golden snitch.
Potential Step 3: ‘’Daddy move’’
The drone will collect data from the camera feed, this data can be used to analyse which kinds of dance work on the females and which don’t. This data will then be put into a realistic looking robot male, that will then demonstrate how to dance to the reject male chicks. Why is this necessary? -> If in the event that a small male chick gets denied by the mother and thus the community, that bird will not be able to learn from the other males how to dance. By using the robot ‘’Daddy move’’, the male birds will have a chance to still woo a female later on in life.
Presentation and Prototype
Of course, considering our background, education, and timeframe ; we wanted to show our idea despite not having an actual drone to show. From styrofoam, wire and glue we made our two birds to demonstrate the Wingman in action. ‘’The Wingman’’ was made from a led light, styrofoam and a strong piece of string. If we had time and a budget, we would like to actually try and make ‘’the wingman.’’ We also had a small animation showing off the GPS system. The dots would move towards the assigned targets.


Reflection
Apart from the project it was very interesting to see how the birds do their mating dance and how males are attractive to females. Each bird does this in its own, unique way. The birds in the movie are special. This project is interesting because it looks at how birds could be helped to improve their mating dance. The objective would be for birds to mate more frequently which would result in more birds of this species. This would ensure that the chance of extinction of this species would be smaller.
During this project allocating the tasks went well. Everyone had a specific role in the total project. A number of things had to be done: birds had to be made, a drone had to be made, a map had to be drawn, an animation had to be made and the reflecting feathers of the birds had to be made. The cooperation went well and produced a good resulted. It was a tricky idea and we choose for the assignment to be very basic. The different parts where made, but the drone and the tracing system don’t work yet. It would be very nice if the drone would really work. It now works as a lamp but there is no gps and it can’t fly.
It would be interesting to see how this idea could be developed further. It would be a problem if the birds came dependant on the Wingman. It’s not intended to stop the natural process. It’s intended as additional. Would it be an interesting idea for humans? It might be easier to find a partner. The question is whether we would become more dependant on technology and whether we would like to manipulate nature in this way.

Project 3: From Devices to systems
Fisher Price Child Radio
—Project from Charlotte & Charlotte —
On to our third assignment, the ‘’Black Box’’, we had to open a device/machine, document our findings and put it back together with a new function and added sensor feedback loops.
We chose a 90’s Fisher Price children’s radio. After haggling on MarktPlaats, eventually we were able to get the radio for 10 euro’s with 7 euro’s postal costs. It was small, battery-operated, and came with headphones.

Step 1: The outside
At the front you can see a blue plate which indicates the frequencies for FM en AM. At the top are two turning weels: blue and yellow and one red slider.
- Blue: volume
- Red: AM/FM
- Yellow: Tuning
Step 2: Opening the radio
One of the first things we noticed was that the radio was not made to be opened. We had to break the plastic casing to get inside. Some of the screws would not loosen at all and would break under force. When the back was opened you could see the technology of the circuit board inside very well. On the left side there is a red plate that covers a quarter of the technology. When this plate is taken away you can see the mechanism of the gear wheels and the slider. By turning the wheels it’s possible to switch to another radio station.


Step 3: Detaching the circuit board
On the inside you can find the turning capacitor. You can find it as a square part left of the blue wheel with numbers on it. Near the main turning capacitor you can see two small coils of copper wire that are mounted on the circuit board. These are used to determine the frequency range of the radio. The tuning transformers are the square metallic boxes with a small groove in the middle. The AM antenna is located on the long side of the circuit board. The black part in the middle is the Radio IC.
Step 4: Adding a light
The two poles of the batteries are connected to the circuit board through an electrical wire. A lamp was added in a separate circuit. The white circles on the image show where the electricity wires for the lamp were added.
Step 5: Adding a different speaker
I replaced the original speakers with a new one. It turned out the new speaker was not significantly louder then the old speakers. This was possibly because the volume button does not go beyond a certain strength. The white circles on the image show where the new speaker was added.


Reflection
I really enjoyed taking the radio apart. It’s interesting to see how a device works. You can’t see on the outside what happens on the inside. In the past I have often made circuits with physics. That’s why I recognized the circuit within the radio. This doesn’t mean that I know exactly how it works within a radio. It was difficult to create an idea that would give the radio a new feature. Not knowing enough about the working of radios I was limited in my creative options. If I would continue with this project I would probably soon crash because I would not know how to change the radio.
Project 4: Cartography of Complex Systems & the Anthropocene

ADD
I have been diagnosed with ADD since July 11 this year. In order to understand what ADD means, I have tried to clarify it for myself. Very little has been written about ADD, probably because people with ADD do not stand out. ADD is an internalizing disorder that does not go away. The environment is not aware. That is why it is difficult to see what is going on. The problem is that you see things that we all sometimes have: daydreaming, not paying attention, arriving to late, being untidy, losing things, feeling insecure, etc. Still, there is a difference. This is in the intensity and frequency.
The term ADHD is better known. ADHD is stands for Attention Defecit Hyperactivity Disorder. The abbreviation ADD logically stands for Attention Defecit Disorder. This is a disorder in which the emphasis lies on the lack of attention and the hyperactivity is missing. It is estimated that between five and ten percent of the population has enough symptoms to be given the diagnoses ADD or ADHD.
ADD is hereditary for about seventy percent. There is also an increased risk of ADD if the mother to be smokes or drinks alcohol during pregnancy. In addition, research was carried out into the influence of diet and living conditions on attention and concentration. It seems that bad dietary habits can be of influence. This is also true for a lack of exercise. Sitting too much in front of a non-interactive display also causes damage to the brain. Noise pollution above 65 decibels also plays a detrimental role in the concentration. We live in a world with environmental pollution and electromagnetic radiation such as WiFi. What the consequences of this will be in the long term, the future will tell.
In ADD, the brain is slightly smaller and less active. There are problems with communication between brain areas. Signals between brain cells are transmitted by neurotransmitters. These are chemical messengers. Research has shown that the neurotransmitters dopamine and noradrenaline are less present in the front part of the brain of people with ADD, as a result of which certain functions of this part of the brain are less active. This mainly concerns functions such as planning, attention and concentration, motivation, short-term memory and impulse control. People with ADD are dreamy, suffer from a lot of thoughts and have difficulties keeping attention. They are often distracted and chaotic. A positive effect is a lot of creativity and versatility. However, important tasks are done at the very last moment, many things do not come to an end and sufferers often arrive too late at appointments. Undertaking tasks is an everyday struggle for people with ADD. They are often inactive for a long time and tend to postpone activities.
The permanent train of thoughts is caused by a chemical imbalance in the brain. Because of this, people with ADD are sometimes somewhat slow in response, are often more distracted and are restless. It is possible that multiple mood fluctuations occur in a single day. People may be forgetful, have sleeping problems, a different sense of time and may be disorganized. In addition, people with ADD can often be hypersensitive to sound and image impulses. They often have a constant stream of thought which to other people makes them seem dreamy or uninterested. It makes it difficult for them to concentrate on the business at hand. The filter function in the brain ensures that most stimuli are ignored and that only important stimuli are registered. In people with ADD the filter function that separates relevant and irrelevant items does not seem to work as it should. All stimuli are accepted equally. As a result, someone with ADD is less able to concentrate on a conversation. The voice of the person he is talking with sounds just as loud as the voice of someone who is a bit further away. It is difficult for them to concentrate on the one conversation, because they unwittingly listen to all conversations that take place. In addition, it seems that stimuli in people with ADD sometimes are perceived louder. The retrieval of information is also more difficult. Due to lack of attention remembering is sometimes impaired.
People with ADD sometimes have special skills regarding thinking in a problem-solving way, empathy, the ability to quickly combine information and impressions, creativity and spatial insight. They can concentrate very well on fun things. This is called a hyperfocus. In that situation they are extremely concentrated and they will not be aware of what is happening around them. Because of this, it is often said that people with ADD lack discipline, willpower and perseverance. This is not correct.
Treatment of ADD is about reducing stimuli, learning to handle the restrictions and making the filters in the brain work as well as possible. This involves starting with ordinary things, such as adequate sleep and good food. There are also treatments that influence this, such as medication. Medication can help people with ADD. The medication ensures that the filters work better so people have fewer complaints. The side effects of medication can vary per person. This means that it is customized work.
In my case the ADD is hereditary. I recognize a lot of the above information. My head feels permanently full, as a result of which nothing gets through to me and things take a lot of energy and effort. It is regrettable this was not recognized earlier. That would have make a big difference. Despite the fact that setting up the medication is not easy, I am happy that I am now in this phase. Hopefully my chaotic brain will work better in the near future. I am really looking forward to this.
Final project
My internship school is progressive in digital means. In the field of film & photography we work with digital cameras and with IMacs that include the software of Adobe Premiere and Photoshop. This creates many possibilities. These lessons made me curious about the possibilities of a self-made camera without a lens. I wanted to research what kind of photos you can make with a homemade pinhole camera. I thought it would be a challenge to take photos without knowing exactly what would appear on the printed image.
The pinhole camera is one of the first cameras in history. In 1816 Joseph Nicéphore Niépce made the first photograph. He did this by making a box with a very small hole in front, a pinhole. Inside the box he put a light-sensitive plate on the back wall opposite the pinhole. By keeping the hole in the box open for a few hours, an image was created on the plate. This principle of photography has never changed over the years. The hole of the box is now called a lens and the light-sensitive plate on the back wall nowadays is a light-sensitive electronic sensor chip. Because the material of the back wall was not very light-sensitive in the beginning, a shutter time of up to eight hours was required. The first photos were unique. No second copy could be printed. Scientists, artists and photographers have experimented extensively with the pinhole camera.
A pinhole camera is no more than a box with a very small hole. The light comes in through that hole. You do not need a lens. The hole is used instead of a lens. It is not difficult to make a pinhole camera. It is important that no light enters the box you use. I used black tape to make sure of that. The small hole in the light-tight box shows a reversed image of reality on the inside. By placing a photo roll on the side opposite the small hole, a picture is taken of the image. A certain amount of light is needed to ensure that an image is created on the photographic roll. Because the hole through which the light enters is small, pinhole, it takes a lot of time for the photographic wall to be exposed to enough light. The smaller the hole, the sharper the picture becomes. The image is equally sharp everywhere. The amount of light collected depends on the size of the hole and on the shutter speed. This has the advantage that there is no distortion, the depth of field is very large and the camera hardly weighs anything.
There are of course also disadvantages. The light is not bundled, as is the case with a lens, so your photo is never perfectly sharp. The blurry photos of a pinhole camera can also be very beautiful. The photos are creative, experimental and create a unique atmosphere. You never know quite what you get in the picture. You have no complete control over your photo. The pinhole camera registers reality in a completely different way than other analogue cameras or a digital camera. Sometimes there is a dark discolouration on the edges of the photo. This is caused by the fact that it takes longer for the light to reach the corners via the pinhole. The effect of the dark edges is that your attention is focused on the lighter part in the middle of the photo.
Step 1:
To make the pinhole camera, I used a matchbox. I draw a rectangle in the middle of the inner box and cut it out. In the casing I also drew a small square and cut out. Then I cut a piece from a can. In this I drilled a very small hole with a needle. I taped the can on the square of the cover with black tape. I made sure that the hole would really fall on the square. On the front I taped a piece of cardboard also with a small cutout square in the middle. The pinhole had to be in the middle of that square. This piece of cardboard was attached to the front of the box. A strip of cardboard was pushed in front of the hole and was removed to take a photograph. A film roll is placed on the left and the right side of the matchbox. The negative film passes through the backside of the matchbox. This film was taped to a small piece of negative film in a casing on the other side of the box. These must be well attached. This connection must be very secure. Then the camera is completely taped. No light may enter the camera. A paperclip was used to roll the roll of film from one casing to the other. The film roll was developed and the photos were printed. With one roll, the photos were scanned using a negative scanner. Then the images were put together with the help of the Adobe Aftereffects program.


Step 2:
I experimented with taking photos from different distances. I took photos by hand and photos where the camera was placed on a steady surface so it did not move during the exposure. I experimented with shutter speed and speed of rolling through the negative film. Rolling through the role of film was difficult because it did not go smoothly. When taking pictures with the first roll, I always opened and closed the hole and then rolled the roll of film. With the next roll, I rolled the roll of film with the hole open. I occasionally closed the hole to see if a kind of film was being recorded. I did this outdoors as well as inside a train.


Step 3:
I wanted to experiment with the images. That's why I tried to make a video of the images. It was quite a job to get this done. If you scan the negatives on the roll of film with the aid of a frame with windows, you will miss a small piece of film when you move to the next negative. To prevent this, you must pay attention to what you do and be very precise in counting the holes in the roll of film. If the scans overlap each other, the gradient becomes better.
............... ................
Evaluation
I made a pinhole camera. I experimented with the pinhole camera and checked if I could make a kind of movie. This created very abstract images. With one roll I scanned the images and put them together, so that a stop-motion movie could be made.
I find it very difficult to answer the question what I missed during this practice. I noticed that at the beginning of this assignment I found it very difficult to establish a relationship between my major Teacher Training and the practice. The assignment was very open, which I found difficult at first. Because of this I did not know what to do. During my internship I am occupied with film and photography. That gave me the idea to do something with photography in this practice. Once I had made this link, the process became clearer to me. I actually missed time to experiment more. It was a busy period with many assignments from school, busy internship, a full planned week and problems with setting up my medication.
For my final project I chose to do research on photography. Photography has had my interest for a long time. That is why I was very enthusiastic when I heard the subject ‘Film and Photography’ is being given at my internship school. During my internship I support the teacher, I prepare lessons and I teach. In these lessons digital film and photography and Adobe programs are used. This school has the luxury of having Apple computers with good software which makes it easy to give these lessons. The convenience of using the resources that are available nowadays gave me the idea to research the origin of photography. A pinhole camera seemed like a good idea. I took several pictures with the pinhole camera. I am curious what others see in the photos. I had little expectations of the photos myself beforehand.
I would have liked to experiment with the exposure time and the size of the pinhole. I also would have wanted to experiment more with scanning the images and to see how I could create a better transition between the images. What would happen if you were to overlap everything? This takes a lot of time. You get more frames per second, because you scan more photos. Will the image run smoother then? I could have done this, for example, by creating more overlap during scanning. I moved the film seven holes for the next scan in order to miss nothing. What would have happened if I had moved the film six, five or four holes with more overlap as a result?
Inside a closed black painted matchbox, I applied a light-sensitive film on the back wall. In the front of the matchbox I made a small hole, the pinhole. The image is projected upside down through the hole on the light-sensitive layer. I used a strip of black cardboard as a shutter. The pinhole camera sees all objects equally sharp or out of focus. This creates very special images. It's crazy because you have an idea for an image in your head, but the outcome is totally different. Interesting abstract images have emerged. By looking closely it turned out later a house could be seen.
During my research, I wanted to find out whether you can use a pinhole camera to make a kind of ‘movie’.
Written Assignment
My reading the 'Fine Art & Design Teacher training' was inspired by my secondary school teacher Art & Design. Her way of teaching and the variety during the lessons gave me the idea to become an art teacher. My discipline is visual arts. Man creates his own world and uses technology to determine his own position. Creativity, it is about being open to unforeseen possibilities. The role of an art teacher is providing the pupil with the means to portray himself and the world according to his own insight. My didactic approach is focused on multiple intelligence. Looking at pupil’s talents appeals to me. Art is one of the few subjects where very many different talents are covered. Art education can contribute to a broader development of talents. I think it's important that I am broadly oriented. If you are not, it is difficult to teach in the various disciplines of the art profession. Orientation on the use of different techniques and materials is also important for your own development. If you do not develop yourself further, there will be no innovation in your work.
It is important to know how the different materials work. Doing research and working with various materials and techniques may give answer to the question how you can shape your work. You can use digital techniques almost everywhere. Digital art can connect very well with the existing art streams. Technology does not replace the expression and underlying thoughts. I use digital programs myself, like Adobe. I also like to create with my hands. I use all kinds of different materials. Only working digitally does not, in my opinion, add enough to my creative process. For me the use of these programs is only of added value as an instrument. As mentioned earlier, my area of interest lies mainly in teaching. The starting point for teaching art subjects is the development of visual possibilities. You learn to express your ideas and to visualize them. Images are important in our lives. They evoke all kinds of emotions and associations. This is necessary to start thinking processes, which in turn trigger a creative process. When you sketch with pencil and paper you learn to think in more dimensions. During this process you will be forced to make choices and thus gain new insights.
The world is becoming increasingly digital. The media can no longer be ignored. Education is struggling to stay up-to-date. It is important that schools are active and creative in dealing with the digital media. Here lie clear opportunities for targeted use of digital media in innovative education in which attention is paid to the artistic. For art teachers it is therefore important to introduce pupils to the various media and let them experience the differences in their creative capacity. My internship school is progressive in digital means. With the subject Film & Photography we work with digital cameras and with IMacs with among other things installed software of Adobe Premiere and Photoshop. This creates many possibilities. In addition, it ensures that papers look different than they used to when, for example, a mood board consisted of images that were cut and pasted. Due to the use of the Digiboard information is visually. Despite the fact that digital programs are easy to use and offer many possibilities, I think it is still important to work manually. Working with your hands stimulates creative ability. This is related to the functioning of our brain.

During art lessons a lot of information is presented about art, artists and their work methods. Art gives us a different view on history. Art makes us understand how history has made us what we are. Art inspires, gives energy and brings on new ideas. As mentioned earlier, my secondary teacher Art & Design is my inspiring example. Folkert de Jong is also an example of how an artist may bridge the gap between the present and the past. For him the way history leaves traces in our collective subconscious is interesting. He is often occupied with war, greed and power. The horrific lynching of the De Witt brothers in 1672 has inspired him to make a sculpture titled ‘Dutch Mechanisms’. He links the murder to the power struggle taking place at that time in The Netherlands. A power struggle, that unfortunate also exists today. The title was chosen because the political murder of the De Witt brothers was not the first and certainly not the last. Folkert de Jong cast two synthetic skeletons in bronze. The skeletons represent the transience of our existence. This was an important theme in 17th century art. He used the original finger and tongue of the two brothers, scanned them, printed them in 3D and cast them in bronze. These two remains connect us to the events in 1672.
As I mentioned before I think working in art with the traditional methods and material is important. It is necessary to master basic techniques and feel material with your own hands and make them dirty so to speak. In addition, technologies open up a whole new world of creativity possibilities. With technique we can find and explore new borders. Artists will create more cross over techniques like Folkert de Jong did with the 3D printed finger and tongue of the De Witt brothers. Artists need not necessarily use technology in the prescribed way. For example, a new technique may emerge, because a technology is used improperly. It is interesting to totally explore a new technology and experience its possibilities and limitations. This contributes to the discussion about technique and the application features. Creation and research are connected with each other. I find this very interesting. Modern technologies including digital technology are an interesting and challenging development for the individual and collective creative process. As an added plus the internet has made art very much more accessible to people in general and has made the use of examples in teaching a lot easier. In short, I think we should embrace whole heartedly all new techniques without forgetting where art comes from and without letting go of the old.