Export to pdf: Difference between revisions
No edit summary |
added something on top Tag: visualeditor |
||
| (24 intermediate revisions by 5 users not shown) | |||
| Line 1: | Line 1: | ||
{{Template:Quickstartguide}} | {{Template:Quickstartguide}} | ||
The fastest way to make a PDF from a JPG file is: | |||
* right mouse / control click in Finder on your document and go to Quick Actions. Choose '''create PDF'''. | |||
*For more control, read text below. | |||
When making a PDF from '''Canva''' or '''Procreate''', it is not always printable. To be sure it is printable, open the file in '''Acrobat'''. Go to Edit > '''Preflight'''. Choose the '''PDF/X''' version and then the first option. Click on Analyse and fix, change the name (I always add XA to the name). If red crosses appear, your file was not printable, but probably fixed now. | |||
To print a '''magazine''', alway export single pages, never spreads. Be sure the total amount of pages is dividable by four. So: 8, 12, 16, 20, 24 pages. If you have more pages, consider glue binding of hand binding. The official way to handle all pictures you placed in your InDesign document is to have the originals in approximately the right size and changed to 300 dpi. | |||
== InDesign == | |||
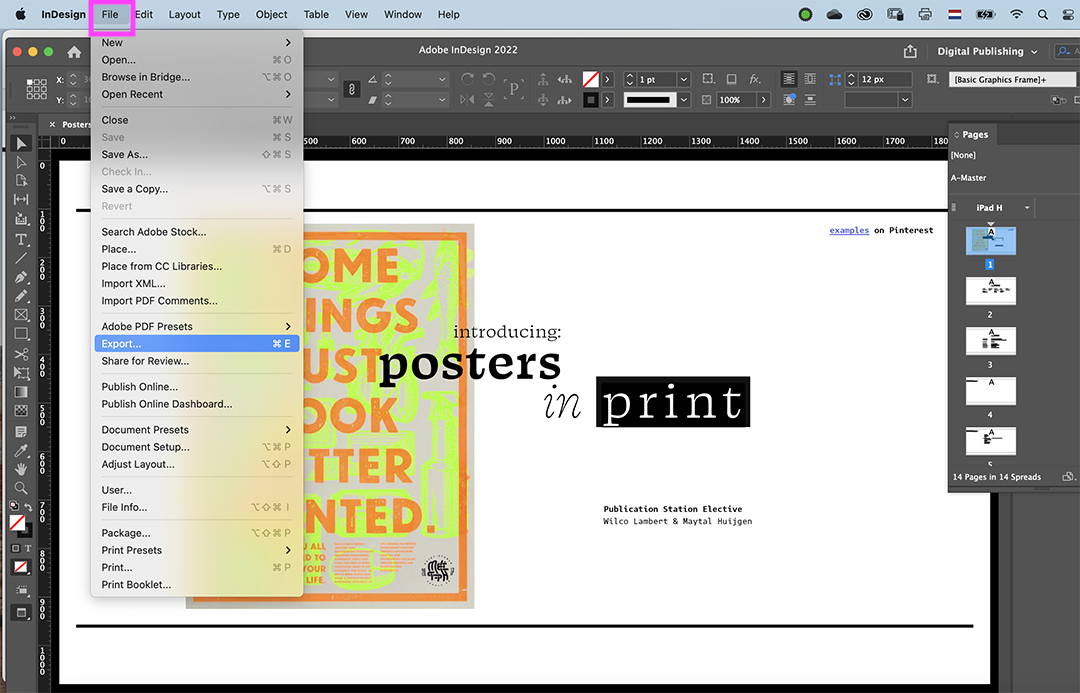
go to file> export | go to file> export | ||
<br><br> | <br><br> | ||
| Line 57: | Line 34: | ||
[[File:Export_InDe_4.png]]<br> | [[File:Export_InDe_4.png]]<br> | ||
== Illustrator == | == Illustrator == | ||
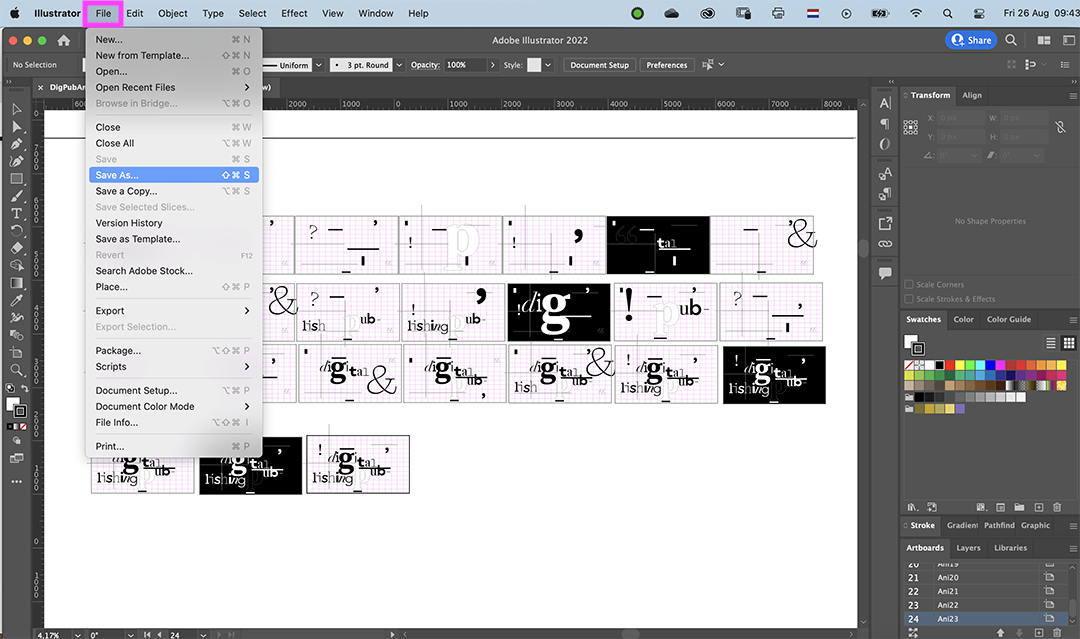
go to file> save as | go to file> save as | ||
<br><br> | <br><br> | ||
| Line 65: | Line 43: | ||
<br> | <br> | ||
[[File: | [[File:Export_Phot1b.png]]<br> | ||
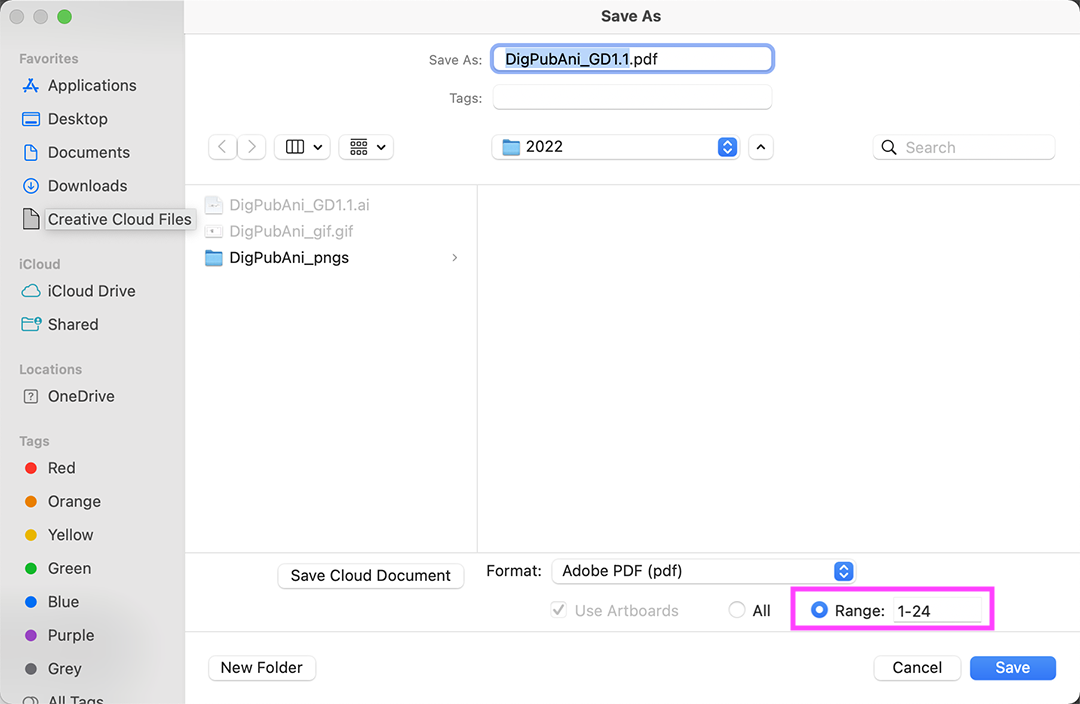
you can select specific pages or all of them | you can select specific pages or all of them | ||
| Line 81: | Line 59: | ||
[[File:Export_Illu_8.png]]<br> | [[File:Export_Illu_8.png]]<br> | ||
== Photoshop == | |||
<br> | |||
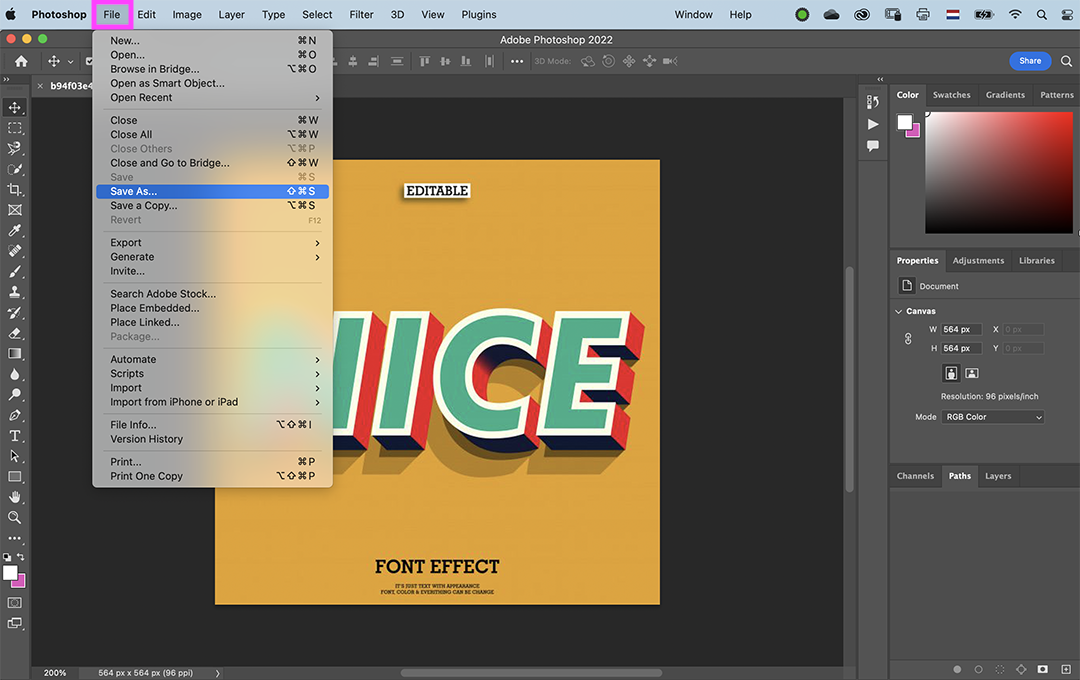
go to file> save as | |||
<br><br> | |||
[[File:Export_Phot_0.png]]<br> | |||
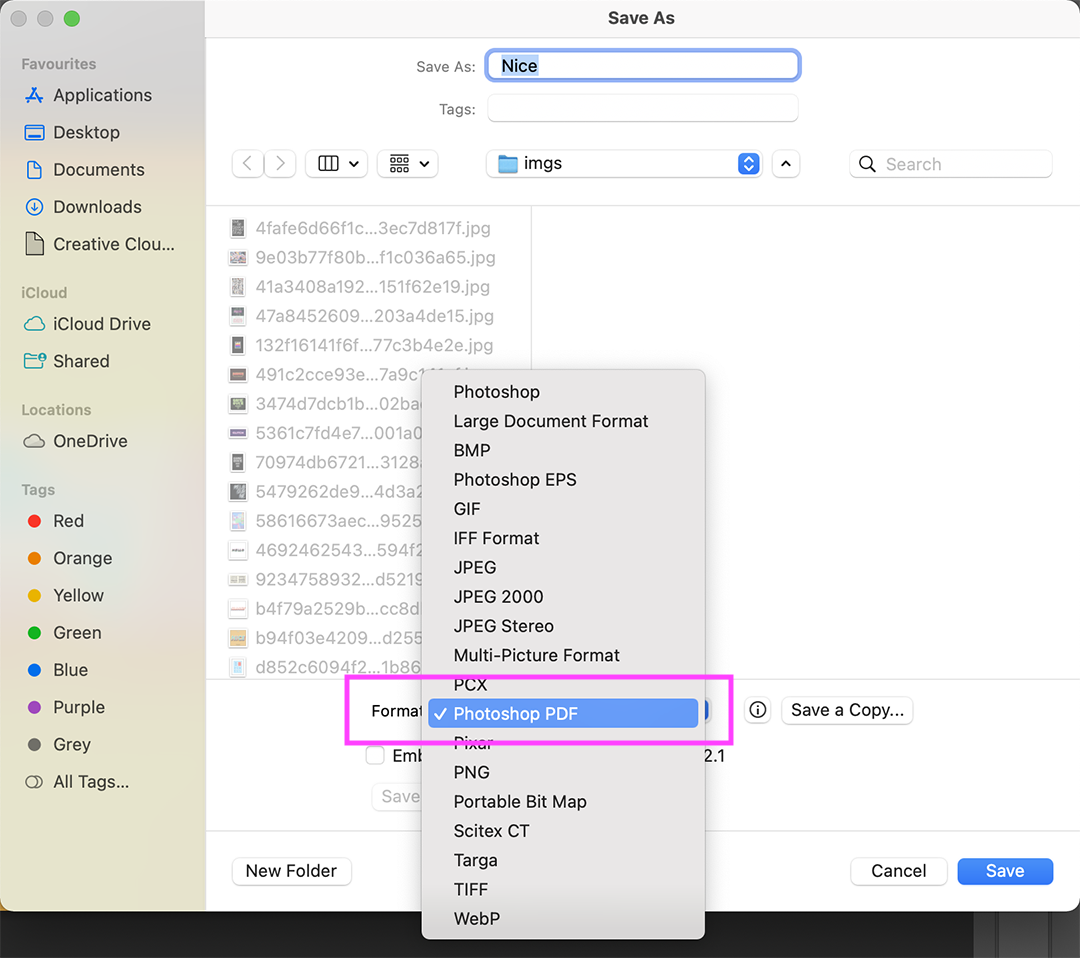
choose format> Photoshop PDF | |||
<br> | |||
[[File:Export_Phot_1b.png]]<br> | |||
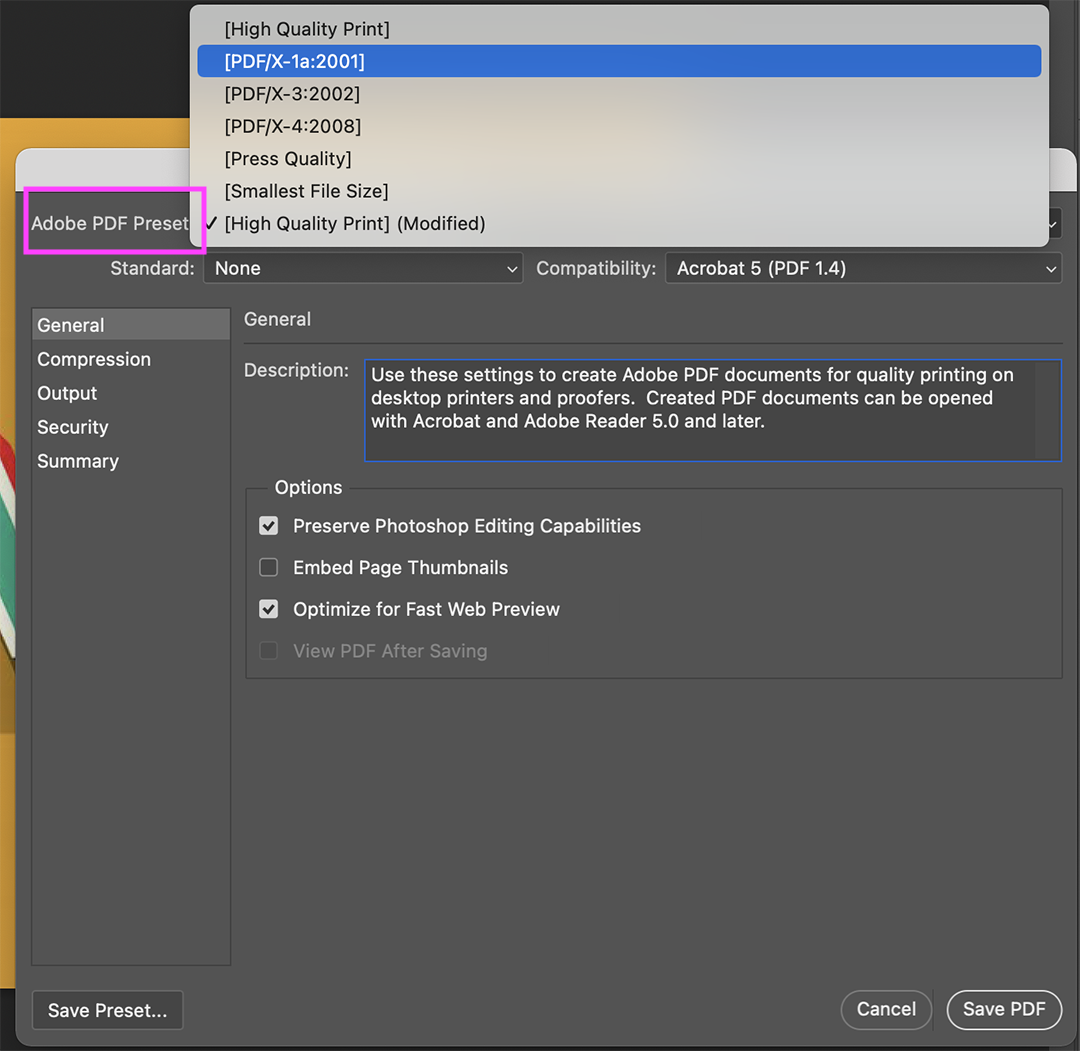
choose preset PDF/X1a:2001 | |||
<br> | |||
[[File:Export_Phot_2b.png]]<br> | |||
under 'output' choose no color conversion > save PDF!<BR> | |||
[[File:Export_Phot_3b.png]]<br> | |||
== Procreate== | |||
<br> | |||
Click on the Tools button> select menu Share | |||
<br><br> | |||
[[File:Export_from_procreate_step_1.jpg]]<br> | |||
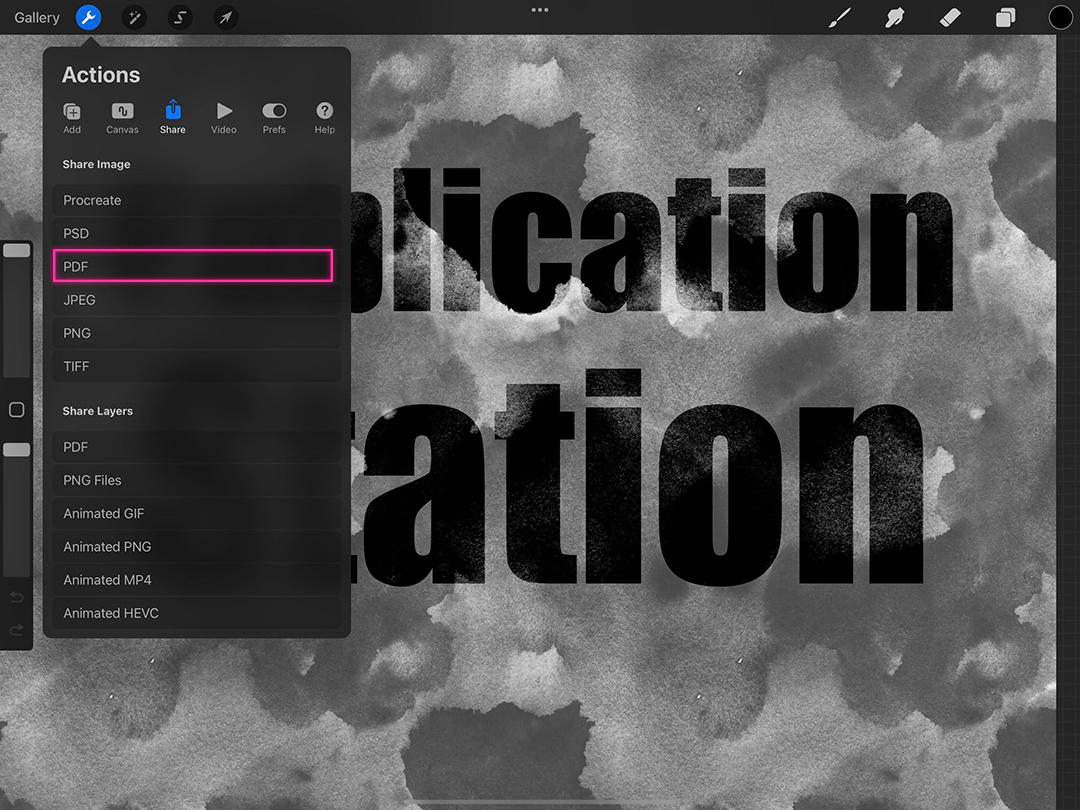
Share Image> PDF | |||
<br> | |||
[[File:Export_from_procreate_step_2.jpg]]<br> | |||
choose PDF quality> Best | |||
<br> | |||
[[File:Export_from_procreate_step_3.jpg]]<br> | |||
from here you can: Save to Files, Print directly with the iPrint app, or AirDrop | |||
[[File:Export_from_procreate_step_4.jpg]]<br> | |||
== Word == | |||
<br> | |||
go to file> save as | |||
<br><br> | |||
[[File: Export_Word_1.png]]<br> | |||
choose format> PDF | |||
<br> | |||
[[File: Export_Word_2.png]]<br> | |||
select 'best for printing' > export! | |||
<br> | |||
[[File: Export_Word_3.png]]<br> | |||
== iPhone == | |||
To turn your iPhone snapshots into PDFs follow the following steps. | |||
Open your iPhone Photo app and find the photo you want to PDF. | |||
Select the image and click the Share icon. You can select more images. | |||
[[File:Iphone2pdf-1.png|400px]]<br> | |||
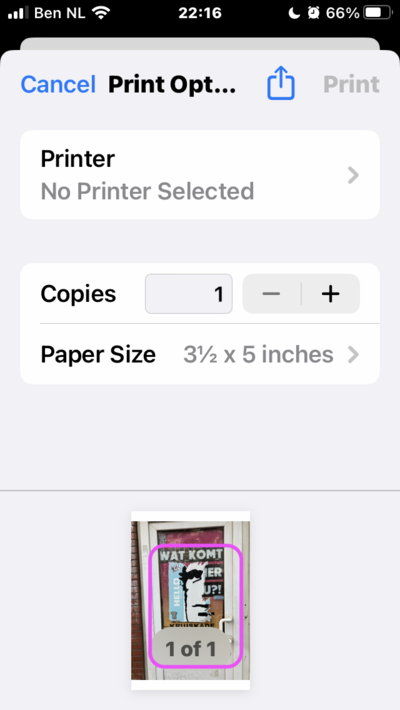
Choose the Print option (it should be at the bottom of your options list) | |||
[[File:Iphone2pdf-2.png|400px]]<br> | |||
Tap and hold on the image this opens your image as a preview. | |||
Tap on your image; this opens your image in a PDF viewer. | |||
<br> | |||
[[File:Iphone2pdf-3.png|400px]]<br> | |||
Tap the Share icon again once you're in the PDF viewer. | |||
[[File:Iphone2pdf-4.png|400px]]<br> | |||
You can use airdrop to share the PDF file. | |||
[[File:Iphone2pdf-5.png|400px]]<br> | |||
Latest revision as of 14:33, 21 December 2023
The fastest way to make a PDF from a JPG file is:
- right mouse / control click in Finder on your document and go to Quick Actions. Choose create PDF.
- For more control, read text below.
When making a PDF from Canva or Procreate, it is not always printable. To be sure it is printable, open the file in Acrobat. Go to Edit > Preflight. Choose the PDF/X version and then the first option. Click on Analyse and fix, change the name (I always add XA to the name). If red crosses appear, your file was not printable, but probably fixed now.
To print a magazine, alway export single pages, never spreads. Be sure the total amount of pages is dividable by four. So: 8, 12, 16, 20, 24 pages. If you have more pages, consider glue binding of hand binding. The official way to handle all pictures you placed in your InDesign document is to have the originals in approximately the right size and changed to 300 dpi.
InDesign
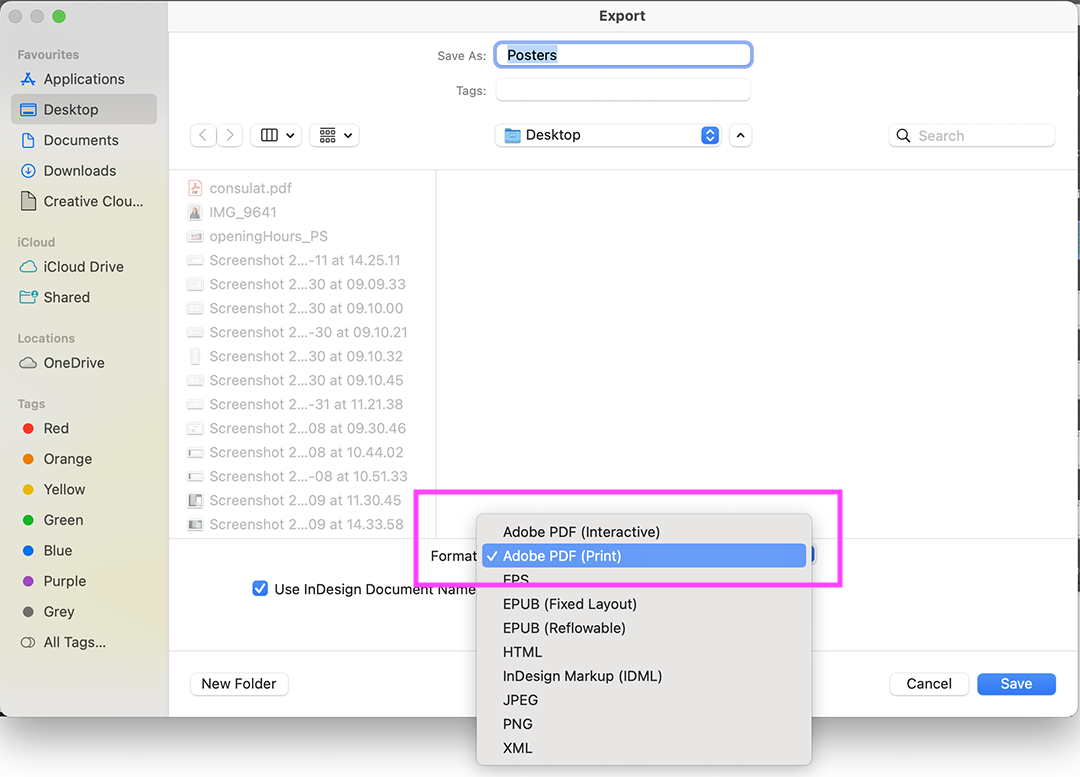
choose format> Adobe PDF (Print)
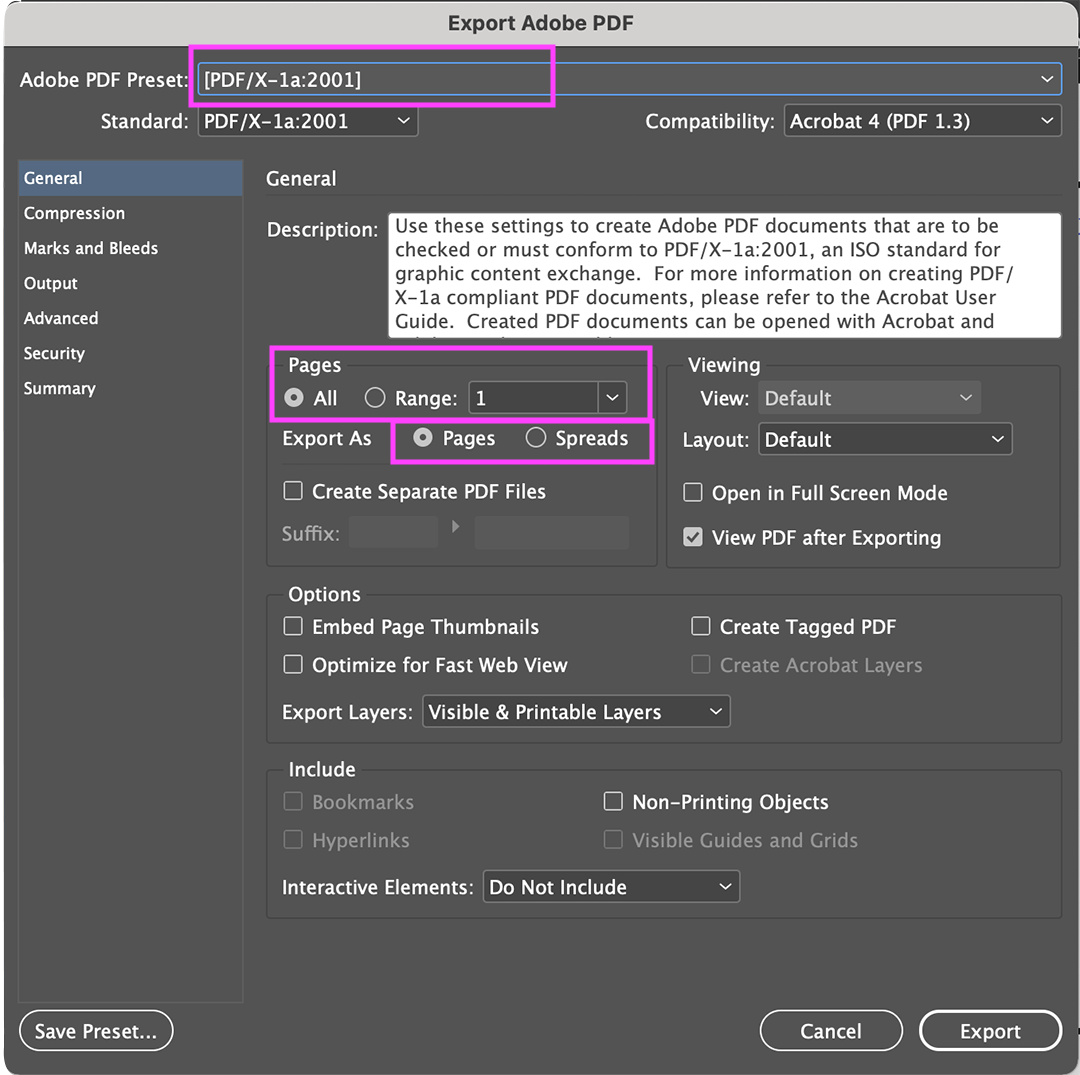
choose preset PDF/X1a:2001
choose the relevant or all pages
export as pages, not spreads, for single pages and booklets
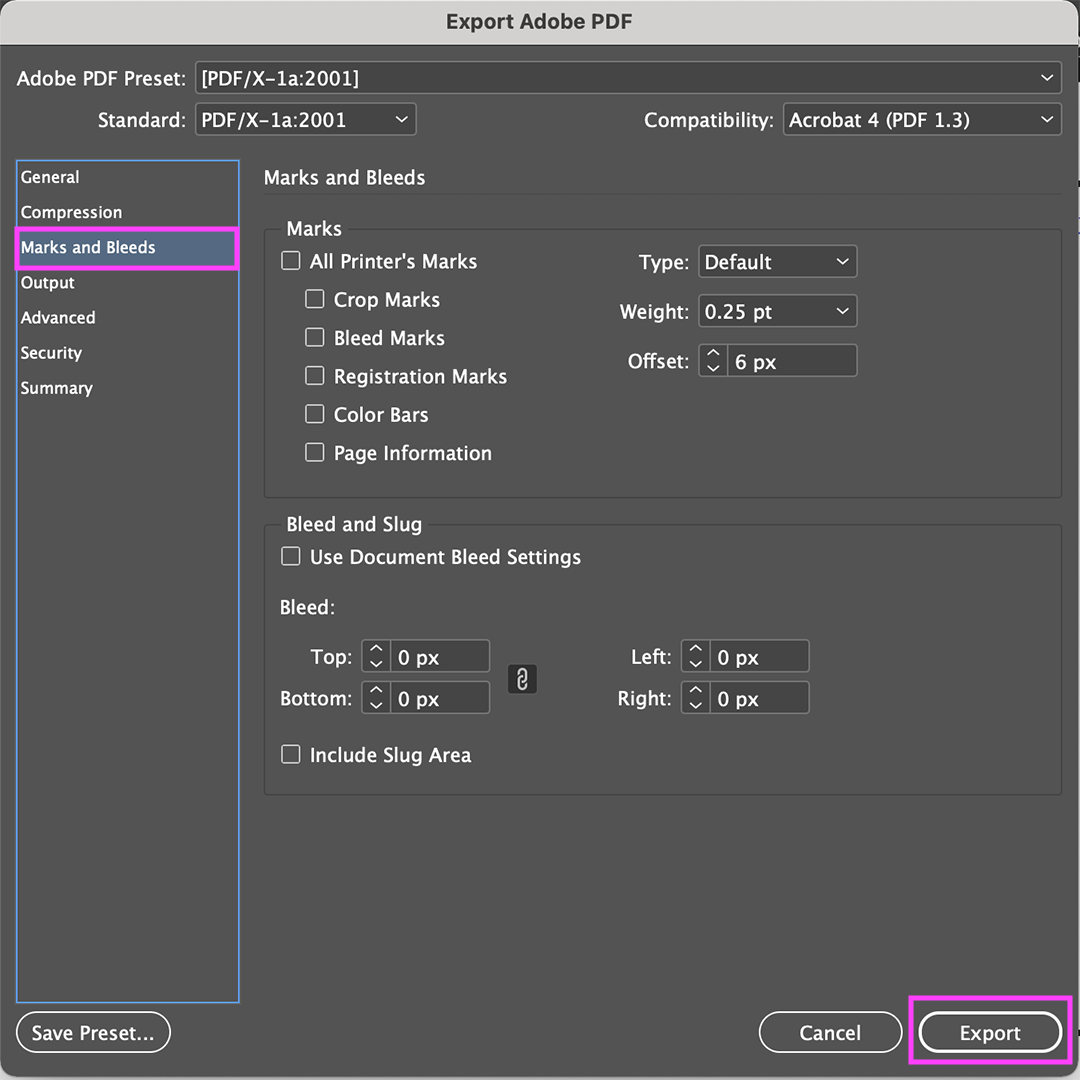
if needed, you can add crop marks and export!
Illustrator
choose format> Adobe PDF
you can select specific pages or all of them
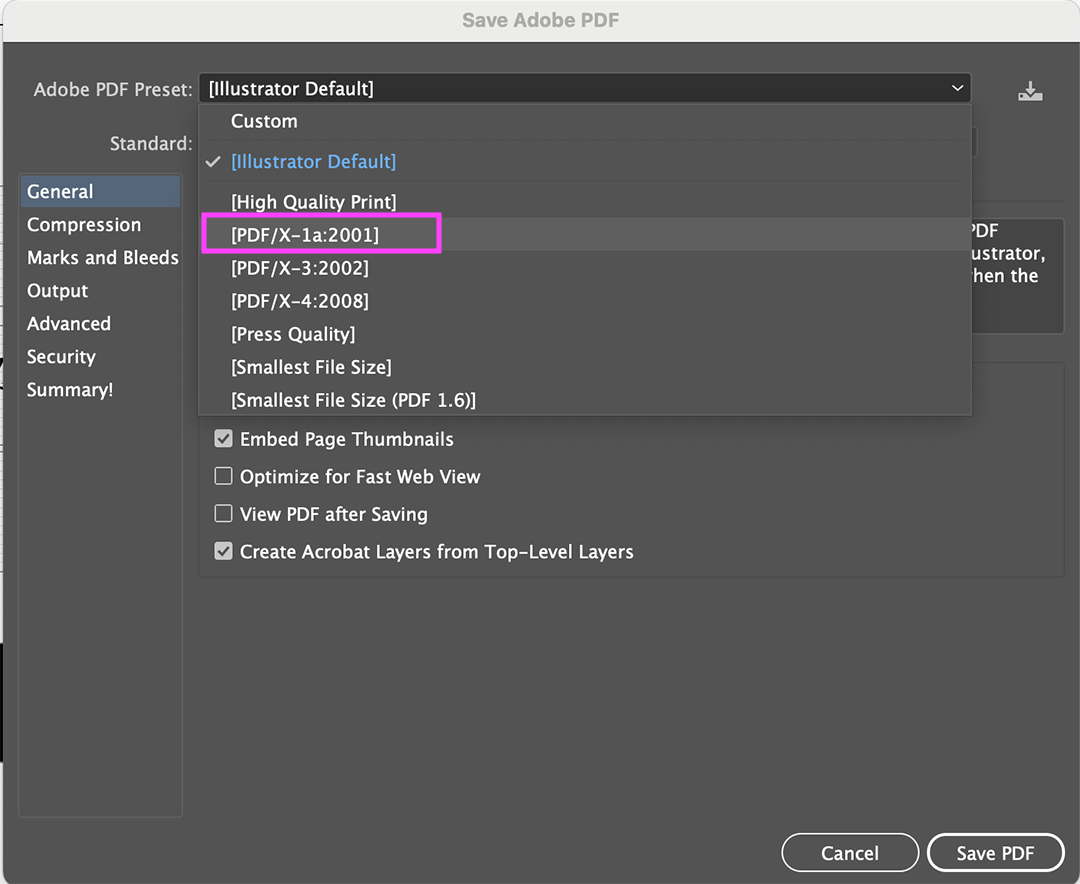
choose preset PDF/X1a:2001
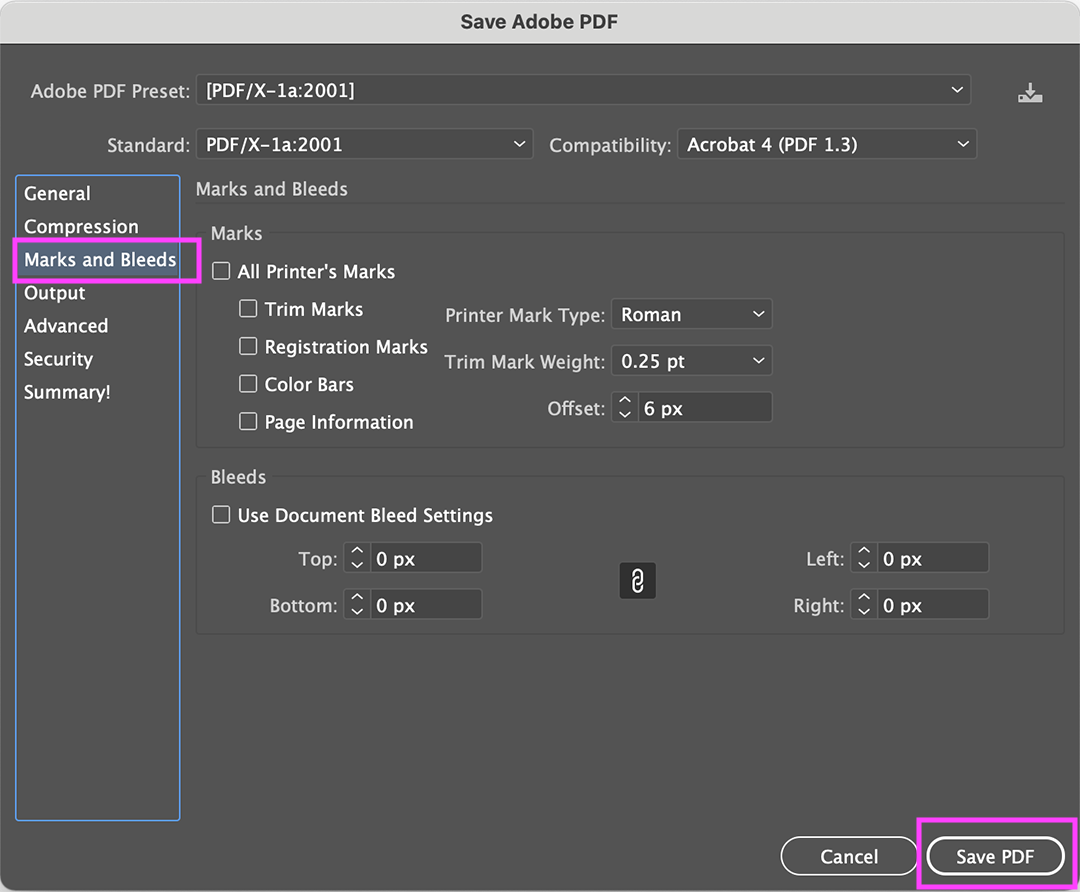
if needed, you can add crop marks and save!
Photoshop
choose format> Photoshop PDF
choose preset PDF/X1a:2001
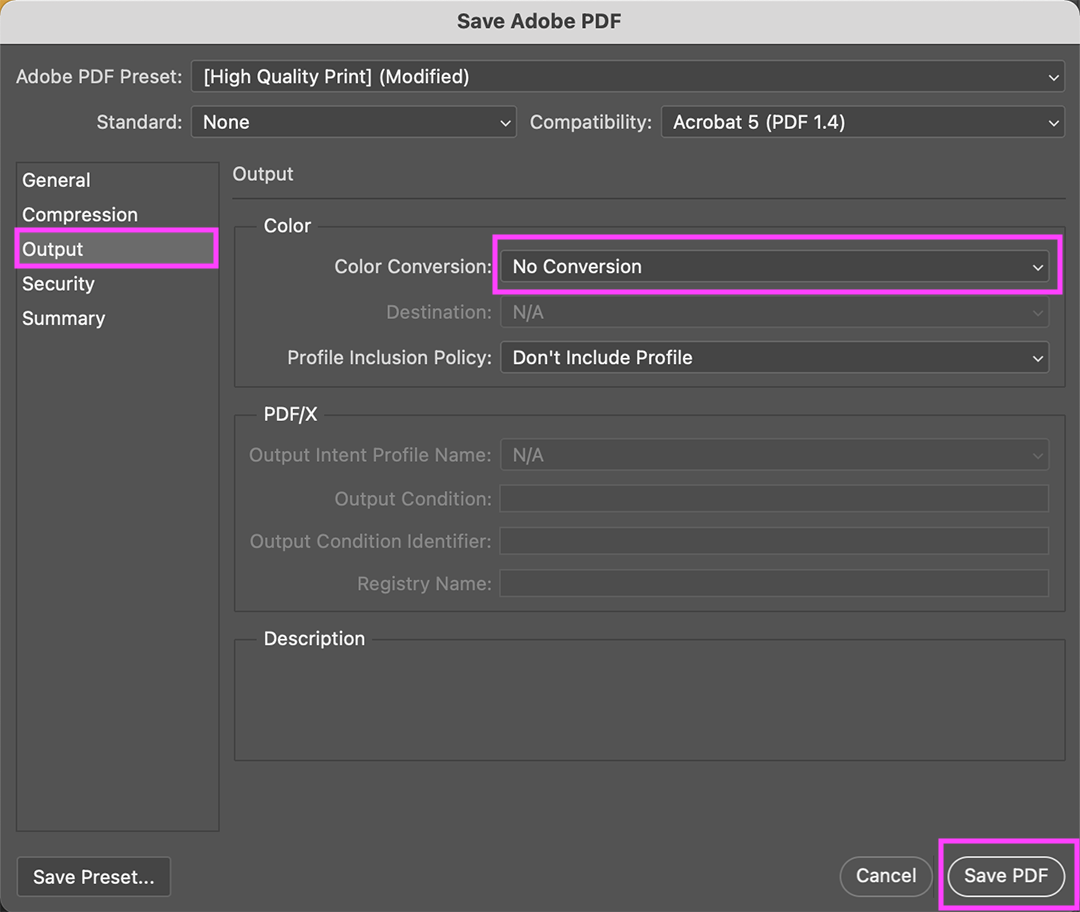
under 'output' choose no color conversion > save PDF!
Procreate
Click on the Tools button> select menu Share
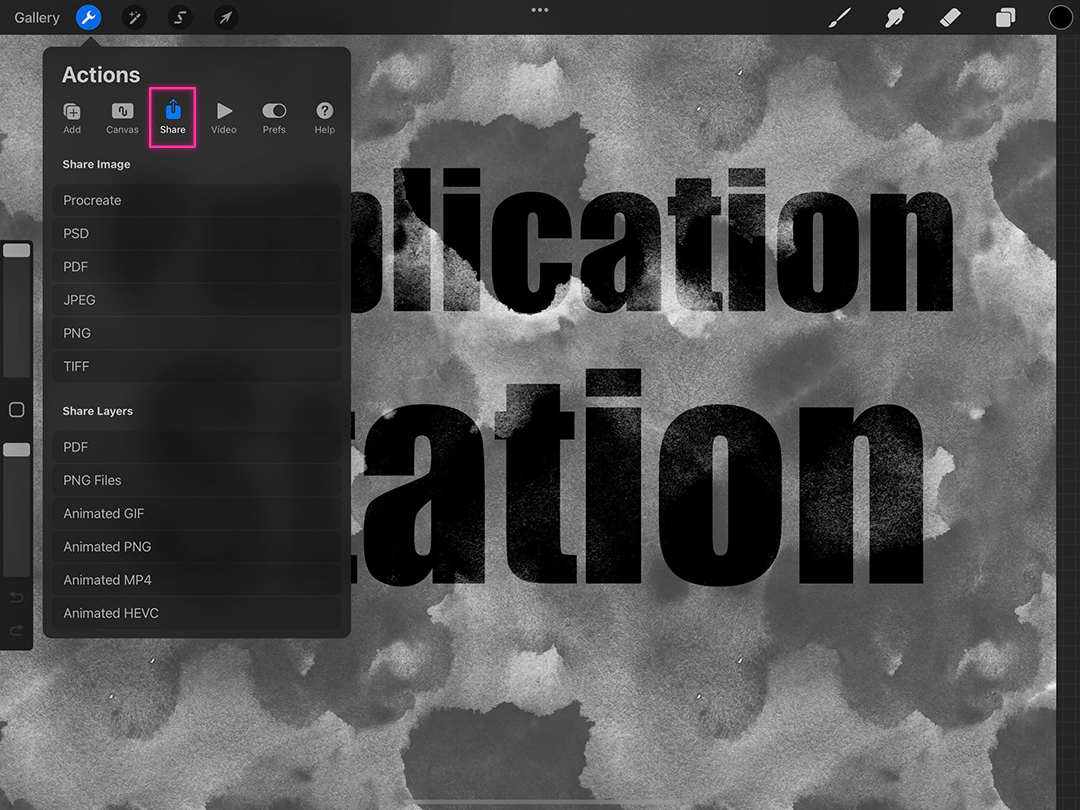
Share Image> PDF
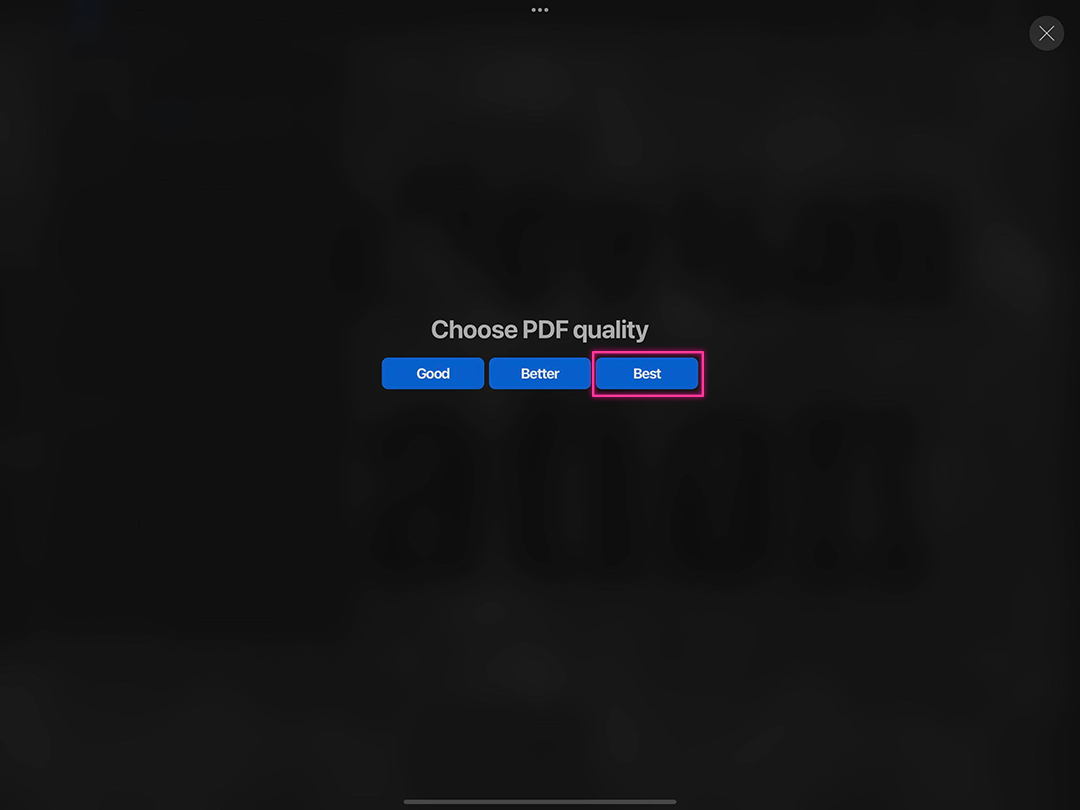
choose PDF quality> Best
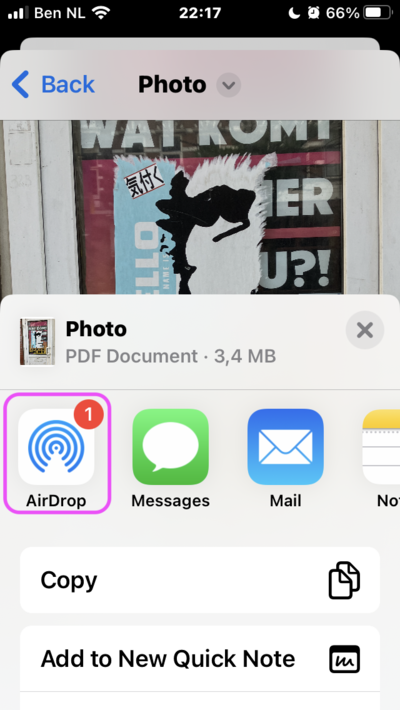
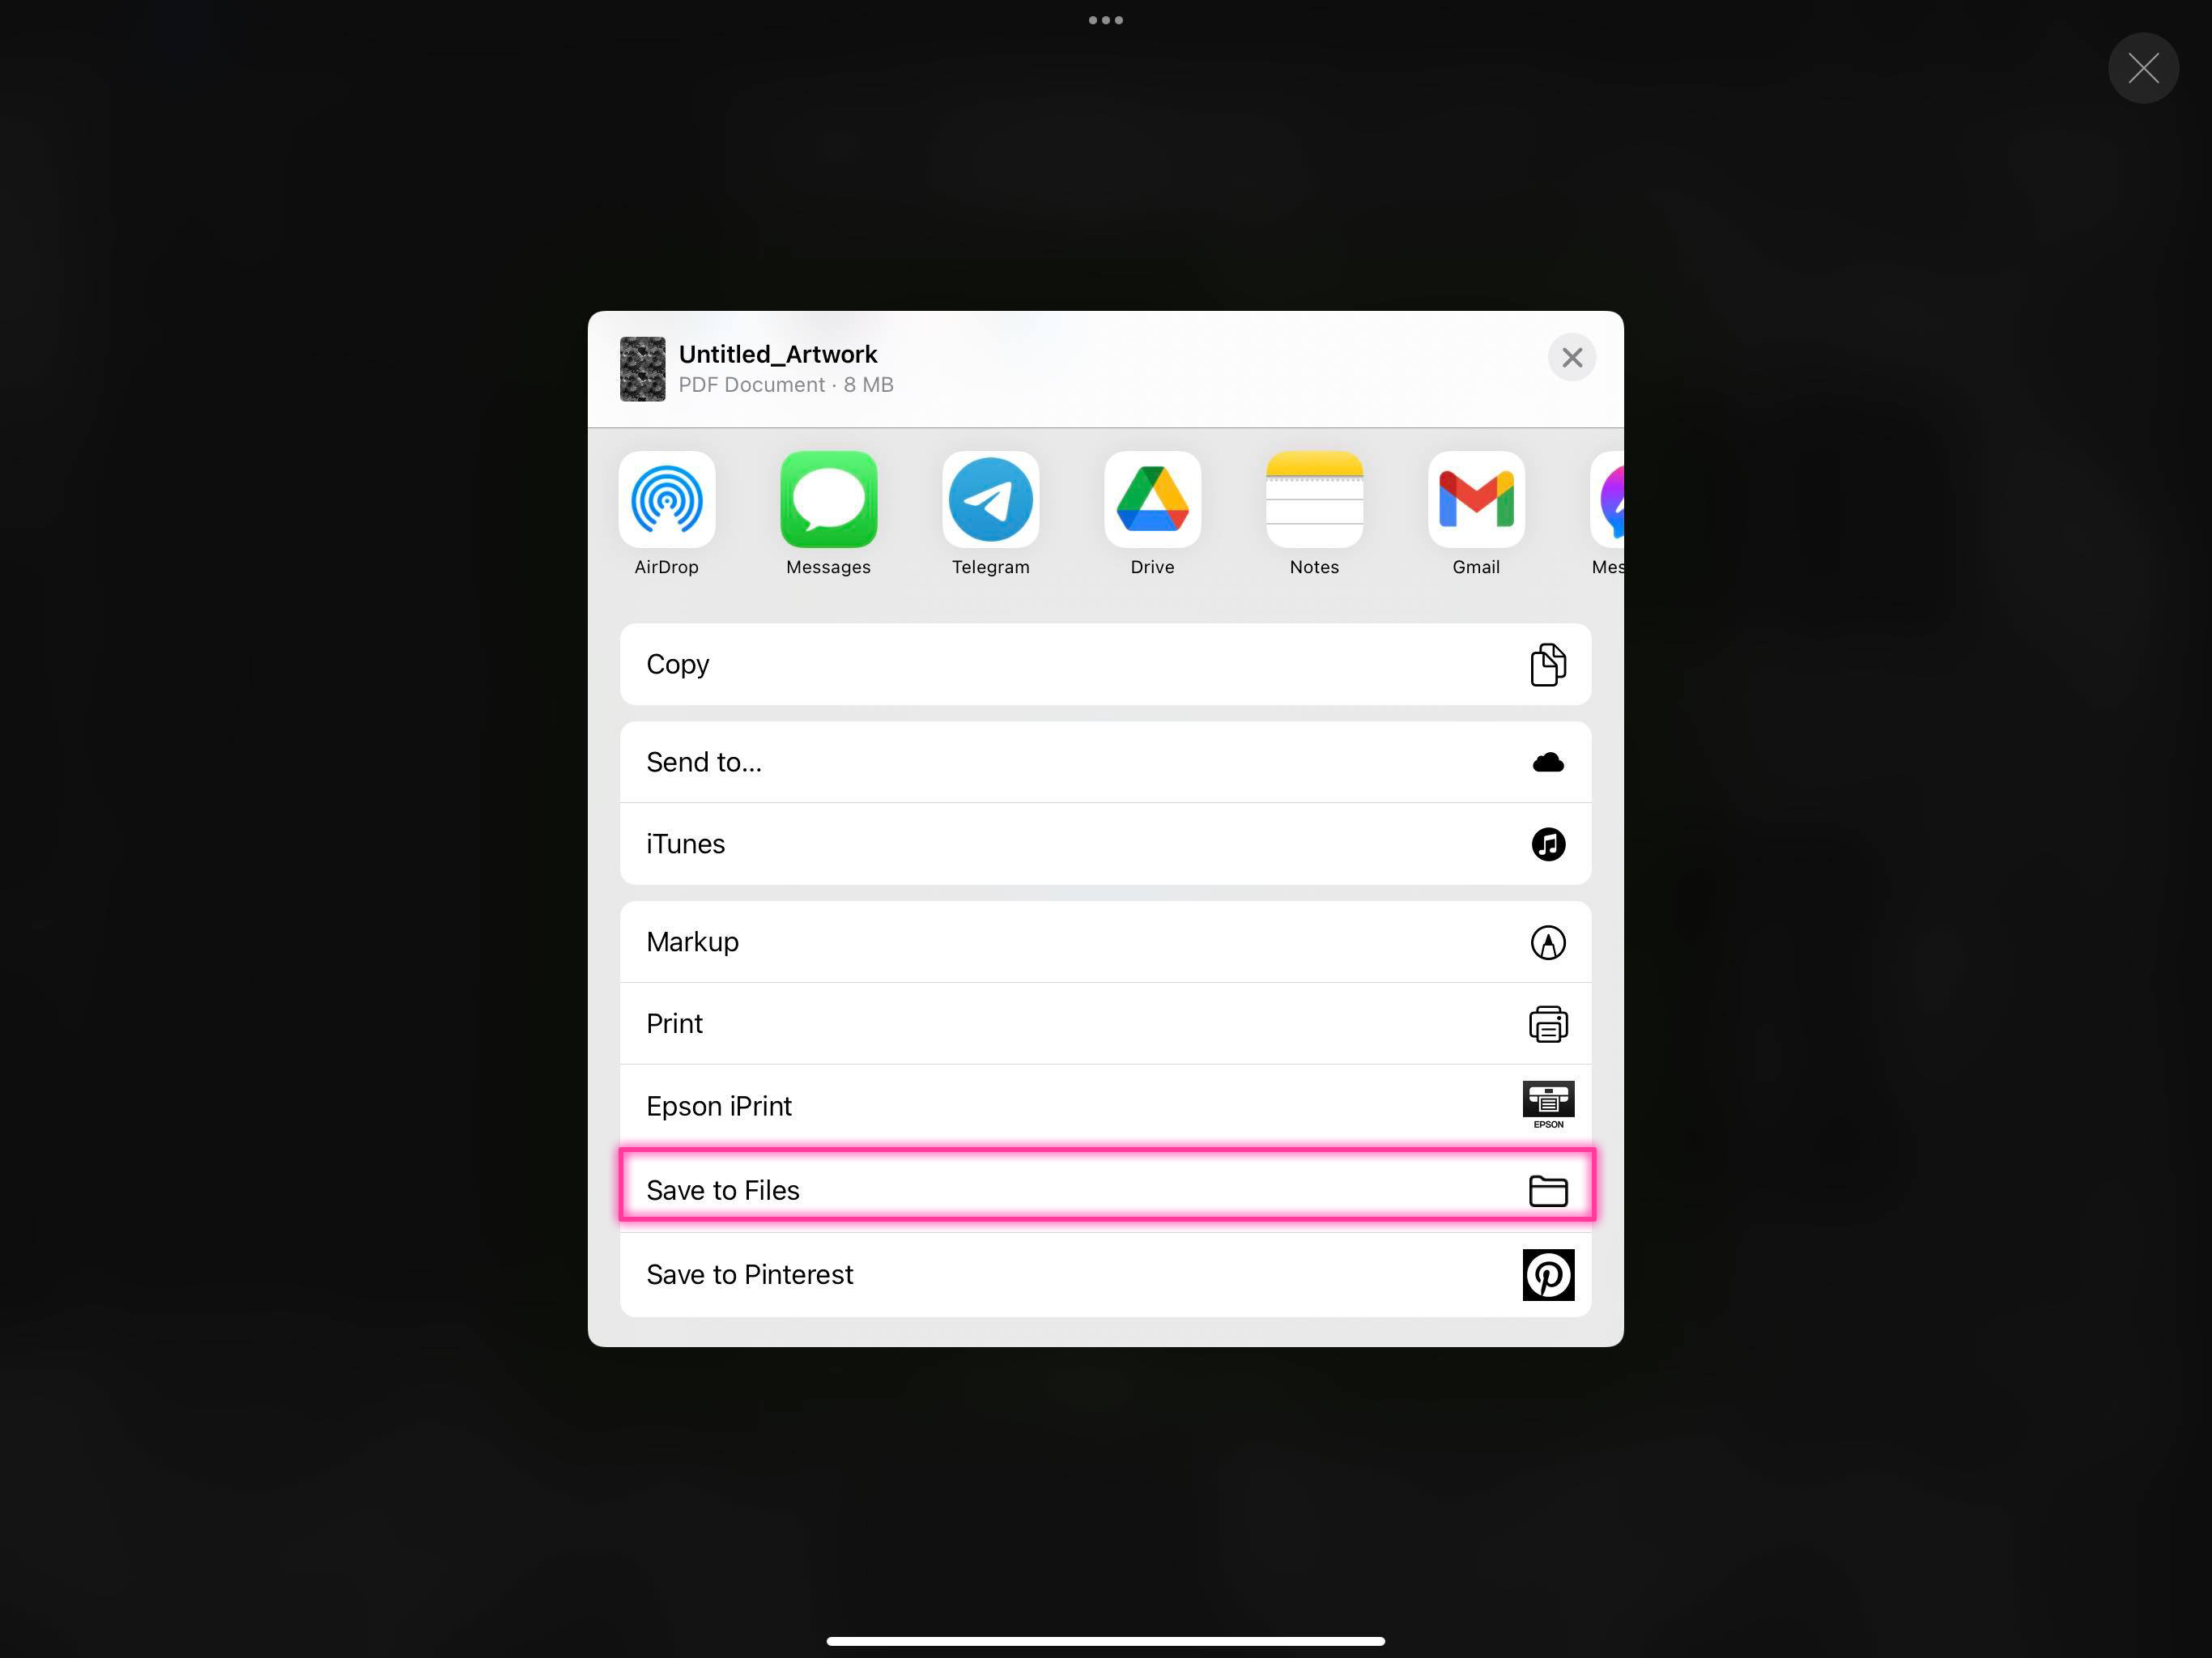
from here you can: Save to Files, Print directly with the iPrint app, or AirDrop
Word
go to file> save as
File:Export Word 1.png
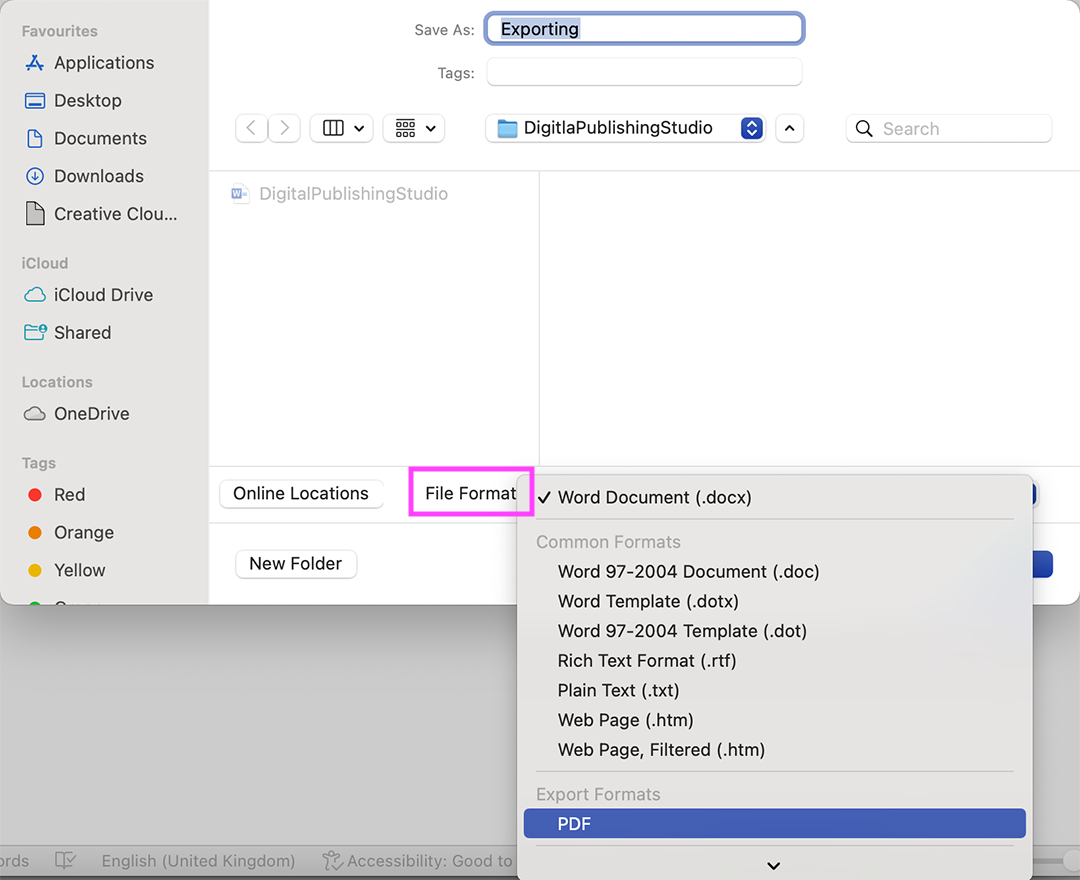
choose format> PDF
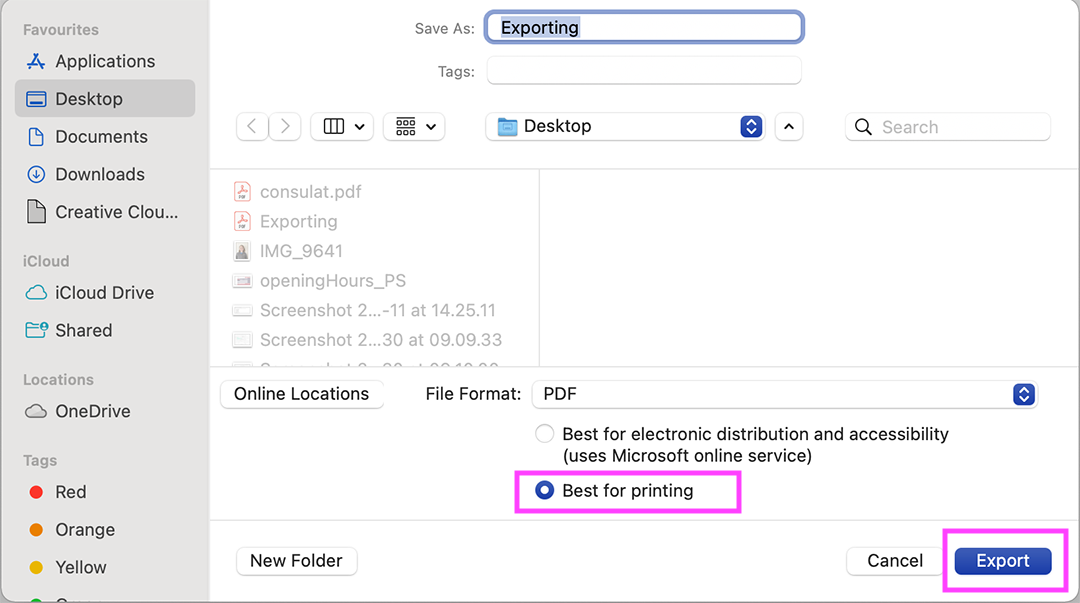
select 'best for printing' > export!
iPhone
To turn your iPhone snapshots into PDFs follow the following steps.
Open your iPhone Photo app and find the photo you want to PDF. Select the image and click the Share icon. You can select more images.

Choose the Print option (it should be at the bottom of your options list)
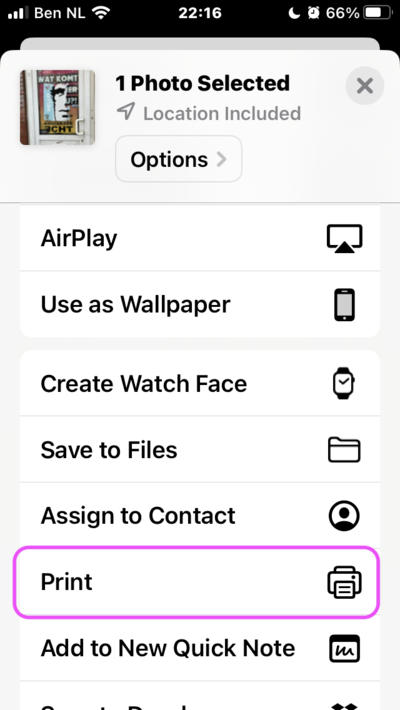
Tap and hold on the image this opens your image as a preview.
Tap on your image; this opens your image in a PDF viewer.
Tap the Share icon again once you're in the PDF viewer.
